Are you ready to ace your Kubernetes interview? Whether you’re a seasoned professional or just starting, mastering the right Kubernetes interview questions is key to showcasing your skills. This guide will equip you with the essential knowledge and insights to tackle the most common and challenging questions, helping you stand out and impress your potential employers. Get ready to demonstrate your expertise in container orchestration and cloud-native technologies!
Top 50 Essential Kubernetes Interview Questions and Answers
How is Kubernetes different from Docker Swarm?
What is the need for Container Orchestration?
Consider you have 6 microservices for a single application performing various tasks, and all these microservices are put inside separate containers. Now, to make sure that these containers communicate with each other we need container orchestration.
What is Kubernetes?
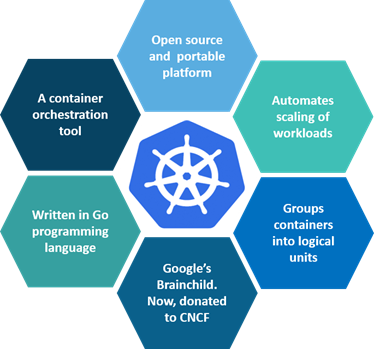
Kubernetes is an open-source container management tool that holds the responsibilities of container orchestration, deployment, scaling/descaling of containers & load balancing.
What are the features of Kubernetes?
The features of Kubernetes, are as follows:

What is Google Container Engine?
Google Kubernetes (Container) Engine (GKE) is an open-source management platform for Docker containers and clusters. This Kubernetes-based engine supports only those clusters which run within Google’s public cloud services.
What are the different components of Kubernetes Architecture?
The Kubernetes Architecture has mainly 2 components – the master node and the worker node. As you can see in the below diagram, the master and the worker nodes have many inbuilt components within them. The master node has the kube-controller-manager, Kube-apiserver, kube-scheduler, etcd. Whereas the worker node has kubelet and kube-proxy running on each node.
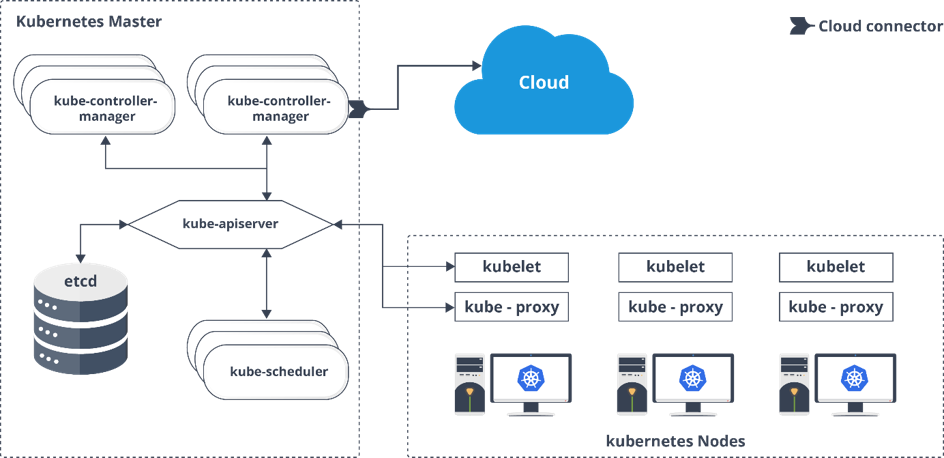
Kube-proxy: This service is responsible for the communication of pods within the cluster and to the outside network, which runs on every node. This service is responsible to maintain network protocols when your pod establishes a network communication.
kubelet: The kubelet is a service agent that controls and maintains a set of pods by watching for pod specs through the Kubernetes API server. It preserves the pod lifecycle by ensuring that a given set of containers are all running as they should. The kubelet runs on each node and enables the communication between the master and slave nodes.
What is the role of kube-apiserver and kube-scheduler?
The kube – apiserver follows the scale-out architecture and, is the front-end of the master node control panel. This exposes all the APIs of the Kubernetes Master node components and is responsible for establishing communication between Kubernetes Node and the Kubernetes master components.
The Kube-scheduler is responsible for the distribution and management of workload on the worker nodes. So, it selects the most suitable node to run the unscheduled pod based on resource requirements and keeps a track of resource utilization. It makes sure that the workload is not scheduled on nodes that are already full.
Can you brief about the Kubernetes controller manager?
Multiple controller processes run on the master node but are compiled together to run as a single process which is the Kubernetes Controller Manager.
So, Controller Manager is a daemon that embeds controllers and does namespace creation and garbage collection. It owns the responsibility and communicates with the API server to manage the endpoints.
So, the different types of controller managers running on the master node are:

What do you understand by Cloud controller manager?
The Cloud Controller Manager is responsible for persistent storage, network routing, and managing communication with the underlying cloud services.
It might be split out into several different containers depending on which cloud platform you are running on and then it enables the cloud vendors and Kubernetes code to be developed without any inter-dependency. So, the cloud vendor develops their code and connects with the Kubernetes cloud-controller-manager while running the Kubernetes.
The various types of cloud controller managers are as follows:

What is ETCD?
Etcd is data storage for k8s .. and it stores data in key-value format.
It is written in Go programming language and is a distributed key-value store used for coordinating distributed work. So, Etcd stores the configuration data of the Kubernetes cluster, representing the state of the cluster at any given point in time.
What is Kubectl?
Kubectl is a CLI (command-line interface) that is used to run commands against Kubernetes clusters.
As such, it controls the Kubernetes cluster manager through different create and manage commands on the Kubernetes component.
Why use namespaces? What is the problem with using the default namespace?
Namespaces make it easier to organize the applications into groups that make sense, like a namespace of all the monitoring applications and a namespace for all the security applications, etc.
Namespaces can also be useful for managing Blue/Green environments where each namespace can include a different version of an app and also share resources that are in other namespaces (namespaces like logging, monitoring, etc.).
Another use case for namespaces is one cluster with multiple teams. When multiple teams use the same cluster, they might end up stepping on each other’s toes. For example, if they end up creating an app with the same name it means one of the teams overrides the app of the other team because there can’t be two apps in Kubernetes with the same name (in the same namespace).
Name the initial namespaces from which Kubernetes starts?
Default
Kube-system
Kube-public
Mention the list of objects of Kubernetes?
The following is the list of objects used to define the workloads.
Pods
Replication sets and controllers
Deployments
Distinctive identities
Stateful sets
Daemon sets
Jobs and cron jobs
What is a pod in Kubernetes?
Pods are high-level structures that wrap one or more containers. This is because containers are not run directly in Kubernetes.
Containers in the same pod share a local network and the same resources, allowing them to easily communicate with other containers in the same pod as if they were on the same machine while at the same time maintaining a degree of isolation.
What is the difference between a replica set and replication controller?
Replica Set and Replication Controller do almost the same thing. Both of them ensure that a specified number of pod replicas are running at any given time. The difference comes with the usage of selectors to replicate pods. Replica Set uses Set-Based selectors while replication controllers use Equity-Based selectors.
Equity-Based Selectors: This type of selector allows filtering by label key and values. So, in layman’s terms, the equity-based selector will only look for the pods which will have the exact same phrase as that of the label.
Example: Suppose your label key says app=nginx, then, with this selector, you can only look for those pods with label app equal to nginx.
Selector-Based Selectors: This type of selector allows filtering keys according to a set of values. So, in other words, the selector-based selector will look for pods whose label has been mentioned in the set.
Example: Say your label key says app in (Nginx, NPS, Apache). Then, with this selector, if your app is equal to any of Nginx, NPS, or Apache, then the selector will take it as a true result
What is a Stateful and stateless application… the difference between a Stateful set app and a Deployment?
Stateful and Stateless Applications
The key difference between stateful and stateless applications is that stateless applications don’t “store” data. On the other hand, stateful applications require backing storage.
Kubernetes is well-known for managing stateless services. The deployment workload is more suited to work with stateless applications.
As far as deployment is concerned, pods are interchangeable. While a StatefulSet keeps a unique identity for each pod it manages. It uses the same identity whenever it needs to reschedule those pods.
Understanding Deployment: The Basics
A Kubernetes Deployment provides means for managing a set of pods. These could be one or more running containers or a group of duplicate pods, known as ReplicaSets. Deployment allows us to easily keep a group of identical pods running with a common configuration.
First, we define our Kubernetes Deployment and then deploy it. Kubernetes will then work to make sure all pods managed by the deployment meet whatever requirements we have set. Deployment is a supervisor for pods. It gives us fine-grained control over how and when a new pod version is rolled out. It also provides control when we have to roll back to a previous version.
In Kubernetes Deployment with a replica of 1, the controller will verify whether the current state is equal to the desired state of ReplicaSet, i.e., 1. If the current state is 0, it will create a ReplicaSet. The ReplicaSet will further create the pods. When we create a Kubernetes Deployment with the name web-app, it will create a ReplicaSet with the name web-app-<replica-set-id>. This replica will further create a pod with name web-app-<replica-set->-<pod-id>.
Kubernetes Deployment is usually used for stateless applications. However, we can save the state of Deployment by attaching a Persistent Volume to it and make it stateful. The deployed pods will share the same Volume, and the data will be the same across all of them.
StatefulSets
4.1. Understanding StatefulSets: the Basics
StatefulSets provides to each pod in it two stable unique identities. First, the Network Identity enables us to assign the same DNS name to the pod regardless of the number of restarts. The IP addresses might still be different, so consumers should depend on the DNS name (or watch for changes and update the internal cache).
Secondly, the Storage Identity remains the same. The Network Identity always receives the same instance of Storage, regardless of which node it’s rescheduled on.
StatefulSet is also a Controller, but unlike Kubernetes Deployment, it doesn’t create ReplicaSet rather, it creates the pod with a unique naming convention. Each pod receives DNS name according to the pattern: <statefulset name>-<ordinal index>. For example, for StatefulSet with the name mysql, it will be mysql-0.
Every replica of a stateful set will have its own state, and each of the pods will be creating its own PVC(Persistent Volume Claim). So a StatefulSet with 3 replicas will create 3 pods, each having its own Volume, so total 3 PVCs. As StatefulSets works with data, we should be careful while stopping pod instances by allowing the required time to persist data from memory to disk. There still might be valid reasons to perform force deletion, for example, when Kubernetes Node fails.
StatefulSets don’t create ReplicaSet, so we can’t rollback a StatefulSet to a previous version. We can only delete or scale up/down the Statefulset. If we update a StatefulSet, it also performs RollingUpdate, i.e., one replica pod will go down, and the updated pod will come up. Similarly, then the next replica pod will go down in the same manner.
Deleting and/or scaling a StatefulSet down will not delete the volumes associated with the StatefulSet.
StatefulSets Usage
StatefulSets enable us to deploy stateful applications and clustered applications. They save data to persistent storage, such as Compute Engine persistent disks. They are suitable for deploying Kafka, MySQL, Redis, ZooKeeper, and other applications (needing unique, persistent identities and stable hostnames).
Difference
A Kubernetes Deployment is a resource object in Kubernetes that provides declarative updates to applications. A deployment allows us to describe an application’s life cycle. Such as, which images to use for the app, the number of pods there should be, and how they should be updated.
A StatefulSets are more suited for stateful apps. A stateful application requires pods with a unique identity (for instance, hostname). A pod will be able to reach other pods with well-defined names. It needs a Headless Service to connect with the pods. A Headless Service does not have an IP address. Internally, it creates the necessary endpoints to expose pods with DNS names.
The StatefulSet definition includes a reference to the Headless Service, but we have to create it separately. StatefulSet needs persistent storage so that the hosted application saves its state and data across restarts. Once the StatefulSet and the Headless Service are created, a pod can access another one by name prefixed with the service name.
What are the different types of services in Kubernetes?
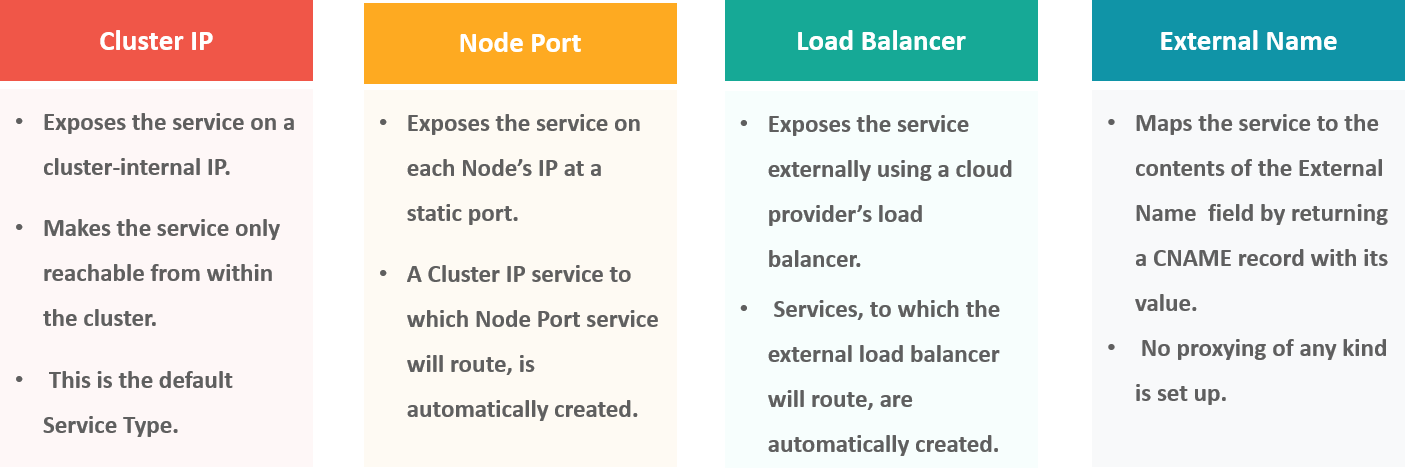
The following are the different types of services used:
What is ClusterIP?
The ClusterIP is the default Kubernetes service that provides a service inside a cluster (with no external access) that other apps inside your cluster can access.
What is NodePort?
The NodePort service is the most fundamental way to get external traffic directly to your service. It opens a specific port on all Nodes and forwards any traffic sent to this port to the service.
What do you understand by load balancer in Kubernetes?
A load balancer is one of the most common and standard ways of exposing service. There are two types of load balancer used based on the working environment i.e. either the Internal Load Balancer or the External Load Balancer. The Internal Load Balancer automatically balances load and allocates the pods with the required configuration whereas the External Load Balancer directs the traffic from the external load to the backend pods.
What is Ingress network, and how does it work?
Ingress network is a collection of rules that acts as an entry point to the Kubernetes cluster. This allows inbound connections, which can be configured to give services externally through reachable URLs, load balance traffic, or by offering name-based virtual hosting. So, Ingress is an API object that manages external access to the services in a cluster, usually by HTTP and is the most powerful way of exposing service.
Now, let me explain to you the working of Ingress network with an example.
There are 2 nodes having the pod and root network namespaces with a Linux bridge. In addition to this, there is also a new virtual ethernet device called flannel0(network plugin) added to the root network.
Now, suppose we want the packet to flow from pod1 to pod 4. Refer to the below diagram.
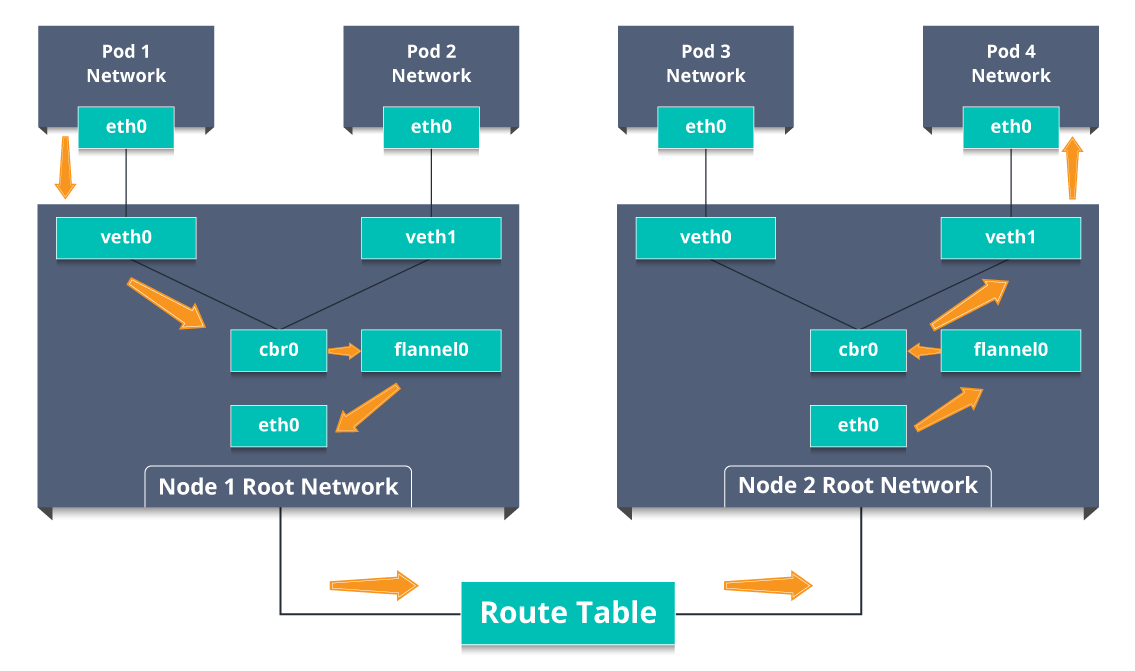
Fig 11: Working Of Ingress Network – Kubernetes Interview Questions
So, the packet leaves pod1’s network at eth0 and enters the root network at veth0.
Then it is passed on to cbr0, which makes the ARP request to find the destination and it is found out that nobody on this node has the destination IP address.
So, the bridge sends the packet to flannel0 as the node’s route table is configured with flannel0.
Now, the flannel daemon talks to the API server of Kubernetes to know all the pod IPs and their respective nodes to create mappings for pods IPs to node IPs.
The network plugin wraps this packet in a UDP packet with extra headers changing the source and destination IP’s to their respective nodes and sends this packet out via eth0.
Now, since the route table already knows how to route traffic between nodes, it sends the packet to the destination node2.
The packet arrives at eth0 of node2 and goes back to flannel0 to de-capsulate and emits it back in the root network namespace.
Again, the packet is forwarded to the Linux bridge to make an ARP request to find out the IP that belongs to veth1.
The packet finally crosses the root network and reaches the destination Pod4.
What is Container resource monitoring?
As for users, it is really important to understand the performance of the application and resource utilization at all the different abstraction layer, Kubernetes factored the management of the cluster by creating abstraction at different levels like container, pods, services and whole cluster. Now, each level can be monitored and this is nothing but Container resource monitoring.
The various container resource monitoring tools are as follows:
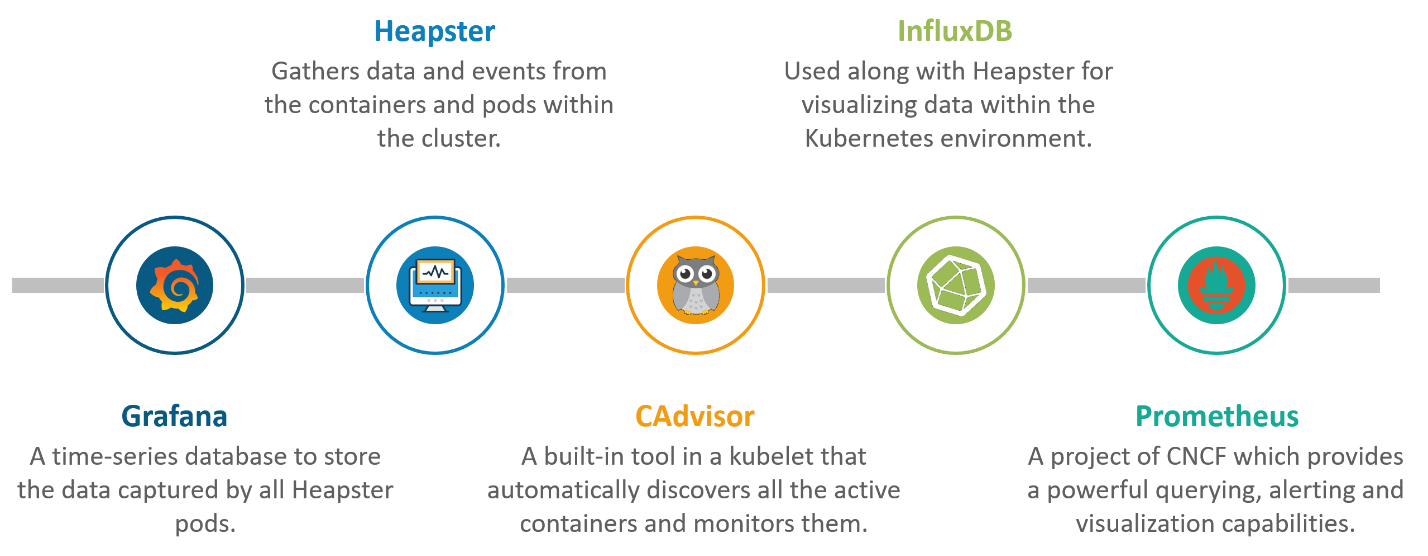
What are the best security measures that you can take while using Kubernetes?
The following are the best security measures that you can follow while using Kubernetes:

By default, POD can communicate with any other POD, we can set up network policies to limit this communication between the PODs.
RBAC (Role-based access control) to narrow down the permissions.
Use namespaces to establish security boundaries.
Set the admission control policies to avoid running the privileged containers.
Turn on audit logging
What are Daemon sets?
DaemonSets are used to ensure that some or all of your K8S nodes run a copy of a pod, which allows you to run a daemon on every node.
When you add a new node to the cluster, a pod gets added to match the nodes. Similarly, when you remove a node from your cluster, the pod is put into the trash. Deleting a DaemonSet cleans up the pods that it previously created.
A Daemonset is another controller that manages pods like Deployments, ReplicaSets, and StatefulSets. It was created for one particular purpose: ensuring that the pods it manages to run on all the cluster nodes. As soon as a node joins the cluster, the DaemonSet ensures that it has the necessary pods running on it. When the node leaves the cluster, those pods are garbage collected.
DaemonSets are used in Kubernetes when you need to run one or more pods on all (or a subset of) the nodes in a cluster. The typical use case for a DaemonSet is logging and monitoring for the hosts. For example, a node needs a service (daemon) that collects health or log data and pushes them to a central system or database (like ELK stack). DaemonSets can be deployed to specific nodes either by the nodes’ user-defined labels or using values provided by Kubernetes like the node hostname.
Why use DaemonSets?
Some examples of why and how to use it:
To run a daemon for cluster storage on each node, such as: – glusterd – ceph
To run a daemon for logs collection on each node, such as: – fluentd – logstash
To run a daemon for node monitoring on ever note, such as: – Prometheus Node Exporter – collectd – Datadog agent
As your use case gets more complex, you can deploy multiple DaemonSets for one kind of daemon, using a variety of flags or memory and CPU requests for various hardware types.
Creating your first DeamonSet Deployment
git clone https://github.com/collabnix/kubelabs
cd kubelabs/DaemonSet101
kubectl apply -f daemonset.yml
The other way to do this:
$ kubectl create -f daemonset.yml –record
The –record flag will track changes made through each revision.
How to do maintenance activity on the K8 node?
Whenever there are security patches available the Kubernetes administrator has to perform the maintenance task to apply the security patch to the running container in order to prevent it from vulnerability, which is often an unavoidable part of the administration. The following two commands are useful to safely drain the K8s node.
kubectl cordon
kubectl drain –ignore-daemon set
The first command moves the node to maintenance mode or makes the node unavailable, followed by kubectl drain which will finally discard the pod from the node. After the drain command is a success you can perform maintenance.
Note: If you wish to perform maintenance on a single pod following two commands can be issued in order:
kubectl get nodes: to list all the nodes
kubectl drain <node name>: drain a particular node
How do we control the resource usage of POD?
With the use of limit and request resource usage of a POD can be controlled.
Request: The number of resources being requested for a container. If a container exceeds its request for resources, it can be throttled back down to its request.
Limit: An upper cap on the resources a single container can use. If it tries to exceed this predefined limit it can be terminated if K8’s decides that another container needs these resources. If you are sensitive towards pod restarts, it makes sense to have the sum of all container resource limits equal to or less than the total resource capacity for your cluster.
Example:
apiVersion: v1
kind: Pod
metadata:
name: demo
spec:
containers:
– name: example1
image:example/example1
resources:
requests:
memory: “_Mi”
cpu: “_m”
limits:
memory: “_Mi”
cpu: “_m”
How to run Kubernetes locally?
Kubernetes can be set up locally using the Minikube tool. It runs a single-node bunch in a VM on the computer. Therefore, it offers the perfect way for users who have just ongoing learning Kubernetes
How to run a POD on a particular node?
Various methods are available to achieve it.
nodeName: specify the name of a node in POD spec configuration, it will try to run the POD on a specific node.
nodeSelector: Assign a specific label to the node which has special resources and use the same label in POD spec so that POD will run only on that node.
nodeaffinities: required DuringSchedulingIgnoredDuringExecution, preferredDuringSchedulingIgnoredDuringExecution are hard and soft requirements for running the POD on specific nodes. This will be replacing nodeSelector in the future. It depends on the node labels
What are the different ways to provide external network connectivity to K8?
By default, POD should be able to reach the external network but vice-versa we need to make some changes. The following options are available to connect with POD from the outer world.
Nodeport (it will expose one port on each node to communicate with it)
Load balancers (L4 layer of TCP/IP protocol)
Ingress (L7 layer of TCP/IP Protocol)
Another method is to use Kube-proxy which can expose a service with only cluster IP on the local system port.
$ kubectl proxy –port=8080 $ http://localhost:8080/api/v1/proxy/namespaces//services/:/
How can we forward the port ‘8080 (container) -> 8080 (service) -> 8080 (ingress) -> 80 (browser)and how it can be done?
The ingress is exposing port 80 externally for the browser to access, and connecting to a service that listens on 8080. The ingress will listen on port 80 by default. An “ingress controller” is a pod that receives external traffic and handles the ingress and is configured by an ingress resource For this you need to configure the ingress selector and if no ‘ingress controller selector’ is mentioned then no ingress controller will manage the ingress.
Simple ingress Config will look like
host: abc.org
http:
paths:
backend:
serviceName: abc-service
servicePort: 8080
Then the service will look like
kind: Service
apiVersion: v1
metadata:
name: abc-service
spec:
ports:
protocol: TCP
port: 8080 # port to which the service listens to
targetPort: 8080
What’s the init container and when it can be used?
Init containers are specialized containers that run before app containers in a Pod. Init containers can contain utilities or setup scripts not present in an app image.
You can specify init containers in the Pod specification alongside the containers array (which describes app containers).
A Pod can have multiple containers running apps within it, but it can also have one or more init containers, which are run before the app containers are started. If a Pod’s init container fails, the kubelet repeatedly restarts that init container until it succeeds. However, if the Pod has a restartPolicy of Never, and an init container fails during startup of that Pod, Kubernetes treats the overall Pod as failed.
To specify an init container for a Pod, add the initContainers field into the Pod specification, as an array of container items (similar to the app containers field and its contents).
Differences from regular containers
Init containers support all the fields and features of app containers, including resource limits, volumes, and security settings. However, the resource requests and limits for an init container are handled differently.
Also, init containers do not support lifecycle, livenessProbe, readinessProbe, or startupProbe because they must run to completion before the Pod can be ready.
If you specify multiple init containers for a Pod, kubelet runs each init container sequentially. Each init container must succeed before the next can run. When all of the init containers have run to completion, kubelet initializes the application containers for the Pod and runs them as usual.
Using init containers
Because init containers have separate images from app containers, they have some advantages for start-up-related code.
Init containers can contain utilities or custom codes for setup that are not present in an app image. For example, there is no need to make an image FROM another image just to use a tool like sed, awk, python, or dig during setup.
The application image builder and deployer roles can work independently without the need to jointly build a single app image.
Init containers can run with a different view of the filesystem than app containers in the same Pod. Consequently, they can be given access to Secrets that app containers cannot access.
Because init containers run to completion before any app containers start, init containers offer a mechanism to block or delay app container startup until a set of preconditions are met. Once preconditions are met, all of the app containers in a Pod can start in parallel.
Init containers can securely run utilities or custom code that would otherwise make an app container image less secure. By keeping unnecessary tools separate you can limit the attack surface of your app container image.
Init containers in use
This example defines a simple Pod that has two init containers. The first waits for myservice, and the second waits for mydb. Once both init containers complete, the Pod runs the app container from its spec section.
apiVersion: v1
kind: Pod
metadata:
name: myapp-pod
labels:
app.kubernetes.io/name: MyApp
spec:
containers:
– name: myapp-container
image: busybox:1.28
command: [‘sh’, ‘-c’, ‘echo The app is running! && sleep 3600’]
initContainers:
– name: init-myservice
image: busybox:1.28
command: [‘sh’, ‘-c’, “until nslookup myservice.$(cat /var/run/secrets/kubernetes.io/serviceaccount/namespace).svc.cluster.local; do echo waiting for myservice; sleep 2; done”]
– name: init-mydb
image: busybox:1.28
command: [‘sh’, ‘-c’, “until nslookup mydb.$(cat /var/run/secrets/kubernetes.io/serviceaccount/namespace).svc.cluster.local; do echo waiting for mydb; sleep 2; done”]
You can start this Pod by running:
kubectl apply -f myapp.yaml
What is ‘Heapster’ in Kubernetes?
A Heapster is a performance monitoring and metrics collection system for data collected by the Kublet. This aggregator is natively supported and runs like any other pod within a Kubernetes cluster, which allows it to discover and query usage data from all nodes within the cluster.
How can you get a static IP for a Kubernetes load balancer?
A static IP for the Kubernetes load balancer can be achieved by changing DNS records since the Kubernetes Master can assign a new static IP address.
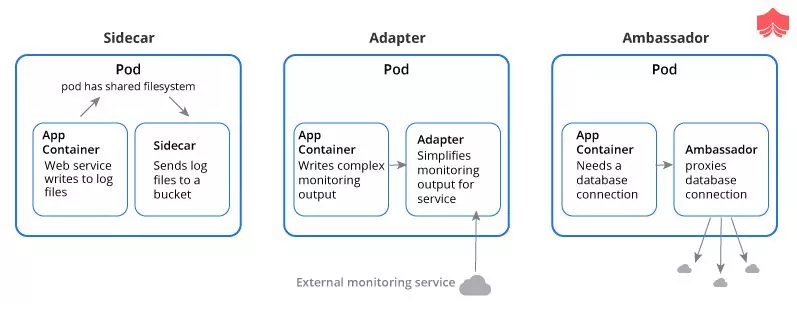
What are the different types of multiple-container pods?
There are three different types of multi-container pods. They are as follows:
sidecar: A pod spec which runs the main container and a helper container that does some utility work, but that is not necessarily needed for the main container to work.
adapter: The adapter container will inspect the contents of the app’s file, does some kind of restructuring and reformat it, and write the correctly formatted output to the location.
ambassador: It connects containers with the outside world. It is a proxy that allows other containers to connect to a port on localhost.
What do you mean by persistent volume?
A persistent volume is a piece of storage in a cluster that an administrator has provisioned. It is a resource in the cluster, just as a node is a cluster resource. A persistent volume is a volume plug-in that has a lifecycle independent of any individual pod that uses the persistent volume.
Explain PVC
The full form of PVC stands for Persistent Volume Claim. It is storage requested by Kubernetes for pods. The user does not require to know the underlying provisioning. This claim should be created in the same namespace where the pod is created.
What are Secrets in Kubernetes?
A Secret is an object that contains a small amount of sensitive data such as a password, a token, or a key. Such information might otherwise be put in a Pod specification or in a container image. Using a Secret means that you don’t need to include confidential data in your application code
How to determine the status of deployment?
To determine the status of the deployment, use the command below:
kubectl rollout status
If the output runs, then the deployment is successfully completed.
What are federated clusters?
Cluster Federation is what you can use to manage multiple Kubernetes clusters as if they were one. This means you can make clusters in multiple datacenters (and multiple clouds), and use federation to control them all at once!
What are the types of Kubernetes Volume?
The types of Kubernetes Volume are:
EmptyDir
GCE persistent disk
Flocker
HostPath
NFS
ISCSI
rbd
Persistent Volume Claim
downwardAPI
What is the Kubernetes Network Policy?
Network Policy defines how the pods in the same namespace would communicate with each other and the network endpoint.
What is Kubernetes proxy service?
Kubernetes proxy service is a service which runs on the node and helps in making it available to an external host.
What is difference between config map and secrets
Config maps ideally stores application configuration in a plain text format whereas Secrets store sensitive data like password in an encrypted format. Both config maps and secrets can be used as volume and mounted inside a pod through a pod definition file.
Config map:
kubectl create configmap myconfigmap –from-literal=env=dev
Secret:
echo -n ‘admin’ > ./username.txt
echo -n ‘abcd1234’ ./password.txt
kubectl create secret generic mysecret –from-file=./username.txt –from-file=./password.txt
When a node is tainted, is there still a way to schedule a pod to that node
When a node is tainted, the pods don’t get scheduled by default, however, if we have to still schedule a pod to a tainted node we can start applying tolerations to the pod spec.
Apply a taint to a node:
kubectl taint nodes node1 key=value:NoSchedule
Apply toleration to a pod:
spec:
tolerations:
– key: “key”
operator: “Equal”
value: “value”
effect: “NoSchedule”
Can we use many claims out of a persistent volume ?
The mapping between persistentVolume and persistentVolumeClaim is always one to one. Even When you delete the claim, PersistentVolume still remains as we set persistentVolumeReclaimPolicy is set to Retain and It will not be reused by any other claims. Below is the spec to create the Persistent Volume.
apiVersion: v1
kind: PersistentVolume
metadata:
name: mypv
spec:
capacity:
storage: 5Gi
volumeMode: Filesystem
accessModes:
– ReadWriteOnce
persistentVolumeReclaimPolicy: Retain
What kind of object do you create, when your dashboard like application, queries the Kubernetes API to get some data?
You should be creating serviceAccount. A service account creates a token and tokens are stored inside a secret object. By default Kubernetes automatically mounts the default service account. However, we can disable this property by setting automountServiceAccountToken: false in our spec. Also, note each namespace will have a service account
apiVersion: v1
kind: ServiceAccount
metadata:
name: my-sa
automountServiceAccountToken: false
What is the difference between a Pod and a Job? Differentiate the answers as with examples)
A Pod always ensure that a container is running whereas the Job ensures that the pods run to its completion. Job is to do a finite task.
Examples:
kubectl run mypod1 –image=nginx –restart=Never
kubectl run mypod2 –image=nginx –restart=onFailure
○ → kubectl get pods
NAME READY STATUS RESTARTS AGE
mypod1 1/1 Running 0 59s
○ → kubectl get job
NAME DESIRED SUCCESSFUL AGE
mypod1 1 0 19s
How do you deploy a feature with zero downtime in Kubernetes?
By default Deployment in Kubernetes using RollingUpdate as a strategy. Let’s say we have an example that creates a deployment in Kubernetes
kubectl run nginx –image=nginx # creates a deployment
○ → kubectl get deploy
NAME DESIRED CURRENT UP-TO-DATE AVAILABLE AGE
nginx 1 1 1 0 7s
Now let’s assume we are going to update the nginx image
kubectl set image deployment nginx nginx=nginx:1.15 # updates the image
Now when we check the replica sets
kubectl get replicasets # get replica sets
NAME DESIRED CURRENT READY AGE
nginx-65899c769f 0 0 0 7mginx-6c9655f5bb 1 1 1 13s
From the above, we can notice that one more replica set was added and then the other replica set was brought down
kubectl rollout status deployment nginx
# check the status of a deployment rollout
kubectl rollout history deployment nginx
# check the revisions in a deployment
○ → kubectl rollout history deployment nginx
deployment.extensions/nginx
REVISION CHANGE-CAUSE
1 <none>
2 <none>
How to monitor that a Pod is always running?
We can introduce probes. A liveness probe with a Pod is ideal in this scenario.
A liveness probe always checks if an application in a pod is running, if this check fails the container gets restarted. This is ideal in many scenarios where the container is running but somehow the application inside a container crashes.
spec:
containers:
– name: liveness
image: k8s.gcr.io/liveness
args:
– /server
livenessProbe:
httpGet:
path: /healthz
How do you tie service to a pod or to a set of pods?
By declaring pods with the label(s) and by having a selector in the service which acts as a glue to stick the service to the pods.
kind: Service
apiVersion: v1
metadata:
name: my-service
spec:
selector:
app: MyApp
ports:
– protocol: TCP
port: 80
Let’s say if we have a set of Pods that carry a label “app=MyApp” the service will start routing to those pods.
Is there a way to make a pod to automatically come up when the host restarts?
Yes using replication controller but it may reschedule to another host if you have multiple nodes in the cluster
A replication controller is a supervisor for long-running pods. An RC will launch a specified number of pods called replicas and makes sure that they keep running. Replication Controller only supports the simple map-style `label: value` selectors. Also, Replication Controller and ReplicaSet aren’t very different. You could think of ReplicaSet as Replication Controller. The only thing that is different today is the selector format. If pods are managed by a replication controller or replication set you can kill the pods and they’ll be restarted automatically.
If you have multiple containers in a Deployment file, does use the HorizontalPodAutoscaler scale all of the containers?
Yes, it would scale all of them, internally the deployment creates a replica set (which does the scaling), and then a set number of pods are made by that replica set. the pod is what actually holds both of those containers. and if you want to scale them independently they should be separate pods (and therefore replica sets, deployments, etc).so for hpa to work You need to specify min and max replicas and the threshold what percentage of cpu and memory you want your pods to autoscale..without having the manually run kubectl autoscale deployment ,you can use the below yaml file to do the sam.
If a pod exceeds its memory “limit” what signal is sent to the process?
SIGKILL as immediately terminates the container and spawns a new one with OOM error.
Let’s say a Kubernetes job should finish in 40 seconds, however on a rare occasions it takes 5 minutes, How can I make sure to stop the application if it exceeds more than 40 seconds?
When we create a job spec, we can give –activeDeadlineSeconds flag to the command, this flag relates to the duration of the job, once the job reaches the threshold specified by the flag, the job will be terminated.
How do you test a manifest without actually executing it?
use –dry-run flag to test the manifest. This is really useful not only to ensure if the yaml syntax is right for a particular Kubernetes object but also to ensure that a spec has required key-value pairs.
kubectl create -f <test.yaml> –dry-run
How do you initiate a rollback for an application?
Rollback and rolling updates are a feature of Deployment object in the Kubernetes. We do the Rollback to an earlier Deployment revision if the current state of the Deployment is not stable due to the application code or the configuration. Each rollback updates the revision of the Deployment
○ → kubectl get deploy
NAME DESIRED CURRENT UP-TO-DATE AVAILABLE AGE
nginx 1 1 1 1 15h
○ → kubectl rollout history deploy nginx
deployment.extensions/nginx
REVISION CHANGE-CAUSE
1 <none>
2 <none>
kubectl undo deploy <deploymentname>
○ → kubectl rollout undo deploy nginx
deployment.extensions/nginx
○ → kubectl rollout history deploy nginx
deployment.extensions/nginx
REVISION CHANGE-CAUSE
2 <none>
3 <none>
We can also check the history of the changes by the below command
kubectl rollout history deploy <deploymentname>
What is node affinity and pod affinity?
Node Affinity ensures that pods are hosted on particular nodes.
Pod Affinity ensures two pods to be co-located in a single node.
I have one POD and inside 2 containers are running one is Nginx and another one is wordpress. So, how can access these 2 containers from the Browser with IP address?
Just do port forward kubectl port-forward [nginx-pod-name] 80:80 kubectl port-forward [wordpress-pod-name] drupal-port:wordpress-port.
To make it permanent, you need to expose those through nodeports whenever you do kubectl port forward it adds a rule to the firewall to allow that traffic across nodes but by default that isn’t allowed since flannel or firewall probably blocks it.proxy tries to connect over the network of the apiserver host as you correctly found, port-forward on the other hand is a mechanism that the node kubelet exposes over its own API
If I have multiple containers running inside a pod, and I want to wait for a specific container to start before starting another one.
One way is Init Containers are for one-shot tasks that start, run, end; all before the next init container or the main container start, but if a client in one container wants to consume some resources exposed by some server provided by another container or If the server ever crashes or is restarted, the client will need to retry connections. So the client can retry always, even if the server isn’t up yet. The best way is sidecar pattern_ are where one container is the Main one, and other containers expose metrics or logs or encrypted tunnel or somesuch. In these cases, the other containers can be killed when the Main one is done/crashed/evicted.
Explain steps for Jenkins installation & node configuration in Kubernetes
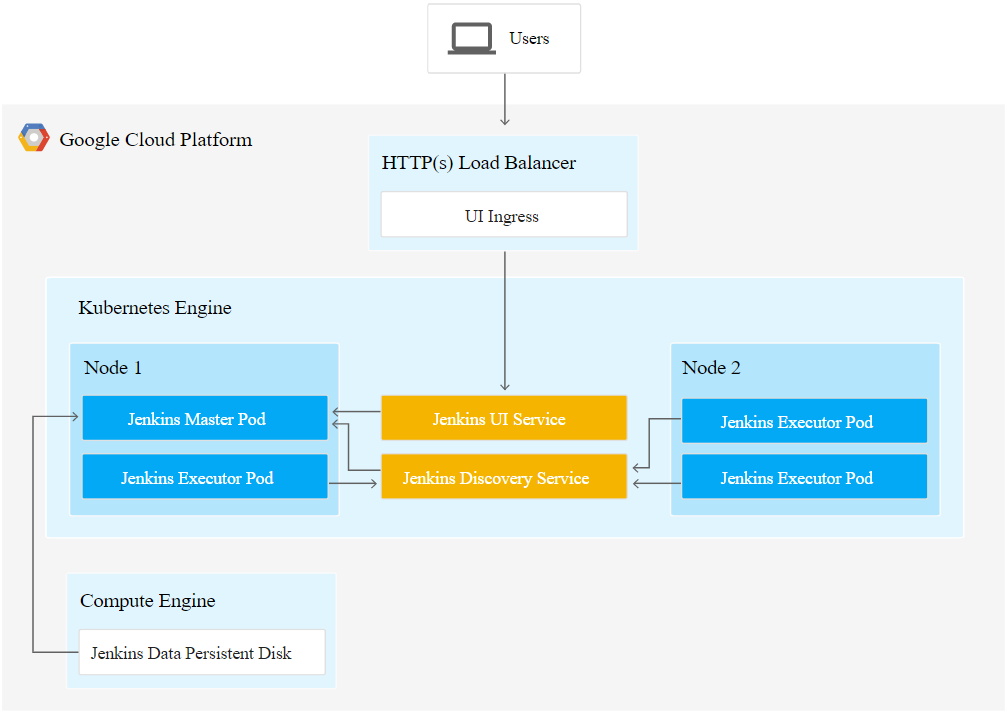
— Create kubernetes cluster
kops create cluster –name=org.jenkins.in –state=s3://kops-jenkins –zones=us-east-1a –node-count=2 –node-size=t2.micro –master-size=t2.micro –dns-zone=org.jenkins.in
kops update cluster –name=org.jenkins.in –state=s3://kops-jenkins –yes
kops create secret –name org.jenkins.in sshpublickey admin -i ~/.ssh/id_rsa.pub –state=s3://kops-jenkins
* validate cluster: kops validate cluster
* list nodes: kubectl get nodes –show-labels
* ssh to the master: ssh -i ~/.ssh/id_rsa admin@api.org.jenkins.in
* the admin user is specific to Debian. If not using Debian please use the appropriate user based on your OS.
kops validate cluster –name=org.jenkins.in –state=s3://kops-jenkins
kubectl get nodes
vim ~/.kube/config (contains username and password) –certificate and password is available which we need to login to our new cluster
— delete kubernetes cluster
kops delete cluster –name=org.jenkins.in –state=s3://kops-jenkins –yes
Install Jenkins in kubernetes cluster using HELM
mkdir jenkins_k8
cd jenkins_k8/
helm init
kubectl create -f serviceaccount.yaml
apiVersion: v1
kind: ServiceAccount
metadata:
name: jenkins-helm
—
apiVersion: rbac.authorization.k8s.io/v1
kind: ClusterRoleBinding
metadata:
name: jenkins-helm
roleRef:
apiGroup: rbac.authorization.k8s.io
kind: ClusterRole
name: cluster-admin
subjects:
– kind: ServiceAccount
name: jenkins-helm
namespace: default
helm install –name jenkins –set master.runAsUser=1000,master.fsGroup=1000 stable/jenkins
aws iam list-roles | kubernetes
If you get the error forbidden: User “system:serviceaccount:kube-system:default” cannot get namespaces in the namespace “default
I can solve by running below commands to my k8s cluster:
kubectl create serviceaccount –namespace kube-system tiller
kubectl create clusterrolebinding tiller-cluster-rule –clusterrole=cluster-admin –serviceaccount=kube-system:tiller
kubectl patch deploy –namespace kube-system tiller-deploy -p ‘{“spec”:{“template”:{“spec”:{“serviceAccount”:”tiller”}}}}’
Copy directories and files to and from Kubernetes Container [POD]
As we all know about SCP Linux command to Copy the files and directories from a remote host to the local host and vice versa over SSH.
Similar to that we have ‘KUBECTL CP’ to Copy the files and directories from a Kubernetes Container [POD] to the local host and vice versa.
Syntax:
> kubectl cp <file-spec-src> <file-spec-dest>
> POD in a specific container
kubectl cp <file-spec-src> <file-spec-dest> -c <specific-container>
> Copy /tmp/foo local file to /tmp/bar in a remote pod in namespace
kubectl cp /tmp/foo <some-namespace>/<some-pod>:/tmp/bar
> Copy /tmp/foo from a remote pod to /tmp/bar locally
kubectl cp <some-namespace>/<some-pod>:/tmp/foo /tmp/bar