Resources used
S3 bucket | RDS | EC2 | cloud front | IAM role
Steps
Step 1: Create Two Security groups
Step 2: Create an EC2 Instance and RDS
Step 3: Setup WordPress in EC2Instance created
Step 4: Create 2 S3 buckets –one for wordpress code and one for wordpress images
Step 5: Create a role for Ec2 service
Step 6: Copy code and images to buckets from wordpress
Step 7: Create cloudfront with S3-image bucket
Step 8: Update config file of Nginx
Step 9: Access the Website and image
WordPress: WordPress is a free and open-source content management system (CMS) that powers millions of websites. It is a popular choice for businesses, bloggers, and individuals because it is easy to use and has a wide range of features.
S3: An S3 bucket is a basic unit of storage in Amazon Simple Storage Service (S3). It is a durable, highly available, and scalable object storage service for data of any size and type. You can store any amount of data in S3, from a few kilobytes to a petabyte or more.
Cloudfront: Amazon CloudFront is a content delivery network (CDN) that helps you distribute your static and dynamic web content, such as HTML, CSS, JavaScript, and image files, to your users. CloudFront delivers your content through a worldwide network of edge locations, which are servers that are located closer to your users than your origin servers. This means that your content can be delivered to your users more quickly and reliably.
Flow Diagram

In this website architecture, when a user accesses the website through its URL, the process begins with Route 53, Amazon’s DNS service, translating the user-friendly domain name into an IP address. The request then flows to a load balancer, which efficiently distributes the incoming traffic. The load balancer is associated with a target group, representing a logical grouping of instances that can handle the load. This target group is linked to an Auto Scaling Group (ASG), providing the ability to automatically adjust the number of EC2 instances based on traffic patterns.
The ASG utilizes a launch configuration, specifying details such as the Amazon Machine Image (AMI), instance type, and other configurations necessary to create new EC2 instances. This allows for the dynamic scaling of the infrastructure to handle varying levels of demand.
For the efficient delivery of images, CloudFront, Amazon’s content delivery network (CDN), comes into play. Images and pictures are stored in an S3 bucket, and CloudFront is configured to serve these assets. CloudFront caches content at edge locations globally, reducing latency and improving the overall performance of content delivery. This ensures that users, regardless of their geographical location, experience fast and reliable access to images from the CloudFront distribution, enhancing the overall responsiveness and user experience of the website.
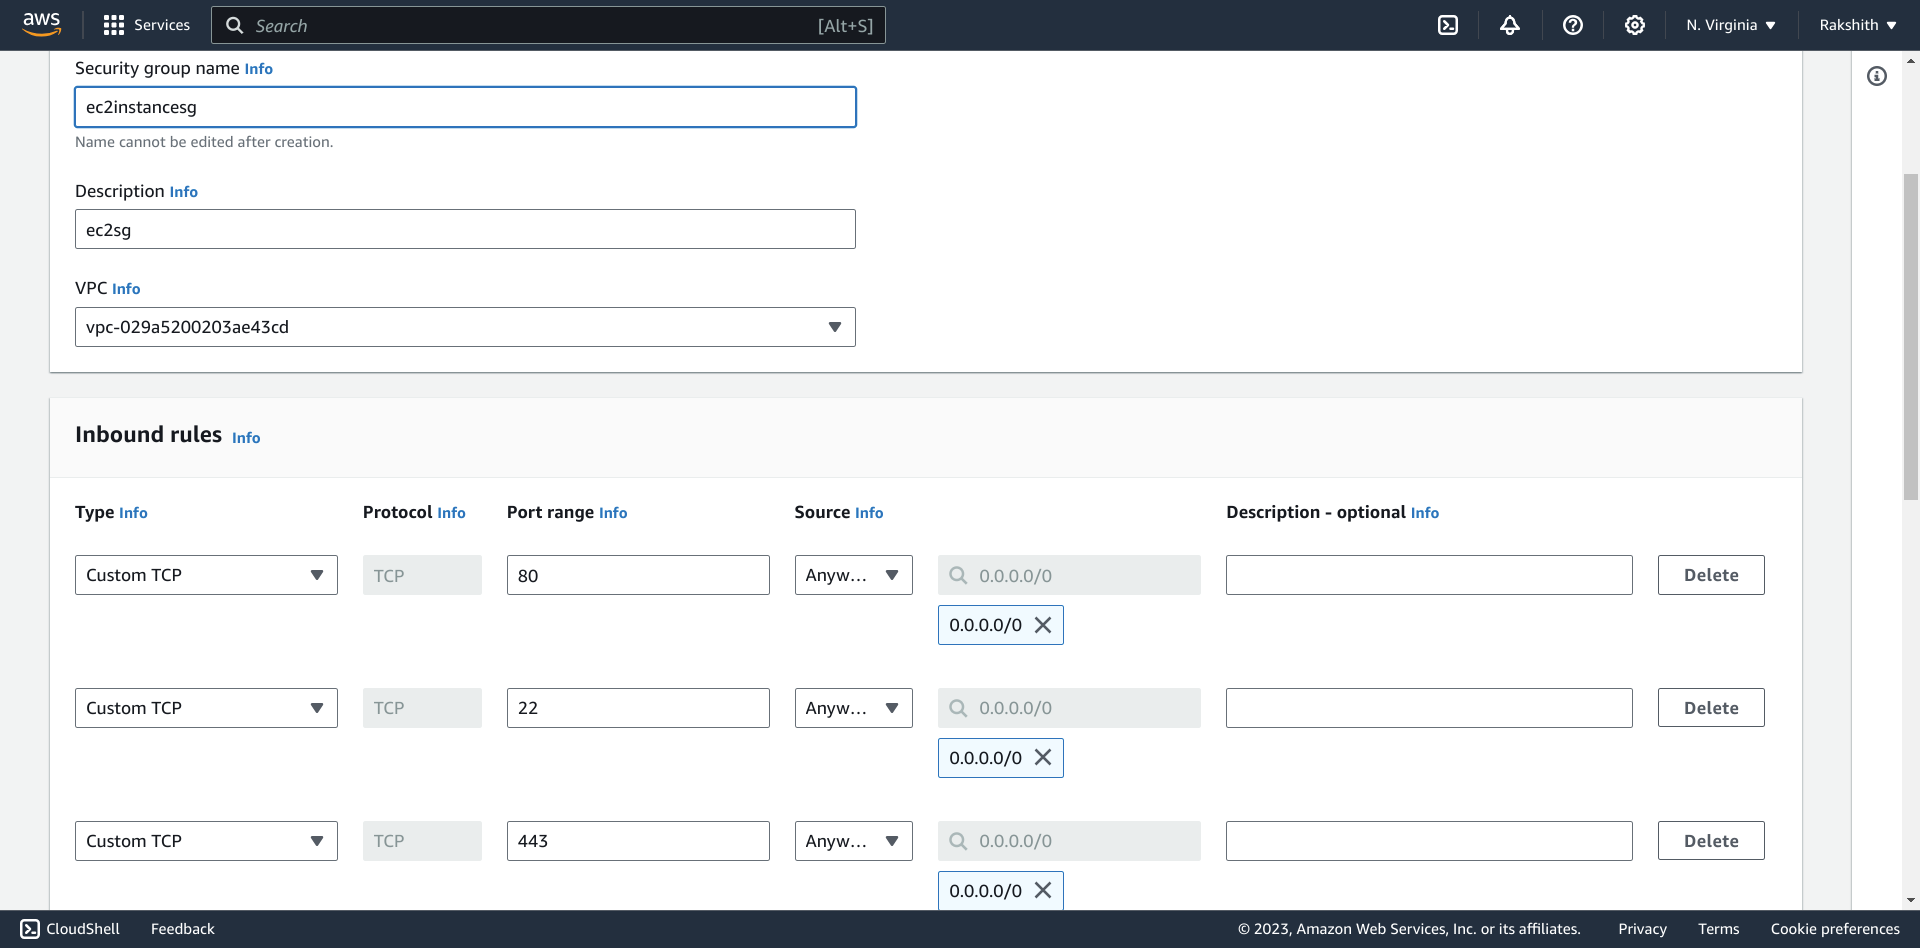
Step 1: Create Two Security groups
All services >> EC2 >> Security groups >> Create
1)Create one security group for EC2 instance with Inbound rules (80, 443, 22) ports open and allow all-traffic
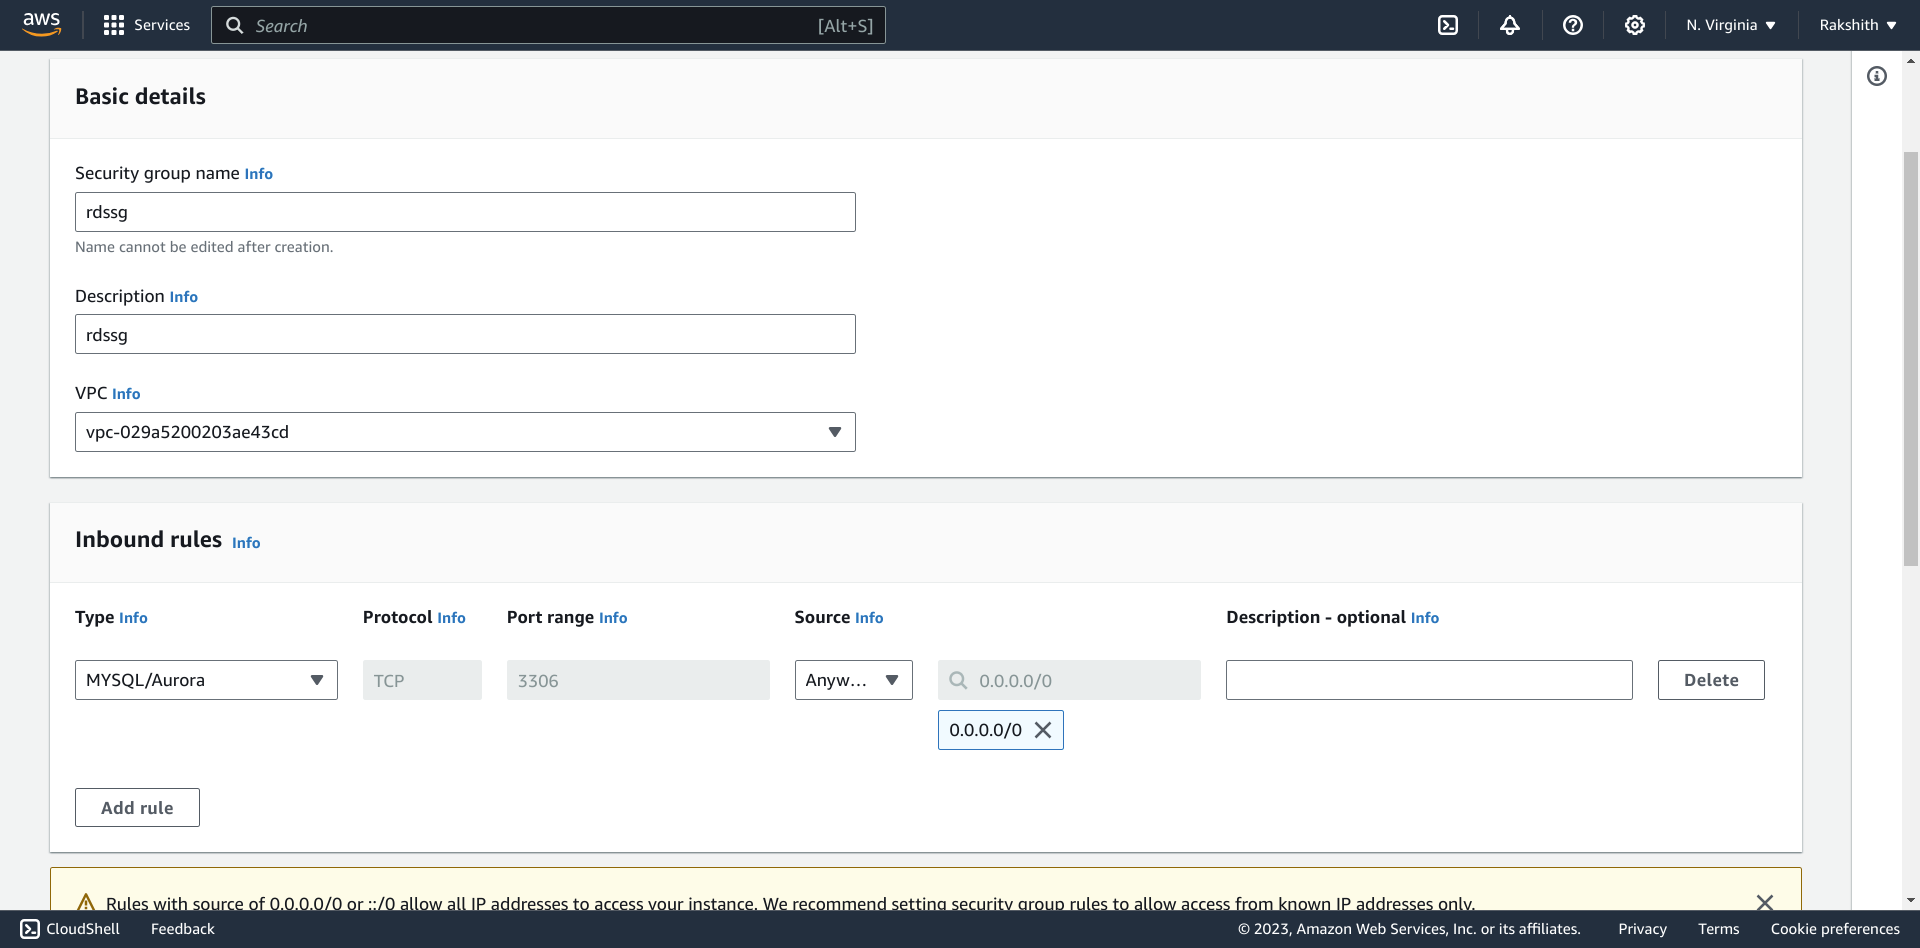
2)Create one security group for RDS instance with Inbound rules (3306) port open and allow all-traffic
Step 2: Create an EC2 Instance and RDS
1)Create an EC2 Instance
All services >> EC2 >> Instances >> Create an instance
Name — wordpressec2 >> Os — OS image should be Amazon-Linux-2 and not Amazon-Linux >> keypair – choose one/create new >> Security group – select one created for instance in step1 >> launch instance

2)Create RDS
Step 3: Setup WordPress in Instance created
Get into the instance created (Remotely) with SSH key-pair login
Remotely login to Instance
Terminal >> Run :
ssh -i pem/file/location/filename.pem ec-2user@ip(instance)
#Entered into insatance
1)Install PHP
sudo su #root user

amazon-linux-extras | grep php

amazon-linux-extras enable php7.4

yum clean metadata

yum install php php-{pear,cgi,common,curl,mbstring,gd,mysqlnd,gettext,bcmath,json,xml,fpm,intl,zip,imap}

yum install php-curl php-mbstring php-intl php-opcache php-soap php-gd php-xml php-mysqli

php -v
2) Install MYSQL client to connect to RDS database of AWS
Run :
yum install -y mariadb-server
yum list installed httpd mariadb-server php-mysqlnd
yum install php-mbstring php-xml –y
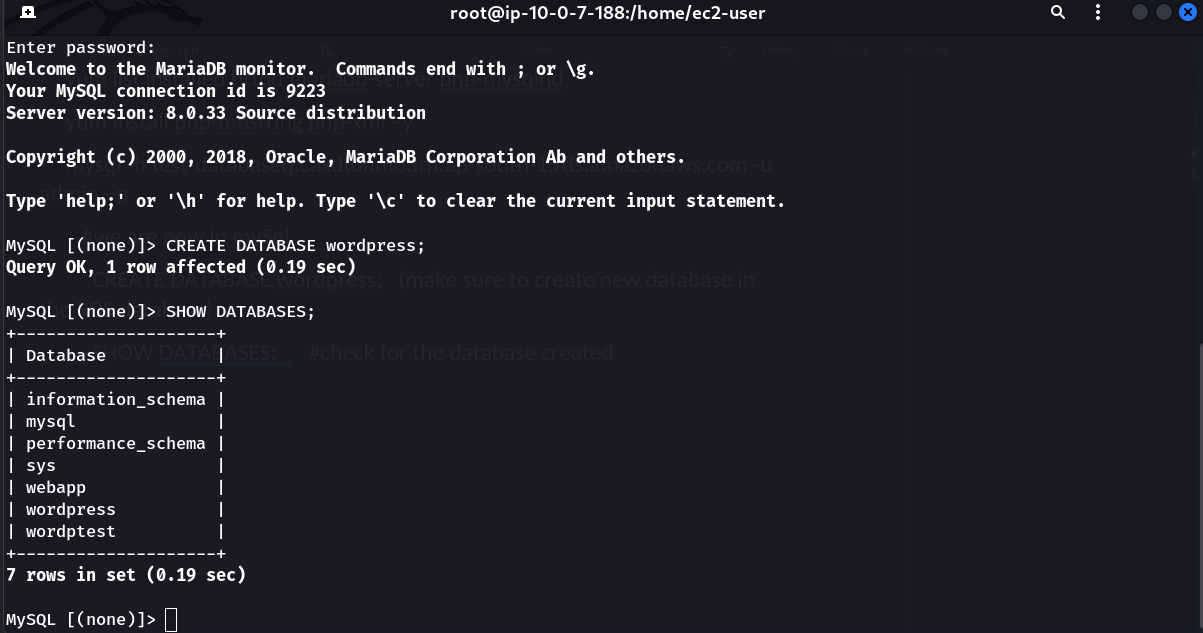
mysql -h test-databaseq.caxdt0nmodrh.ap-south-1.rds.amazonaws.com -u admin -p
#we are now in mySql
CREATE DATABASE wordpress; (make sure to create new database in the RDS database)
SHOW DATABASES; #check for the database created
3)Install NGINX webserver and configure its nginx.conf file
RUN: sudo amazon-linux-extras install nginx1
Then vi /etc/nginx/nginx.conf (delete the existing content and paste below content)
#press “I“ for insert mode delete all and paste the below content and (press “esc” >> “:wq!”) or directly use “:%d” to delete entire content in one go

user nginx;
worker_processes auto;
error_log /var/log/nginx/error.log;
pid /var/run/nginx.pid;

include /usr/share/nginx/modules/*.conf;

events {
    worker_connections 1024;
}

http {
    include /etc/nginx/mime.types;
    default_type application/octet-stream;
    log_format main '$remote_addr - $remote_user [$time_local] "$request" '
                    '$status $body_bytes_sent "$http_referer" '
                    '"$http_user_agent" "$http_x_forwarded_for"';
    access_log /var/log/nginx/access.log main;

    sendfile on;
    tcp_nopush on;
    keepalive_timeout 65;
    types_hash_max_size 2048;
    client_max_body_size 64M;  # Adjust this based on your needs.

    include /etc/nginx/conf.d/*.conf;

    server {
        listen 80;

        root /var/www/html;  # Adjust the path to your WordPress installation.

        index index.php;

        location / {
            try_files $uri $uri/ /index.php?$args;
        }

       location ~ \.php$ {
            try_files $uri =404;
            fastcgi_pass unix:/run/php-fpm/www.sock;
            fastcgi_index index.php;
            fastcgi_param SCRIPT_FILENAME $document_root$fastcgi_script_name;
            include fastcgi_params;
        }
    }
}
4)Install WordPress
cd /var/www/html

wget http://wordpress.org/latest.tar.gz

tar -xzvf latest.tar.gz

mv wordpress/* .

rm -rf wordpress/ latest.tar.gz

mv wp-config-sample.php wp-config.php

vi wp-config.php


-- Configure wordpress database

define( 'DB_NAME', 'wordpress' );

define( 'DB_USER', 'admin' );

define( 'DB_PASSWORD', 'Password12*' );

define( 'DB_HOST', 'test-databasasfeq.cax12nmodrh.ap-south-1.rds.amazonaws.com' );

— provide permission to the wordpress directory
cd /var/www/

chmod -R 777 html/


#restart the services

systemctl restart php-fpm

systemctl restart nginx
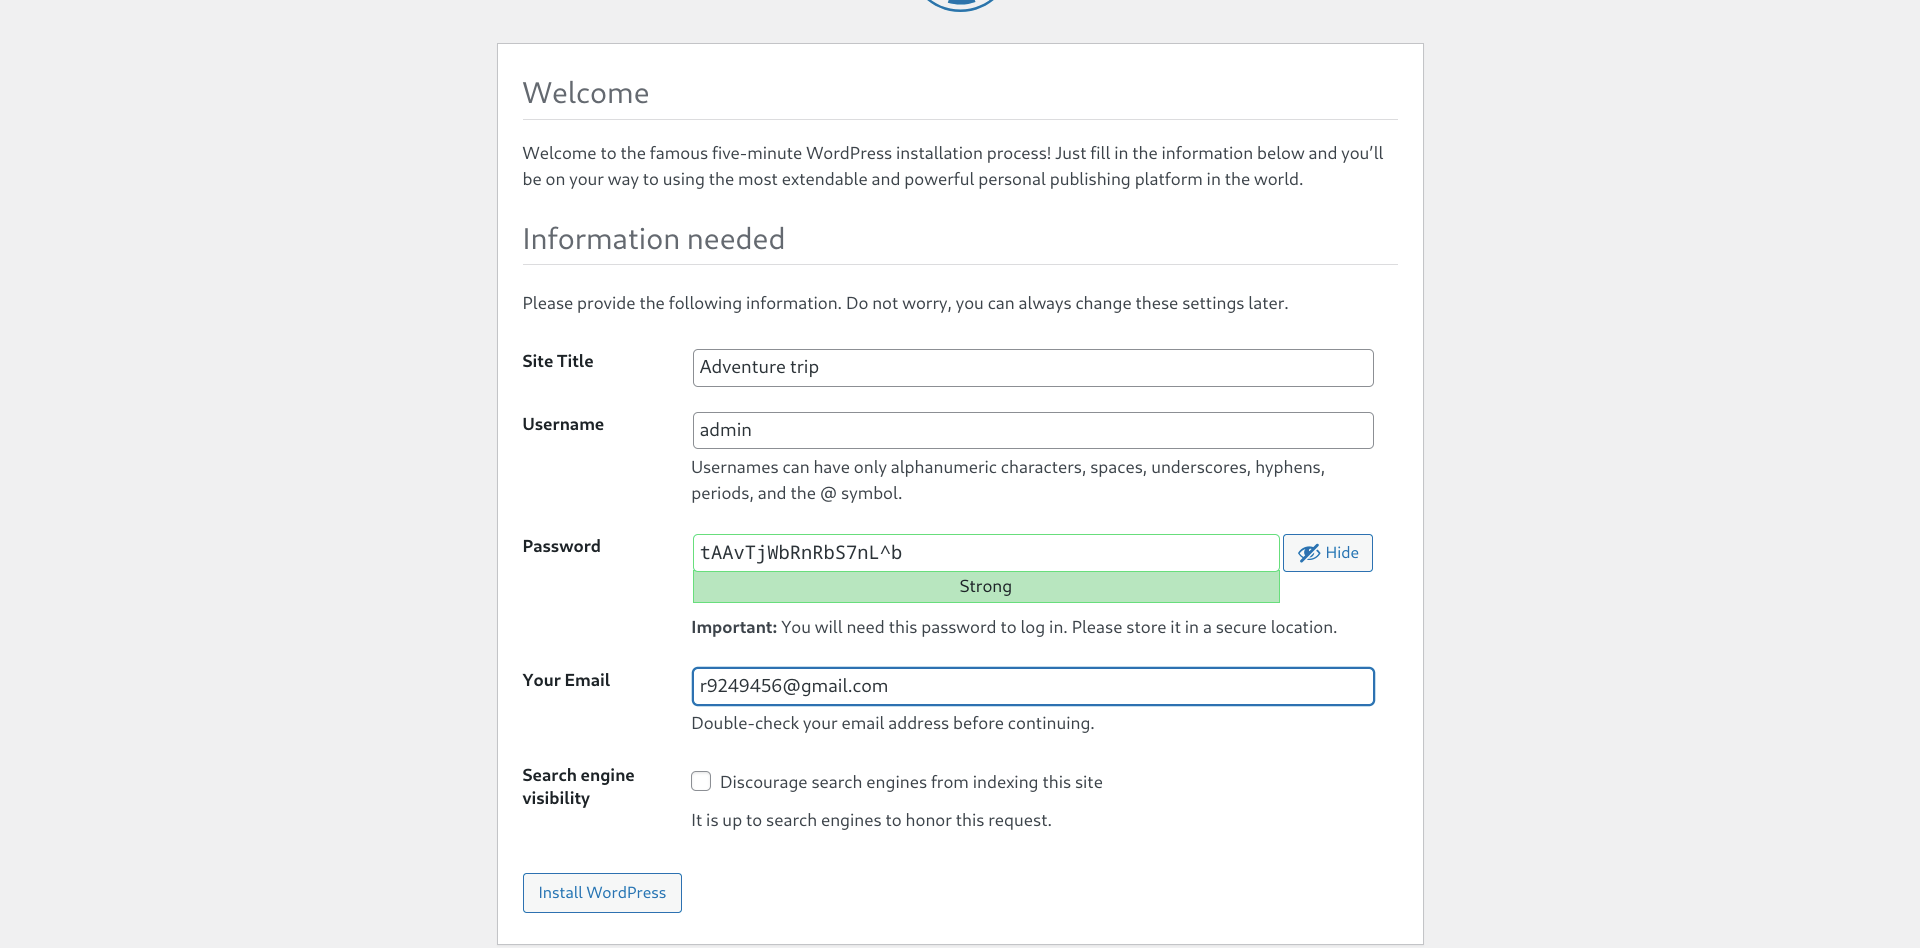
Access the public URL(Ec2 instance IP) and do the initial WordPress setup.
Try creating a new post in wordpress with some Content and Image and update
Here when you browse the post you created make a note of URL of website and URL of image since this will be useful in later part i.e. after creating cloudfront distribution.
Step 4: Create 2 s3 buckets –one for wordpress code and one for wordpress image
1)All services >> S3 >> Create bucket >> create bucket for code
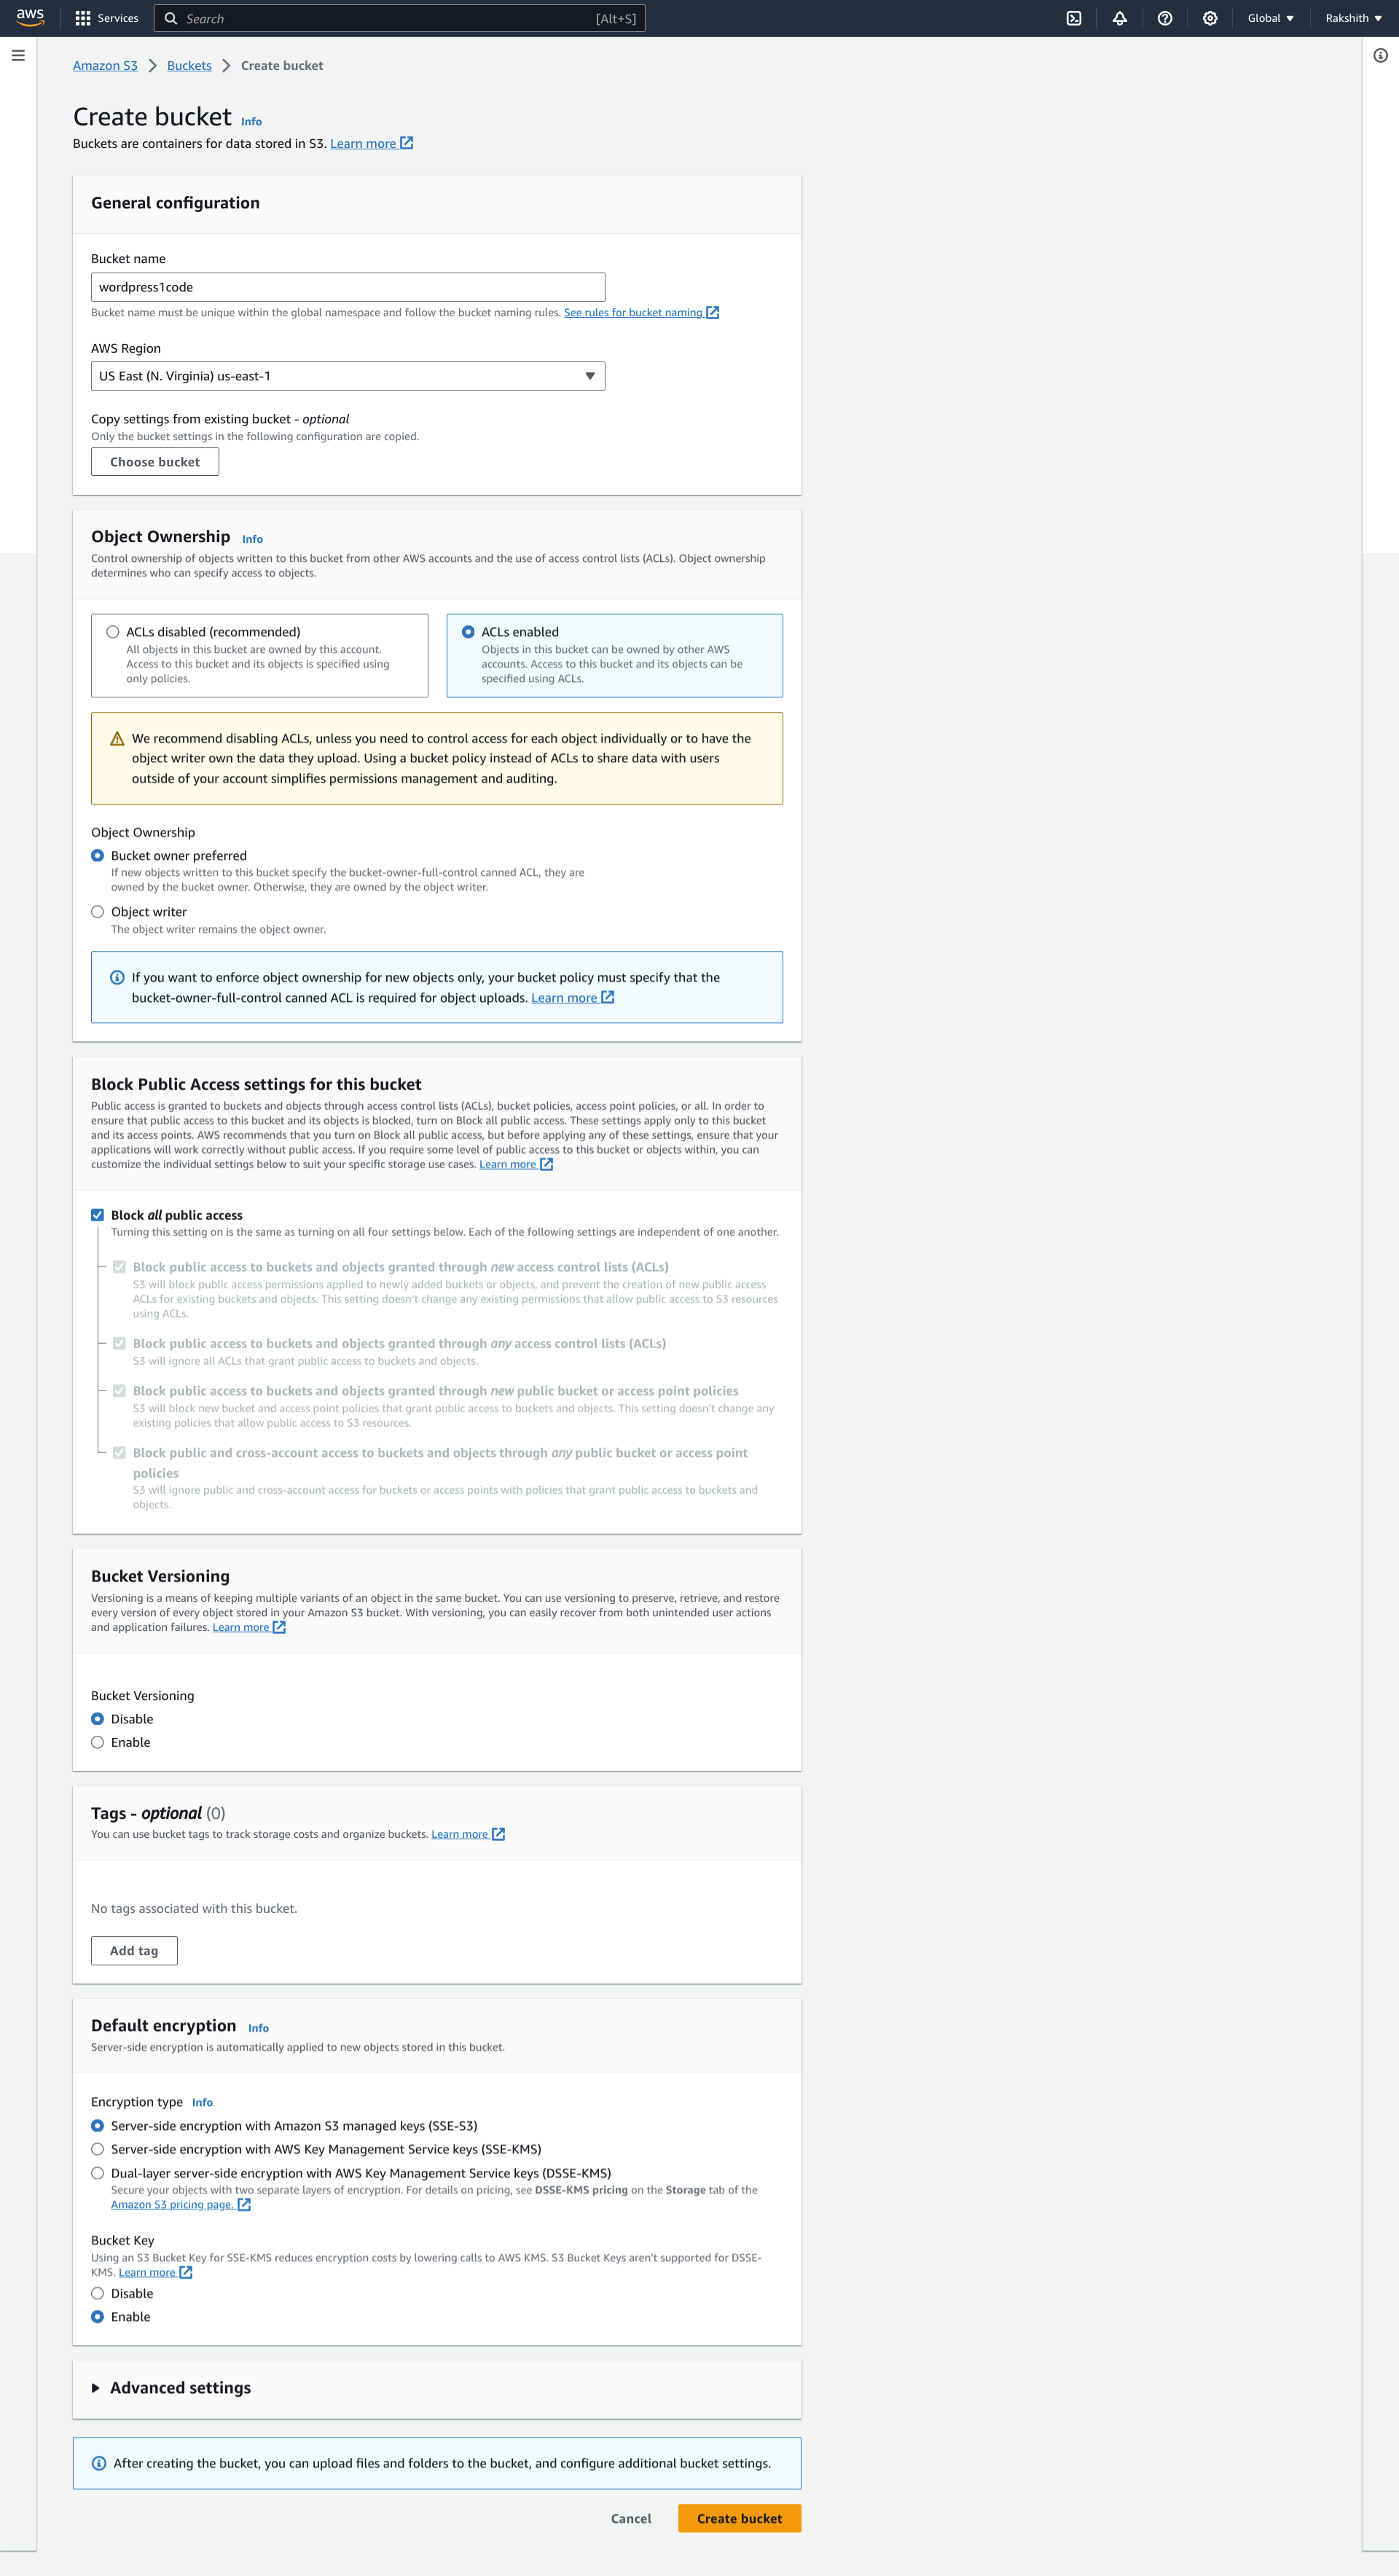
2)All services >> S3 >> Create bucket >> create bucket for images
– while creating wordpressimage bucket.. make the bucket not to be public and there should be no permissions attached.

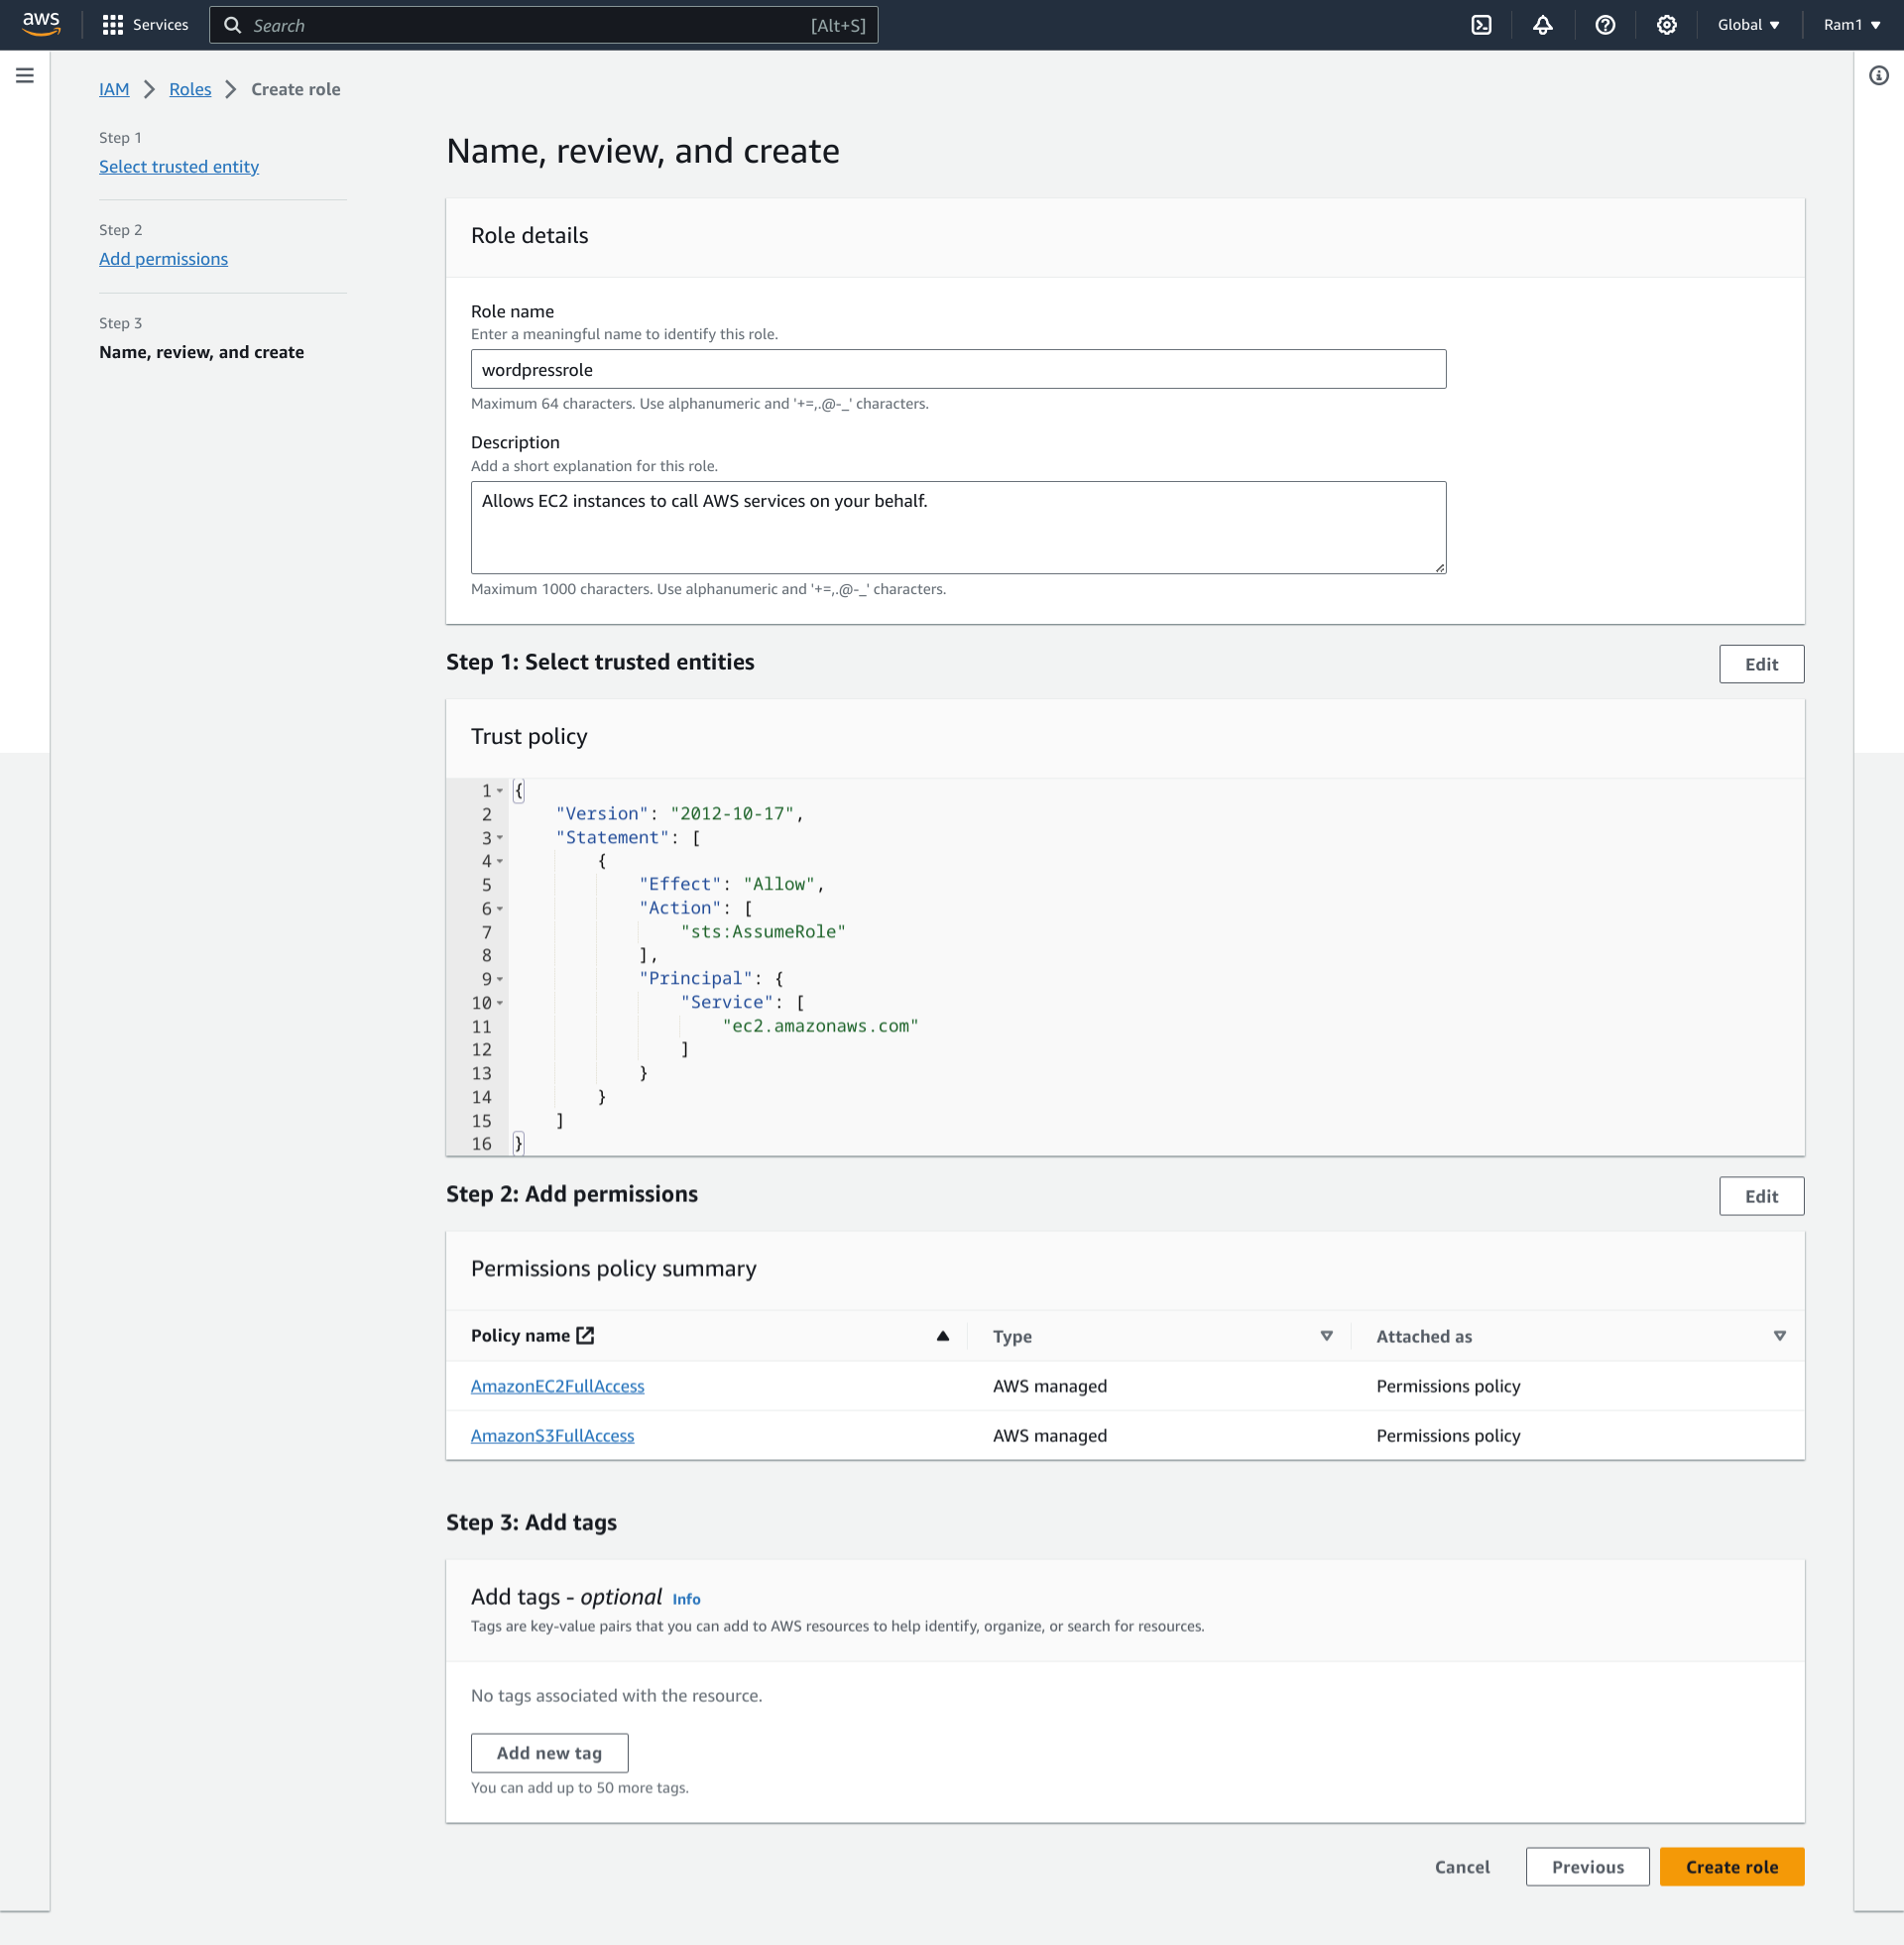
Step 5: Create a role for Ec2 service
1)Create a role for Ec2 service and provide below permissions:
AmazonS3FullAccess
AmazonEC2FullAccess
All services >> IAM >> Role >> Create role >> AWS service >> Use case – EC2 and attach the above permissions
2)Attach IAM role for instance
Select instance >> Actions >> Security >> modify IAM role >> Choose IAM role >> Update IAM role
Step 6: Copy code and images to buckets from wordpress
Run:
aws s3 cp --recursive /var/www/html s3://wordpress1code          #from instance copy code to s3 bucket

aws s3 cp --recursive /var/www/html/wp-content/uploads s3://wordpress1images            #from instance copy images to s3 bucket

#Replace with your bucket names in “wordpress1code”, “wordpress1images”
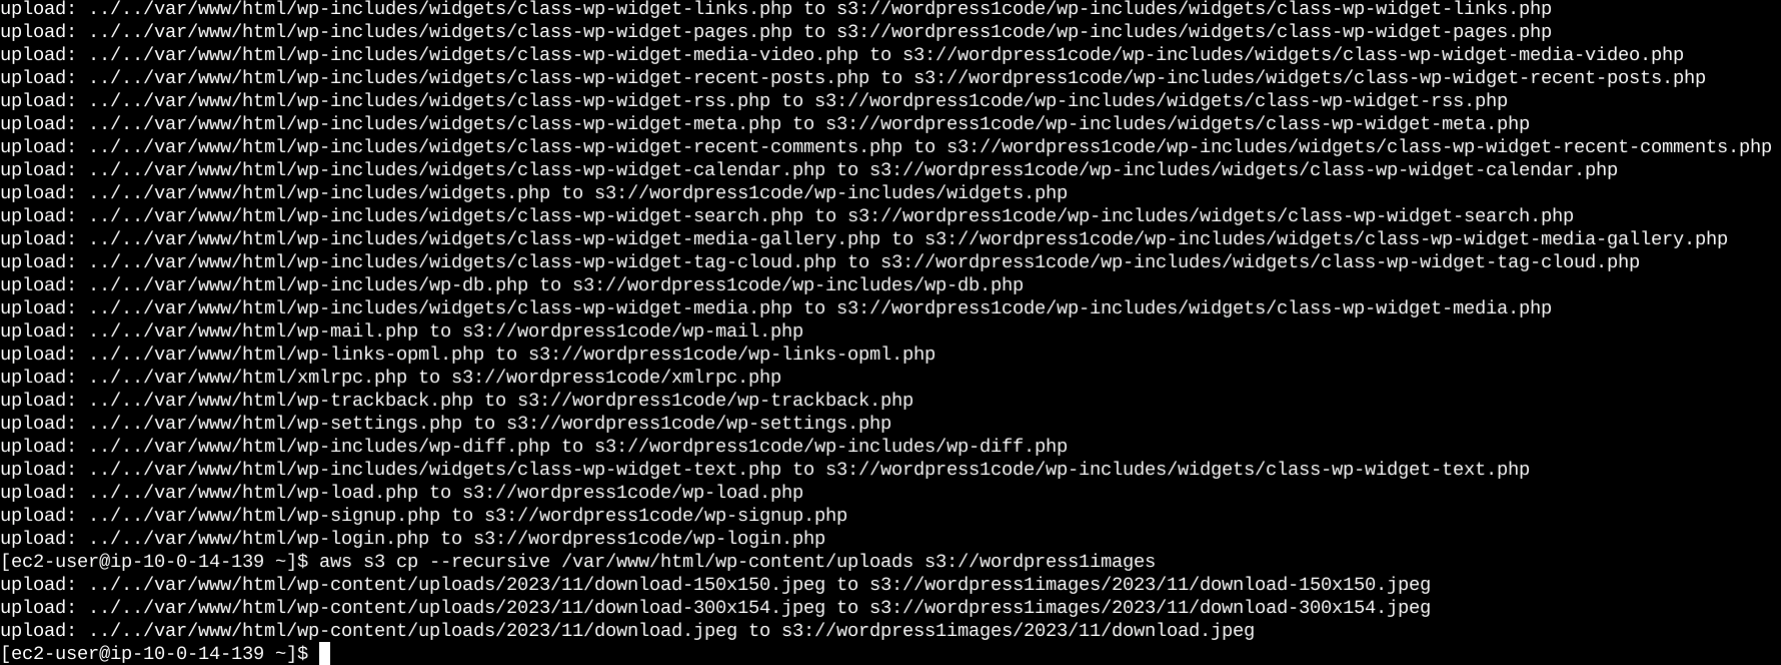
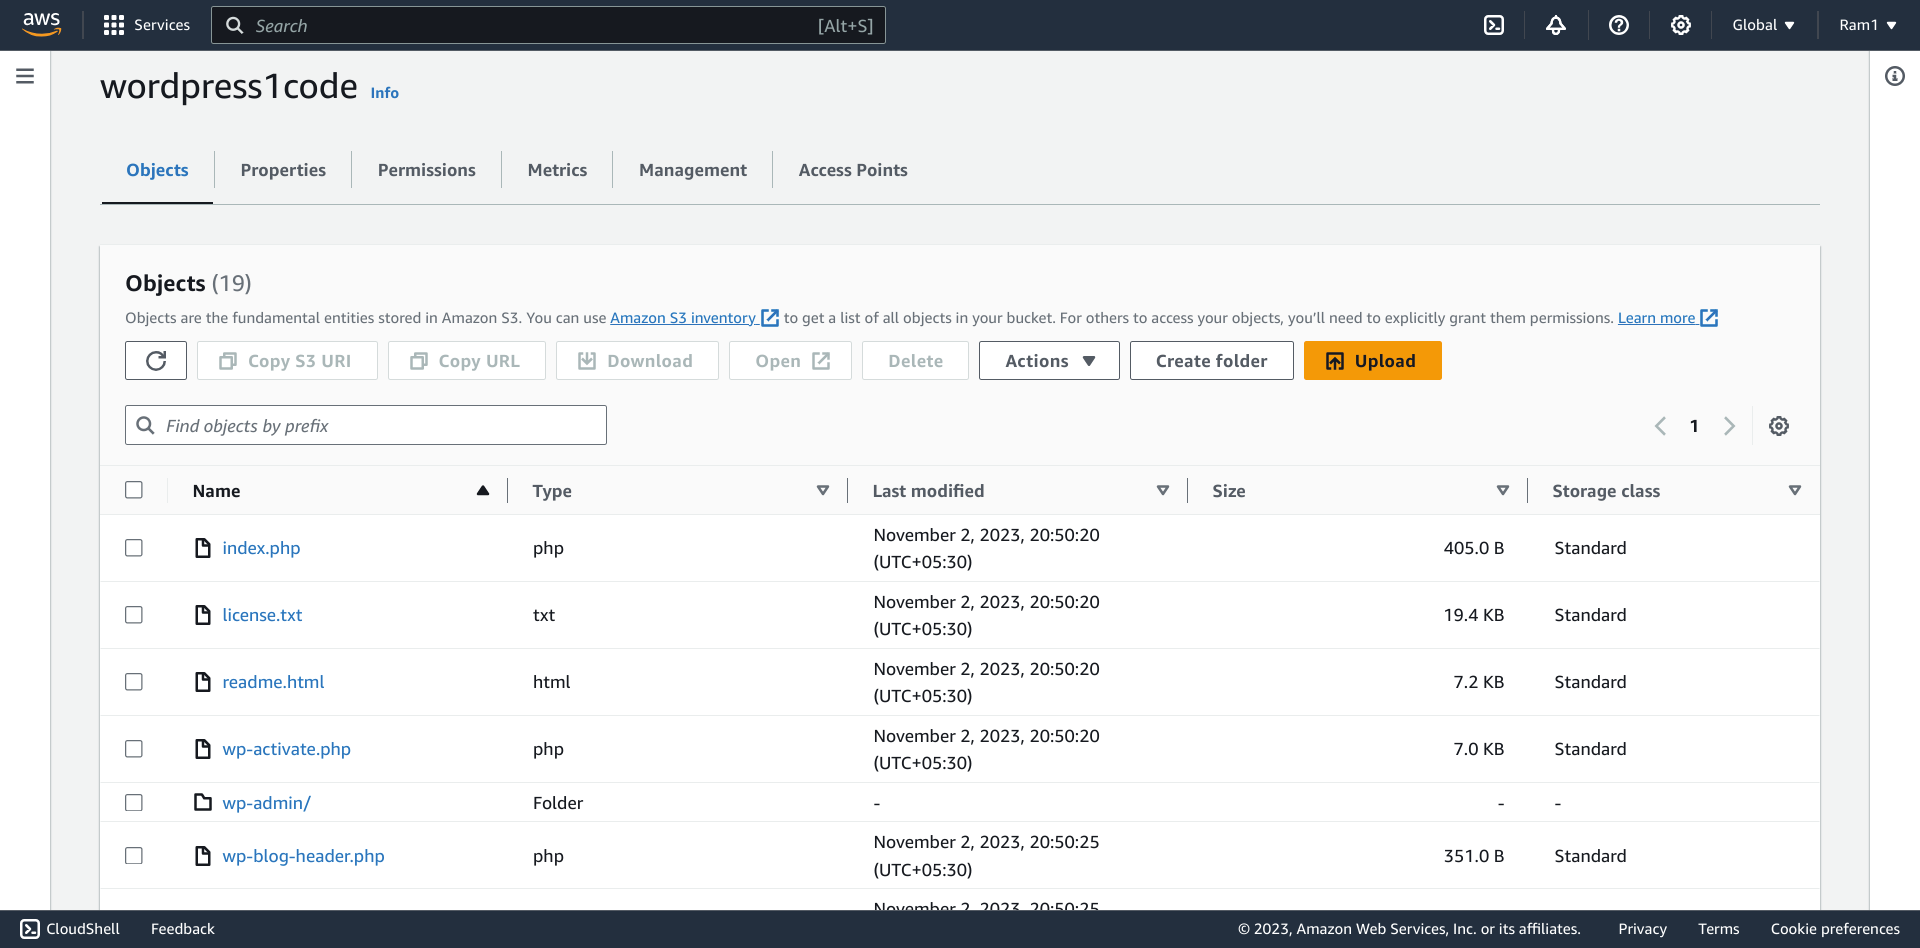
Confirm copied files by checking S3 buckets
Step 7: Create cloudfront for s3-image bucket
All services >> cloudfront >> Distributions >> Create

#As image will be processed from cloudfront. while creating cloudfront distribution for the image, the distribution should not be public but instead should be “Origin access control settings” and for this just create default “origin access control”.
# Once cloudfront with the above setting is created it generates policy for the s3-bucket-image and that we need to update for the s3-bucket image permissions.
Copy policy >> S3-bucket-image >> Permissions — Edit >> Paste
# Note: Origin access is not public if we make public, bucket should also be public so we make origin access as “Origin access control settings”— it means that users should not able to browse bucket directly, and we use cdn url by using cdn we can block public access to s3 bucket still allowing objects to be accessed via cdn url.
— Data is more secure
— Access to files will be faster
— cdn allows objects to be copied to the edge location to store closer to the users.
— Reduce cost of data transfer as serving data from s3 is more than serving data from cdn – edge location.
Step 8: Update config file of Nginx
— update web-server setting in nginx.conf page to render images from Cloudfront instead of instances.
Update nginx.conf as below.. grab distribution domain from cloudfront and update below lines
Run:
vi /etc/nginx/nginx.conf
update below lines
        location ~ ^/wp-content/uploads/(.*) {
            rewrite ^/wp-content/uploads/(.*)$ https://d2pbhw2qz2dwnd.cloudfront.net/$1 redirect;
        }
or directly paste the below content by removing entire content
user nginx;
worker_processes auto;
error_log /var/log/nginx/error.log;
pid /var/run/nginx.pid;

include /usr/share/nginx/modules/*.conf;

events {
    worker_connections 1024;
}

http {
    include /etc/nginx/mime.types;
    default_type application/octet-stream;
    log_format main '$remote_addr - $remote_user [$time_local] "$request" '
                    '$status $body_bytes_sent "$http_referer" '
                    '"$http_user_agent" "$http_x_forwarded_for"';
    access_log /var/log/nginx/access.log main;

    sendfile on;
    tcp_nopush on;
    keepalive_timeout 65;
    types_hash_max_size 2048;
    client_max_body_size 64M;  # Adjust this based on your needs.

    include /etc/nginx/conf.d/*.conf;

    server {
        listen 80;
        root /var/www/html;  # Adjust the path to your WordPress installation.
        index index.php;

        location / {
            try_files $uri $uri/ /index.php?$args;
        }

        location ~ \.php$ {
            try_files $uri =404;
            fastcgi_pass unix:/run/php-fpm/www.sock;
            fastcgi_index index.php;
            fastcgi_param SCRIPT_FILENAME $document_root$fastcgi_script_name;
            include fastcgi_params;
        }

        location ~ ^/wp-content/uploads/(.*) {
            rewrite ^/wp-content/uploads/(.*)$ https://d2pbhw2qz2dwnd.cloudfront.net/$1 redirect;
        }
    }
}
To reflect this change – restart webserver by below command:
systemctl restart nginx
Step 9: Access the Website and image
With public IP of instance access the website and open image in new tab note the URL .
The image will be rendered by cloudfront url
In Previous case the image is shown from Instance in which we have installed WordPress and uploaded image.
PS — Make The wordpress website Highly Available, Fault Taularant, by using load balancer, target group, Auto-scaling and enabling cron for data updation in S3 bucket. Follow below steps:
— Create load balancer and target group
Create load balancer and update route53 with its alias.
Create healthy.html in /var/www/html and then chmod 755 healthy.html
— Create 2 AMI one for read and one for write nodes
Create AMI — 2 AMI ,
Read node – fleet of instance so that code will be synced from s3 to instances
Write node – admin will use it and code/ media will sync from instance to s3 bucket
Read node:
aws s3 sync –delete s3://tm-code /var/www/html –region us-east-1
Write node
cron to sync from /var/www/html to s3 bucket:
aws s3 sync –delete /var/www/html s3://wordpresscode
aws s3 sync –delete /var/www/html/wp-content/uploads s3://wpbucket
— Setup launch template
Using Read AMI, we need to create launch template, to create fleet of EC2 instance as reader node) ..select proper rolw with permissions : AmazonS3FullAccess and AmazonEC2FullAccess
— Create Autoscaling
We need to create AutoScaling (while creating Autoscaling — select target groups as your load balancers -target group – the one we created – its available in the advanced tab)
Remove write node from the targets groups of Elastic load balancer. (This way if we have to change the code in website, we just need to update in the code of write node and subsequently it will be synced to s3:code-bucket and from there it will be synced to read node — as read node cron is setup to sync from s3:code-bucket to website code i.e. /var/www/html) — changing in 1 write node will reflect in n nos of EC2 read nodes.
Thanks for going through the document, please contact-us for any queries.