
Resources used
VPC | Subnet | IGW | NAT | Route tables | EC2 instance
Steps:
Step 3: Create IGW and attach it to our Custom VPC
Step 4: Create a new route table
Step 5: Create two instances and connect to it
Step 6: Create a new NAT gateway
VPC:
A Virtual Private Cloud (VPC) is a virtual network infrastructure that you can provision within a cloud computing environment. It’s a fundamental component of many cloud platforms, including Amazon Web Services (AWS), Microsoft Azure, and Google Cloud Platform (GCP). The purpose of a VPC is to provide a logically isolated section of the cloud where you can launch resources such as virtual machines, databases, and storage.
Subnet:
A subnet, short for subnetwork, is a segmented portion of a larger network. Subnetting is a technique used in networking to divide a single, larger network into smaller, more manageable subnetworks. Each subnet has its unique range of IP addresses and is often associated with a specific geographic location, department, or function within an organization.
Public subnet:
A public subnet is a subnet within a Virtual Private Cloud (VPC) in cloud computing that is configured to route its traffic directly to the internet. In other words, instances (such as virtual machines or servers) deployed in a public subnet have a route to the Internet and can send and receive traffic from the Internet.
Private subnet:
A private subnet, in the context of cloud computing and Virtual Private Clouds (VPCs), refers to a subnet that does not have direct access to the internet. Instances (virtual machines or other resources) within a private subnet cannot send or receive traffic directly to or from the internet. Instead, if these instances need internet access, they typically do so through a network address translation (NAT) gateway or a NAT instance located in a public subnet.
| Feature | Private Subnet | Public Subnet |
|---|---|---|
| Access | Only accessible from other instances within the VPC | Accessible from the internet |
| Routing | Routes traffic to a NAT gateway or VPC endpoint for internet access | Routes traffic directly to the internet |
| Instance placement | Instances that don’t require public access should be placed in private subnets | Instances that require public access should be placed in public subnets |
| Security | More secure because instances are not directly exposed to the internet | Less secure because instances are directly exposed to the internet |
IGW (Internet Gateway):
An Internet Gateway (IGW) is a key component in a cloud computing environment, particularly in services like Amazon Web Services (AWS). It enables communication between resources within a Virtual Private Cloud (VPC) and the broader internet.
NAT gateway (Network Address Translation):
A Network Address Translation (NAT) gateway is a managed service provided by cloud service providers, such as Amazon Web Services (AWS), to enable instances in private subnets to initiate outbound traffic to the internet while keeping them protected from direct inbound traffic. Here are key points about NAT gateways:
| Feature | IGW (Internet Gateway) | NAT Gateway |
|---|---|---|
| Purpose | Provides a public IP address for your VPC so that instances in your VPC can communicate with the internet. | Allows instances in a private subnet to connect to services outside your VPC but external services cannot initiate a connection with those instances. |
| Access | Allows both inbound and outbound access to the internet. | Allows outbound access to the internet. |
| Location | Created in your VPC | Created in a specific Availability Zone (AZ) |
| Cost | No additional cost | Charges based on the creation and usage of a NAT gateway |
| Use cases | Publicly accessible applications, websites, and services | Private applications, services, and databases |
Route table:
A route table is a key component in networking that is used to determine the path that network traffic takes from a source to its destination. In cloud computing environments, such as Amazon Web Services (AWS) or other cloud providers, a route table is typically associated with a Virtual Private Cloud (VPC) or a similar networking construct. Here are the key aspects of a route table:
CIDR block:
A CIDR block (Classless Inter-Domain Routing block) is a way of representing an IP address and its associated subnet mask. It is a more efficient way of representing IP addresses than traditional subnetting methods, and it is also more flexible.
Example for VPC Configuration:
- VPC CIDR Block: 10.0.0.0/16
- Allows for a large number of private IP addresses within the range of 10.0.0.0 to 10.0.255.255.
Public Subnet:
- Subnet CIDR Block: 10.0.1.0/24
- A subnet within the VPC with a specific range of IP addresses.
- In this case, it allows for addresses from 10.0.1.0 to 10.0.1.255.
- Availability Zone: us-east-1a (you can choose any available AZ)
- Route Table:
- Default Route: 0.0.0.0/0 via Internet Gateway
- Public IP Addressing: Enabled (instances get public IP addresses)
Private Subnet:
- Subnet CIDR Block: 10.0.2.0/24
- Another subnet within the VPC.
- Addresses range from 10.0.2.0 to 10.0.2.255.
- Availability Zone: us-east-1b (you can choose any available AZ)
- Route Table:
- Default Route: 0.0.0.0/0 via NAT Gateway or NAT Instance (for internet access)
- Public IP Addressing: Disabled (instances do not get public IP addresses)
Let’s create a simple VPC
Here we will be Creating a VPC and 2 subnets (Public and Private subnets) associated with it and we will launch 2 EC2 instances one in public and one in private subnet
Where the public subnet gets exposed to the internet via IGW and the private subnet has access restricted to the public subnet via NAT gateway. —- Here frontend application will be running in the Public subnet and the backend and database in the private subnet, where resources (ec2-instance, db) in the private subnet can only be accessed by resources in the Public subnet.
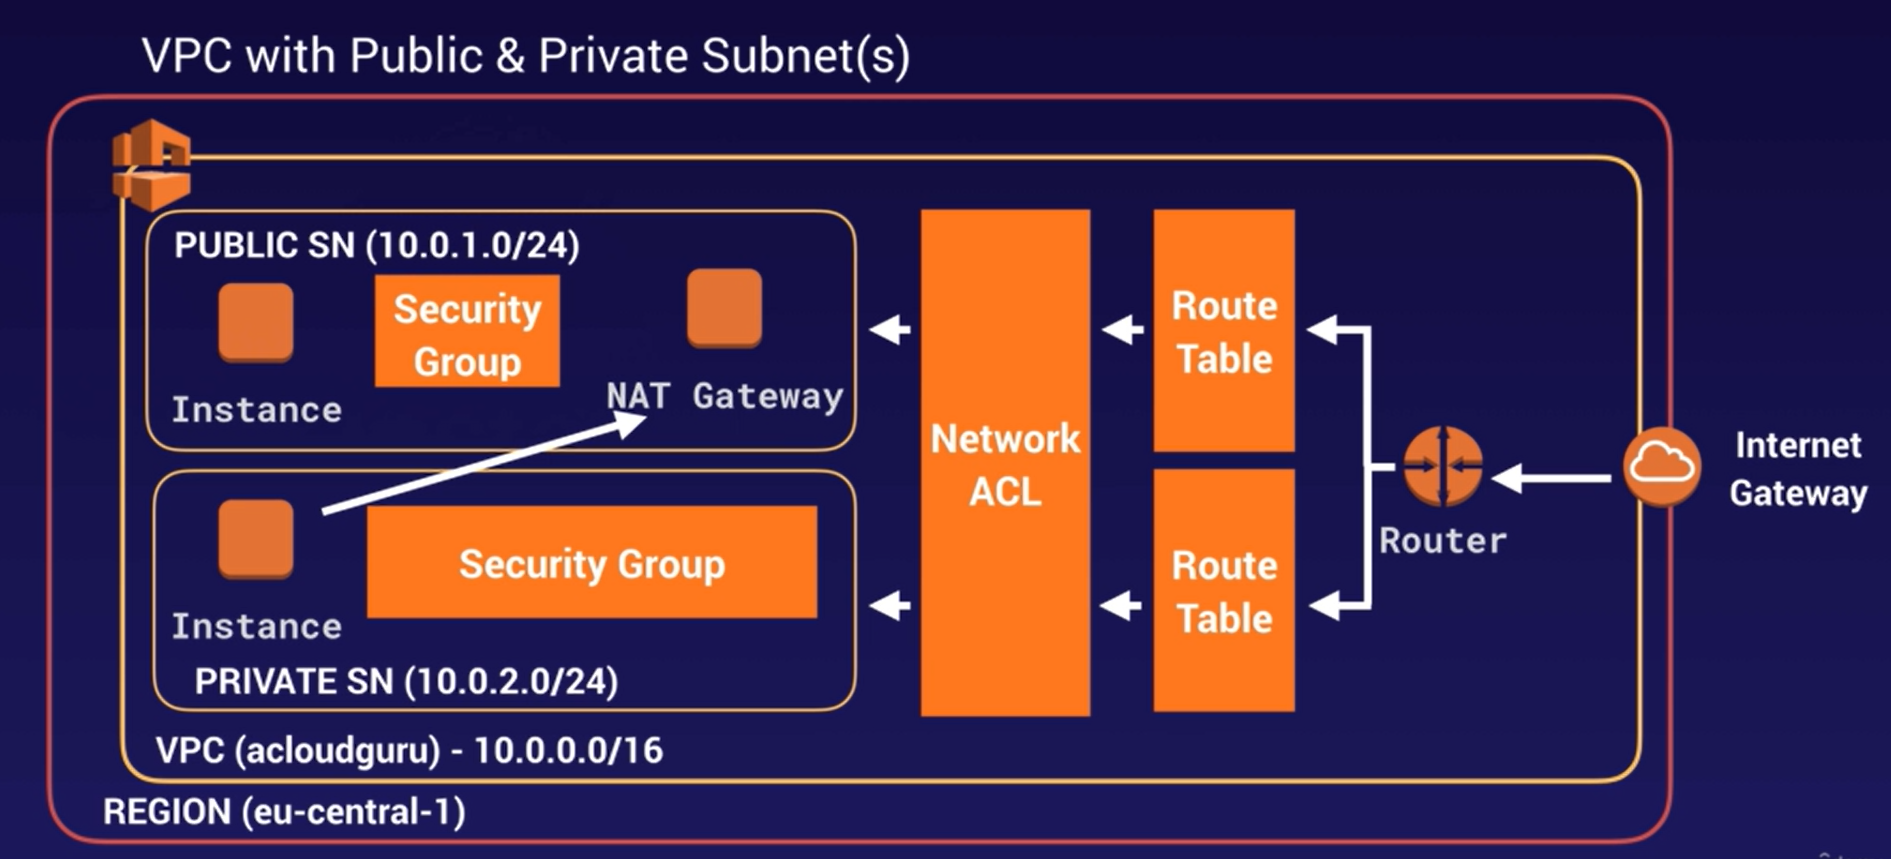
Let’s walk through the flow of creating a VPC with public and private subnets, instances, and connectivity to the outer world using NAT Gateway. This is a common architecture for setting up a secure network in AWS.
- Create a VPC:
- Start by creating a Virtual Private Cloud (VPC) in AWS, defining its CIDR block. This VPC will serve as an isolated network environment.
- Create Subnets:
- Divide the VPC into two subnets: a public subnet and a private subnet. Assign appropriate CIDR blocks to each subnet.
- Create Internet Gateway (IGW):
- Create an Internet Gateway (IGW) and attach it to the VPC. The IGW serves as the gateway for internet-bound traffic.
- Configure Routing for Public Subnet:
- Create a route table for the public subnet.
- Add a route in the public subnet’s route table pointing to the IGW, allowing instances in the public subnet to access the internet.
- Create Security Groups:
- Create a security group for instances in the public subnet to control inbound and outbound traffic.
- Create a separate security group for instances in the private subnet.
- Launch Instances:
- Launch two instances:
- One in the public subnet with both public and private IP addresses. This instance can be accessed from the internet.
- One in the private subnet with only a private IP address. This instance is intended for backend services and is not directly accessible from the internet.
- Launch two instances:
- Security Group Rules:
- Configure security group rules:
- The public instance’s security group allows inbound connections on necessary ports (e.g., SSH for Putty).
- The private instance’s security group allows inbound connections from the IP range of instances in the public subnet.
- Configure security group rules:
- Connectivity from Public to Private Instances:
- Instances in the public subnet can access instances in the private subnet due to the security group configurations.
- Create NAT Gateway:
- Create a Network Address Translation (NAT) Gateway in the public subnet. The NAT Gateway allows instances in the private subnet to initiate outbound connections to the internet while remaining hidden.
- Update Route Table for Private Subnet:
- Update the route table of the private subnet to include a route to the NAT Gateway. This enables instances in the private subnet to access the internet via the NAT Gateway.
In summary, this setup ensures that instances in the public subnet can be accessed from the internet, instances in the private subnet can initiate outbound connections through the NAT Gateway, and security groups control the flow of traffic between the subnets. This architecture enhances security by restricting direct internet access for instances in the private subnet.
All services >> VPC >> create a new VPC
As a reference, you can use the below values as shown in the screenshot, to create a new VPC.
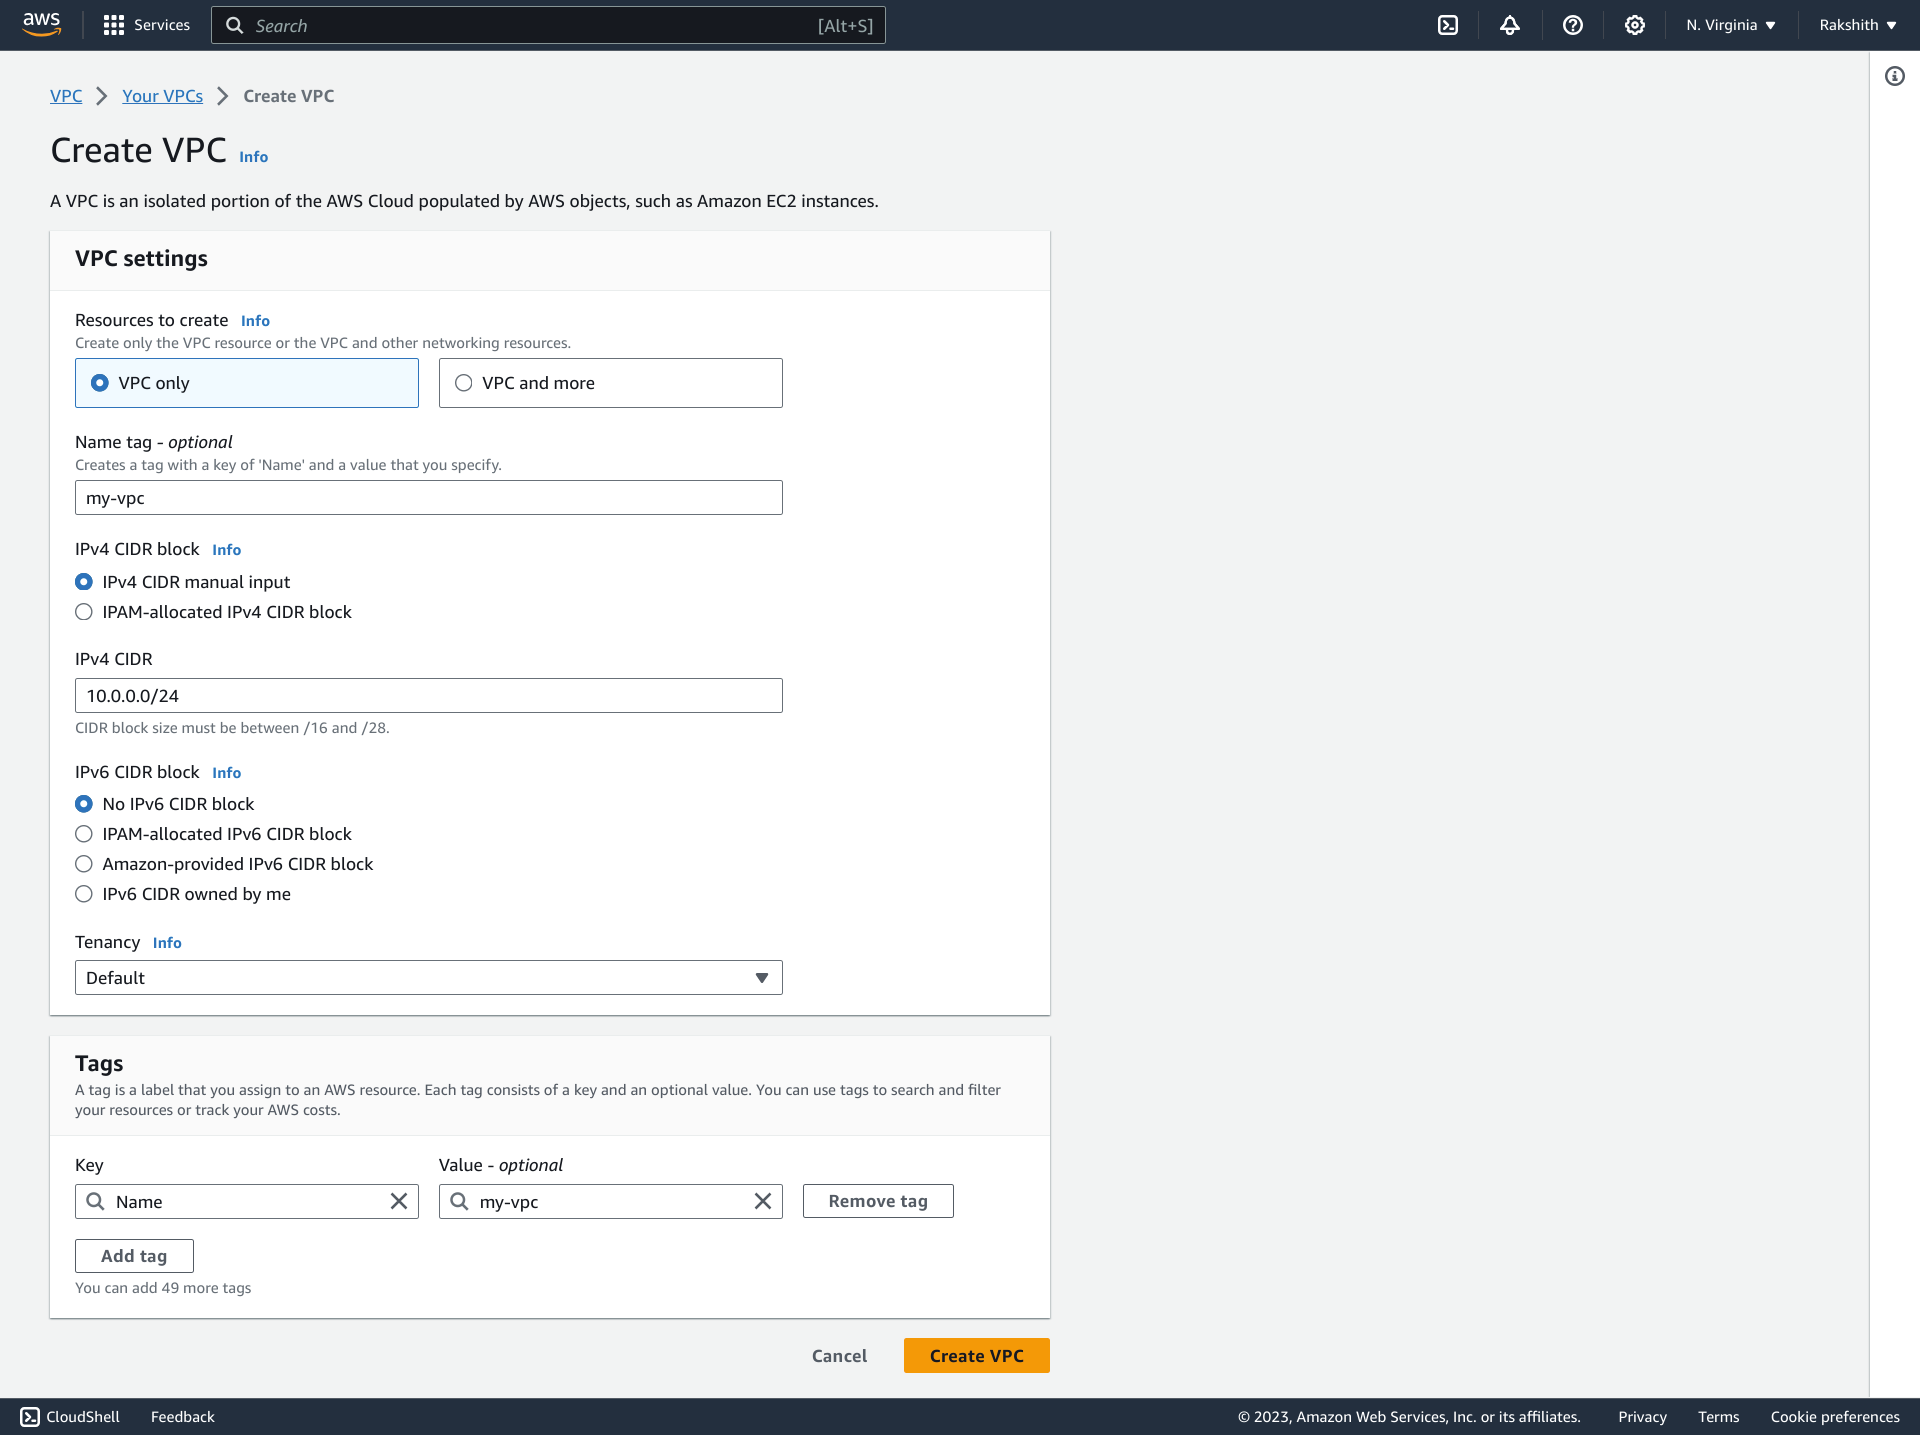
When a VPC is created, it creates below resources by default :
- Route Table
- Security Group
- Network Access list
When a VPC is created, it doesn’t create the below resources by default:
- Subnet
- Internet gateway
By creating a VPC, the subnet is not created automatically, so we need to create subnets manually.
Here we will be creating one public and one private subnet.
To create a subnet browse to – VPC dashboard >> subnets >> Create.
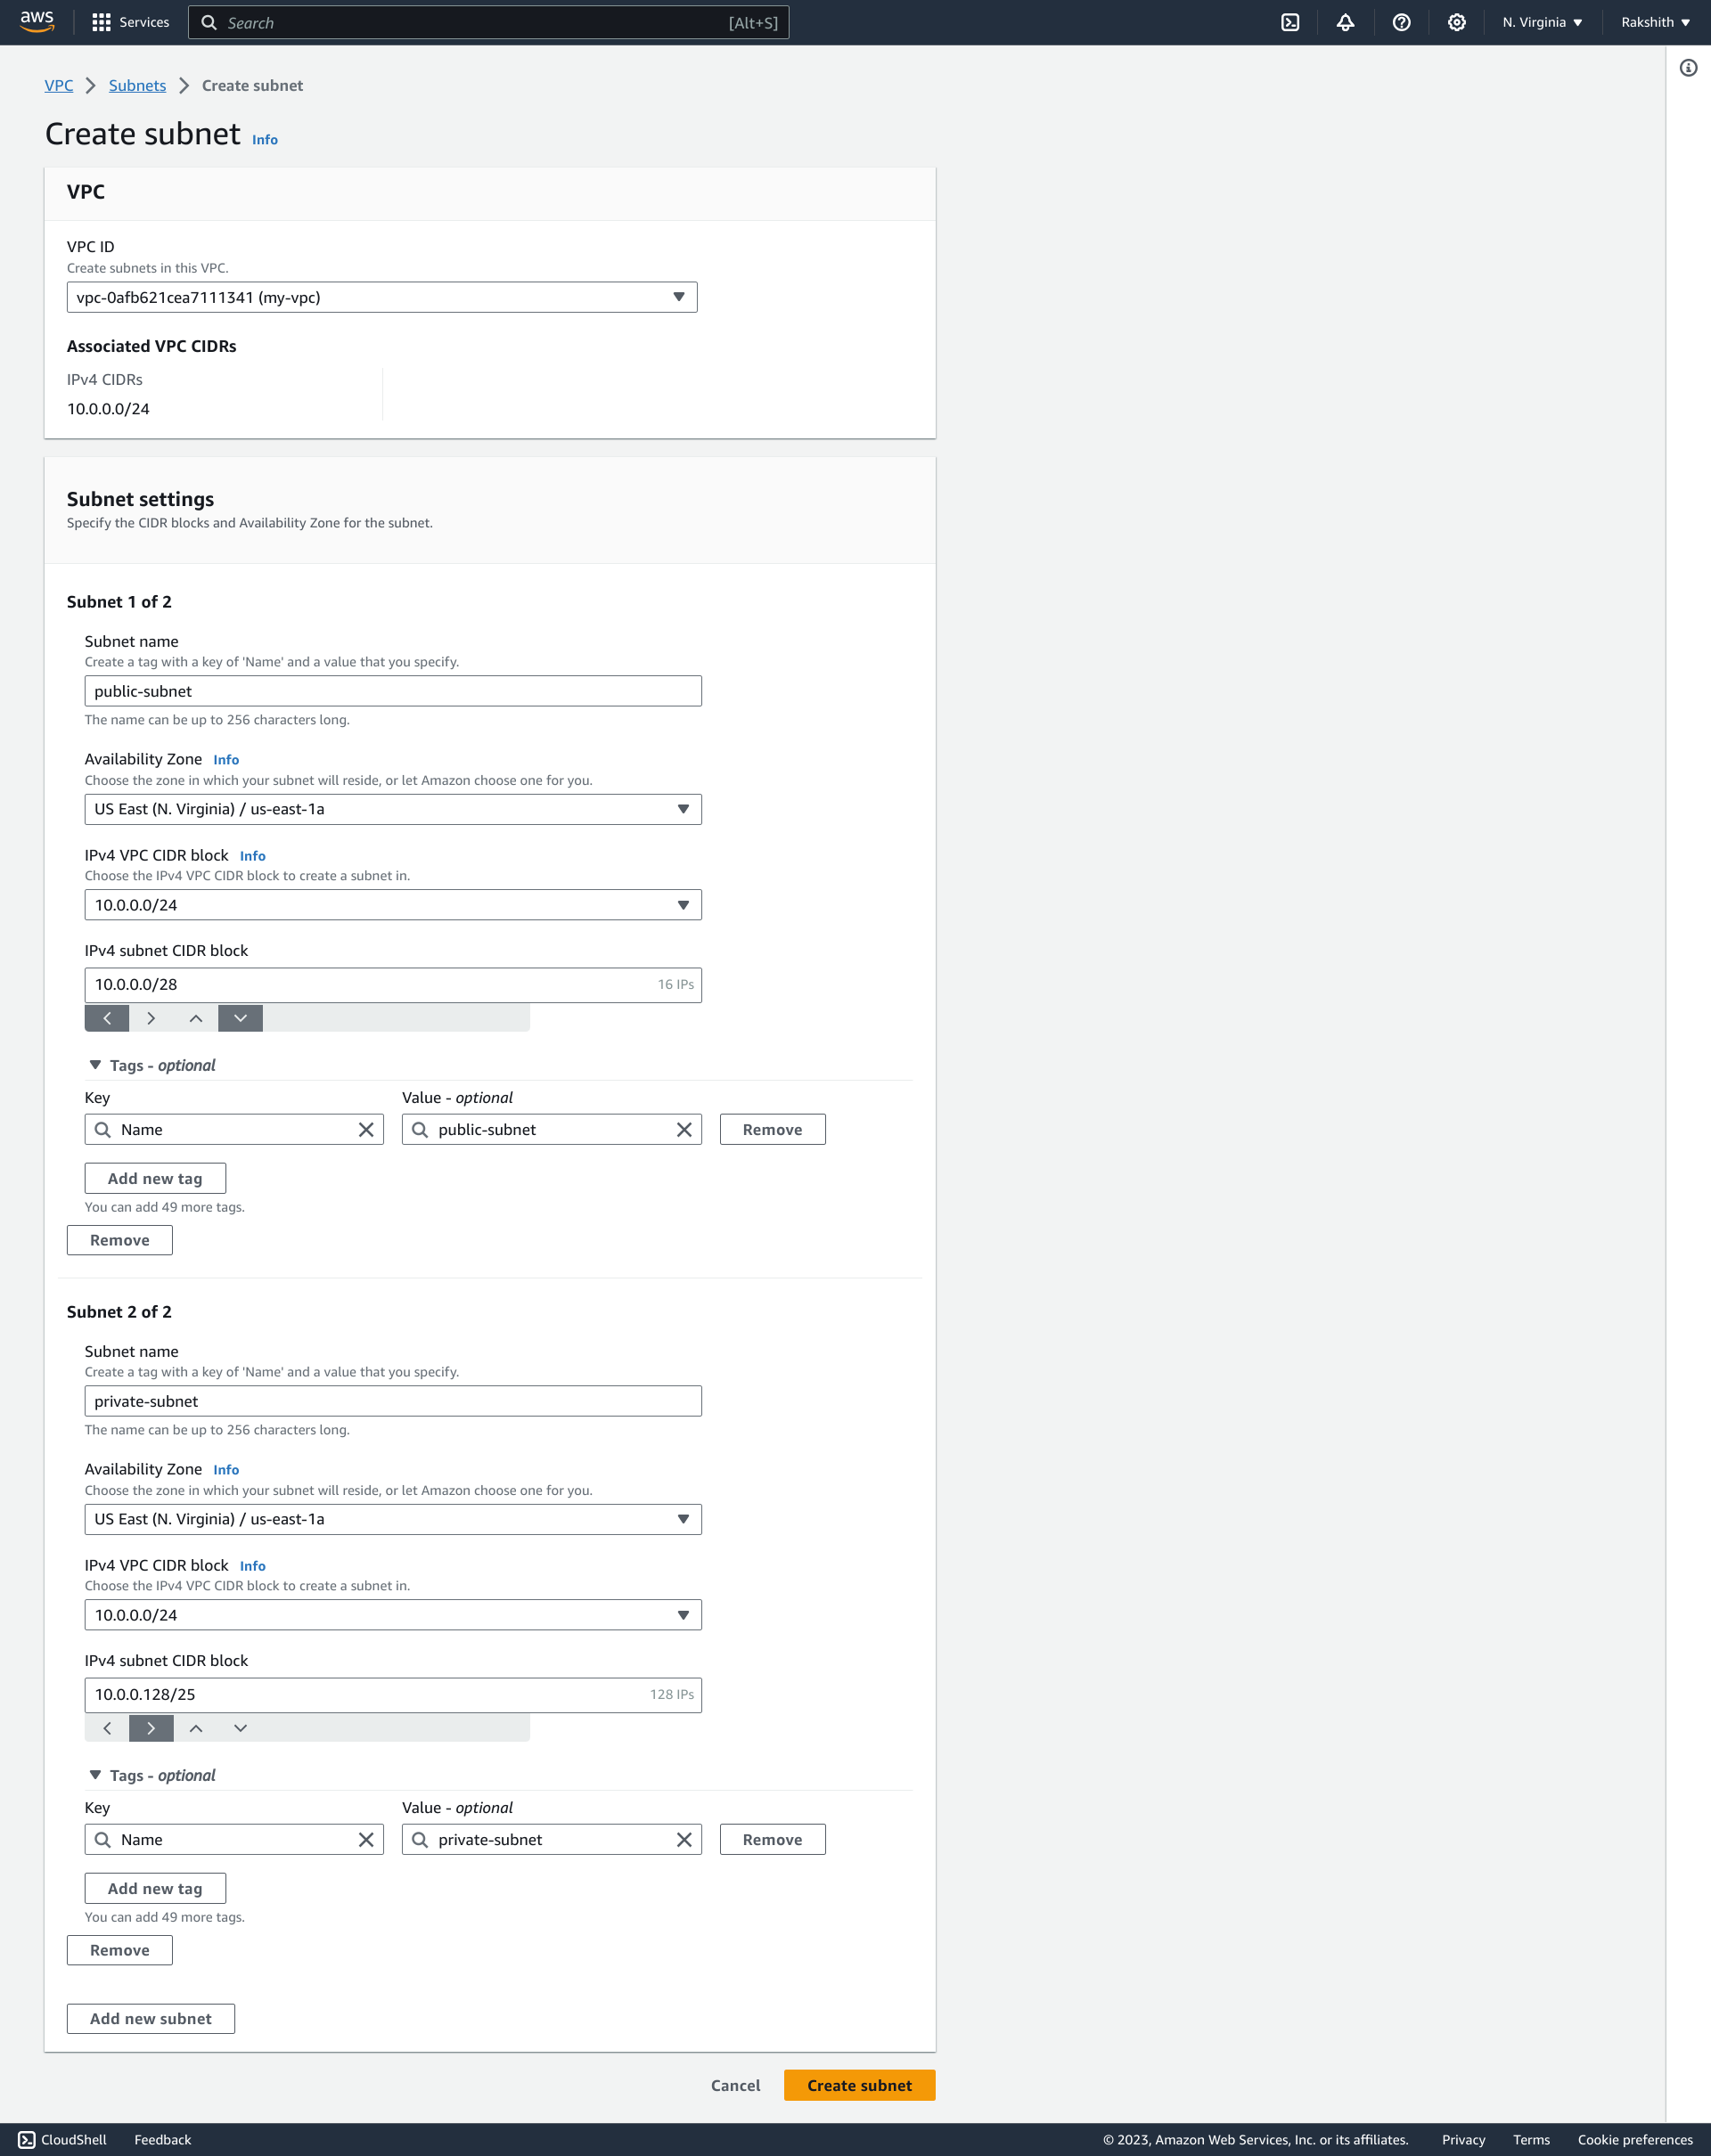
Once 2 subnets are created having 2 different CIDR blocks and availability zones, we need to make one subnet public by enabling “auto assign public IPV4 address”, by selecting the desired subnet and clicking on Actions->> Modify Auto Assign IP settings.
Step 3: Create IGW and attach it to VPC
To create IGW, browse to : VPC >> Internet gateways >> Create internet gateway

Once IGW is created, we need to attach it to VPC to do this open IGW created >> Actions >> Attach VPC
You can have only one IGW attached to one VPC and AWS design it to be always highly available.
Step 4: Create a new route tables
When you create any new subnets within a custom VPC, by default they can communicate with each other, across availability zones. Also, Any subnet created and assigned to a custom VPC will be automatically associated with the main route table (the main route table is the one that was created by default while creating VPC).
And if you make the main route table public, then any subnet created will by default be associated with the main route table and so it will be public. So, this is a security concern. To avoid this issue, we will keep the main route table private and will create a separate route table which will be public, and any subnet to be public, it has to be associated with the public route table.
Create a public route table – VPC >> Create Route tables
Name the route table as “my-public-route” and assign it to a custom VPC. Now we have 2 route tables, one is the main route table which is private, and the other route table which we will make public.
To make the second route table public, we will create routes by editing the route of the route table and adding details below.
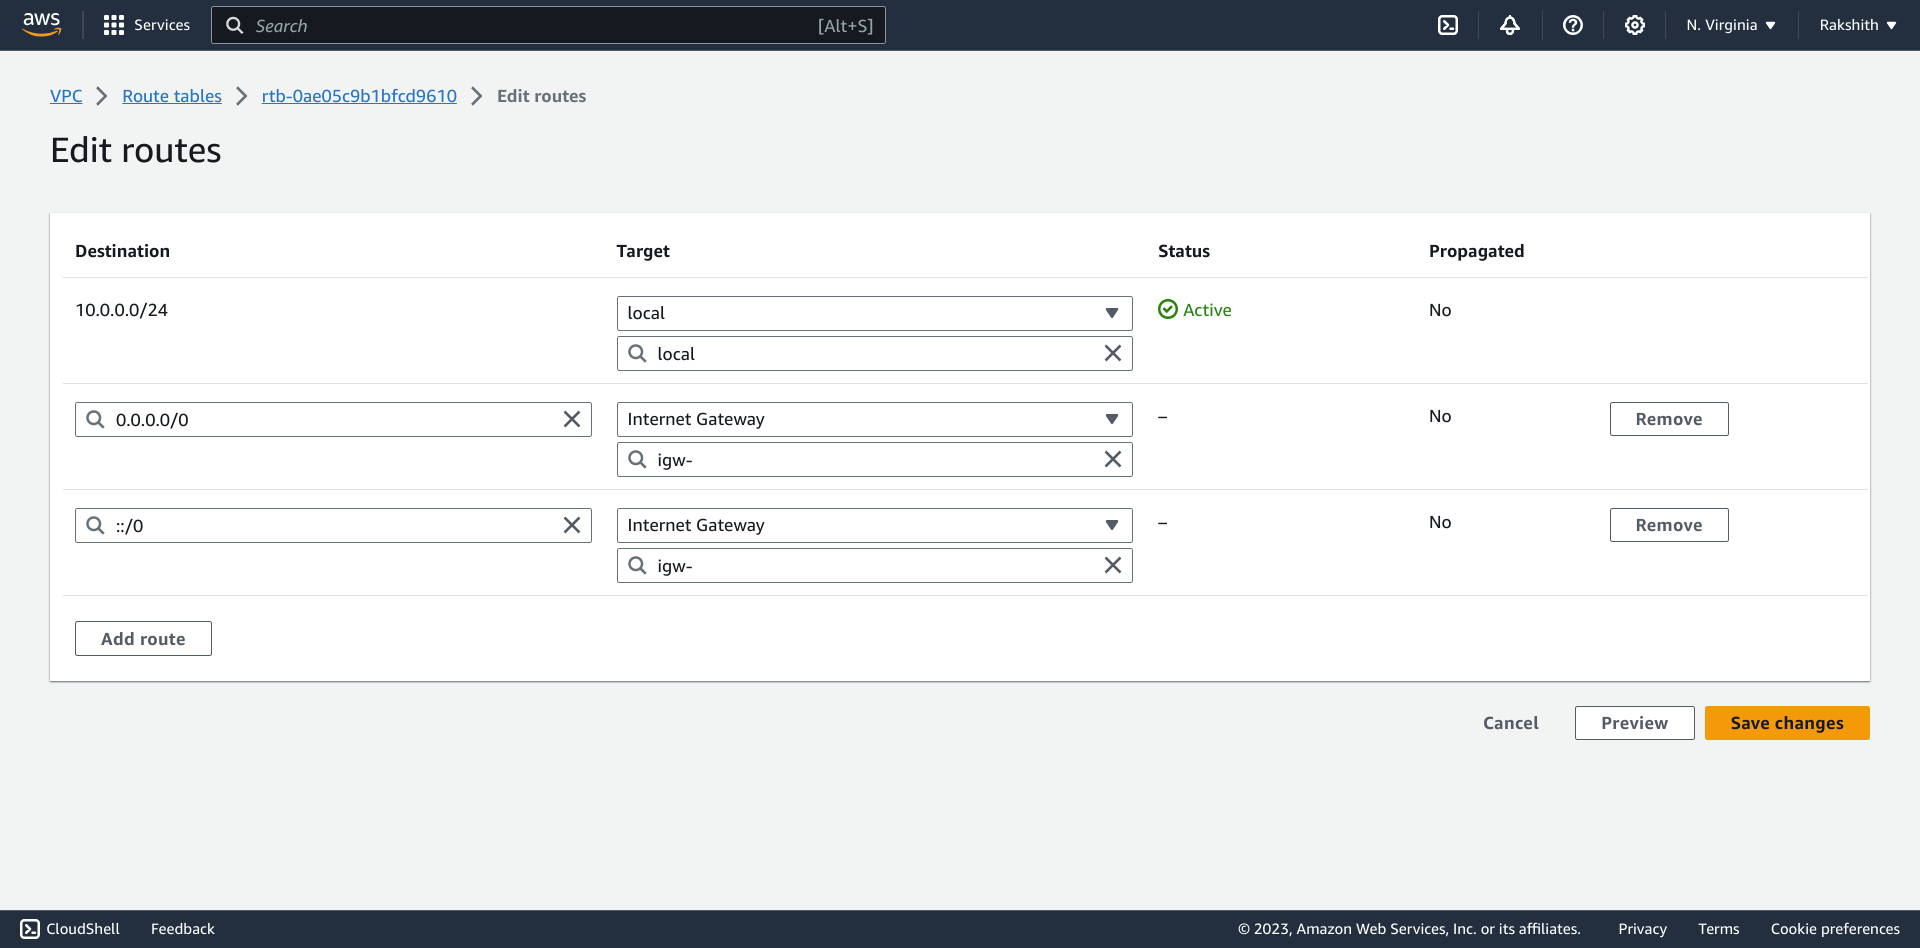

Now we have routed out for IP4 and IPV6 to our internet gateway for the public route table. Now any subnet associated with this route table will become public. Now we will associate the public subnet to this route table.
Select the created RT >> Actions >> Edit subnet association – add public subnet
Differences in the setting of public and private subnets :
- For public subnets, the “auto assign public IPV4 address” is enabled. It is done so, by selecting the desired subnet and clicking on Actions->> Modify Auto Assign IP settings.
- The public subnet is associated with the public route table and the private subnet is associated with the main route table. The main route table doesn’t have access to outside work, whereas the public route table has access to the outside world.
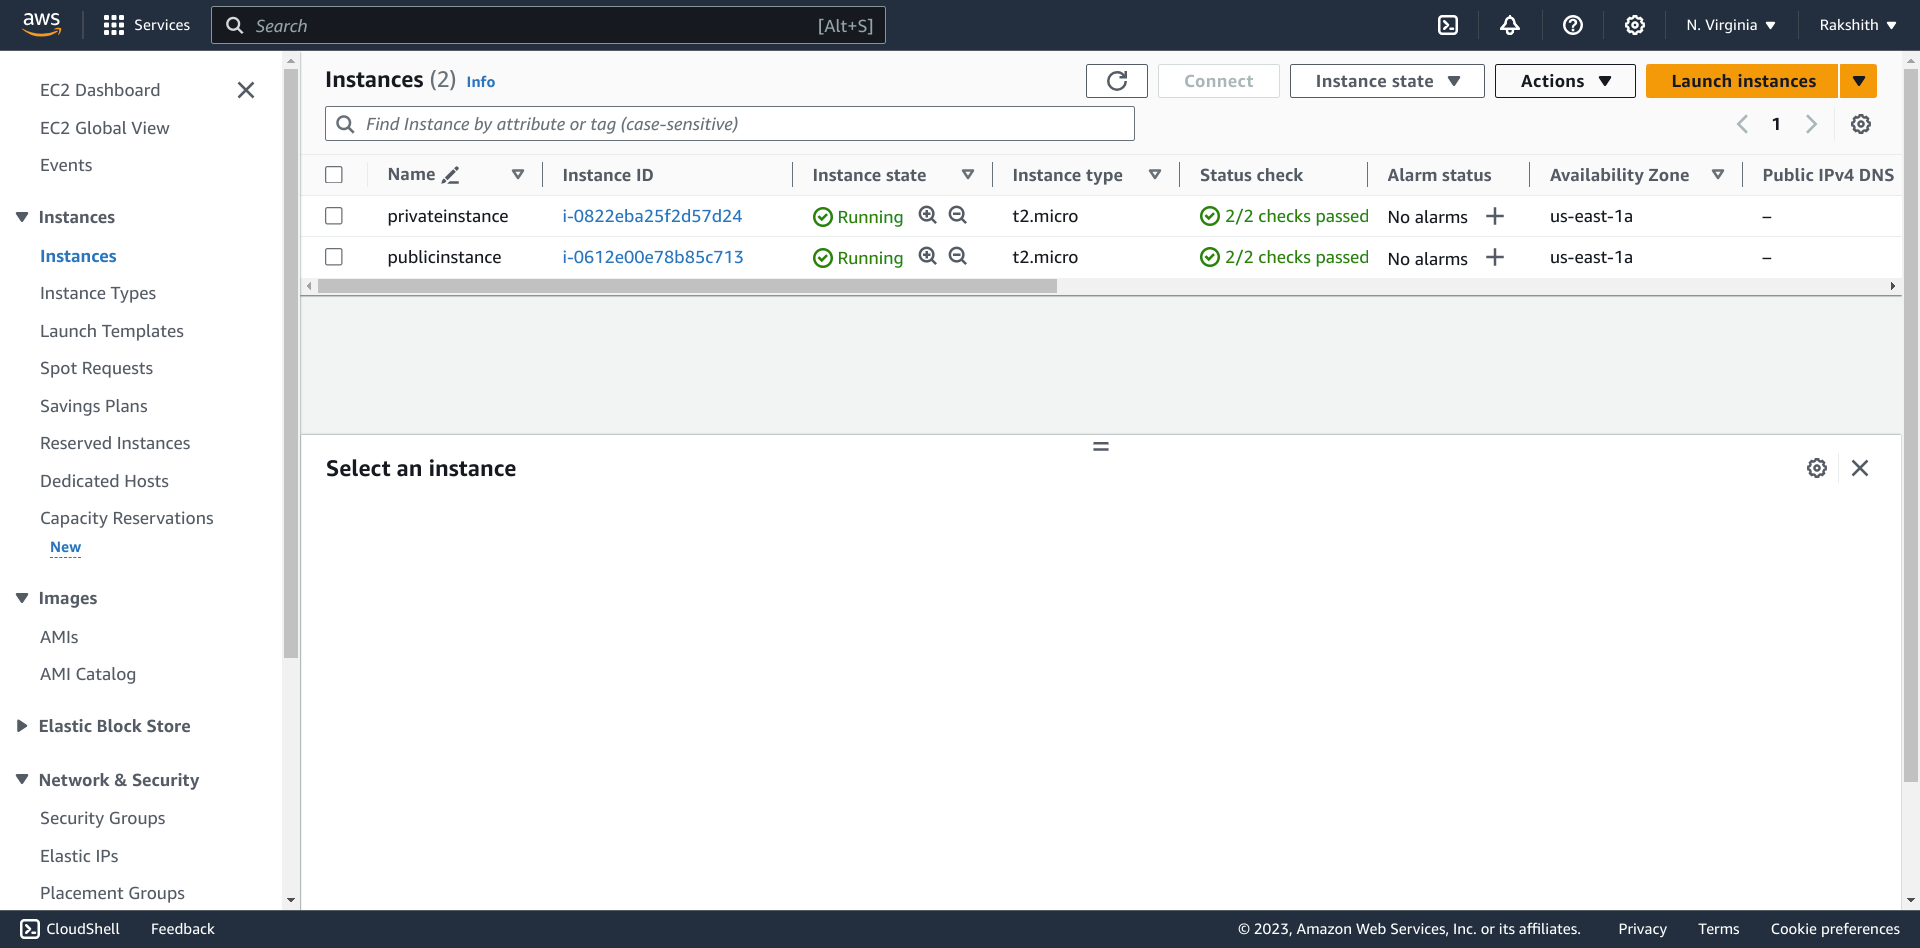
Create two instances – one in a private subnet and one in a public subnet.
Also create 2 security groups, one for public subnet and one for private subnet. In the security group of the private subnet, you allow access to all ports from the security group of the public subnet.
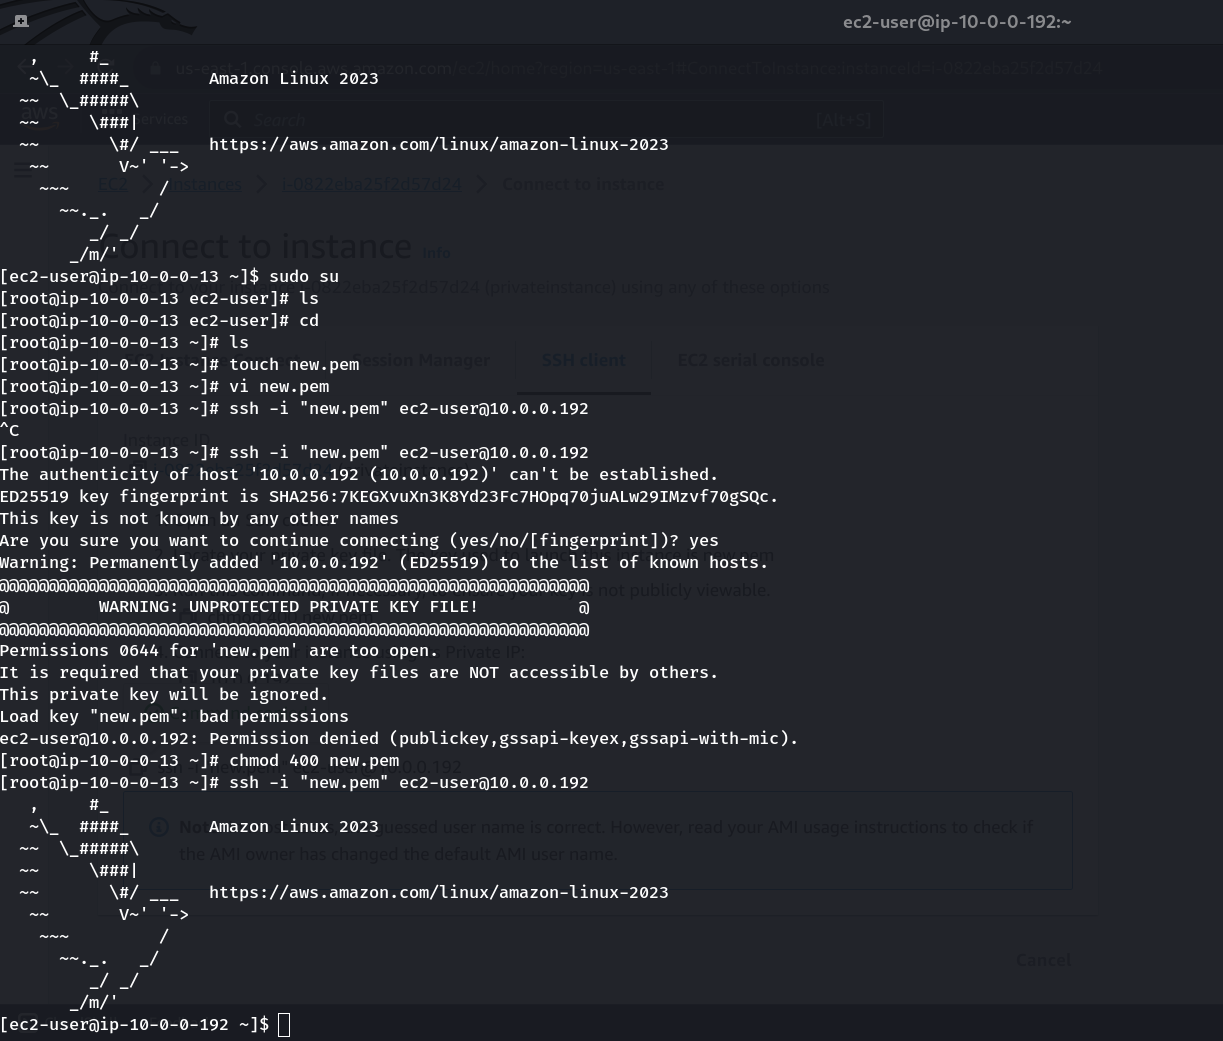
Connect to public and private instances.
Open the local machine terminal and ssh (using Putty) to the public instance.
To connect to a private instance, copy the content of the PEM file. Run:
cat yourpemfile.pem #copy the content
Open the terminal of the public instance you connected with ssh and Run:
touch new.pem
vi new.pem #opens file and paste the copied key here and save
chmod 400 new.pem
ssh -i "new.pem" username@ip
Now connect to private instance from public instance with ssh
— From the public instance you can run commands like “yum install -y wget” or “yum update” as it’s open to the outside world, but from the private instance these commands will not work. To make the commands work from the private instances, we need to create a NAT gateway and assign it to a public subnet. And then add NAT gateway in the “routes” of the existing default main route table (as private subnet is associated with the default main route table)
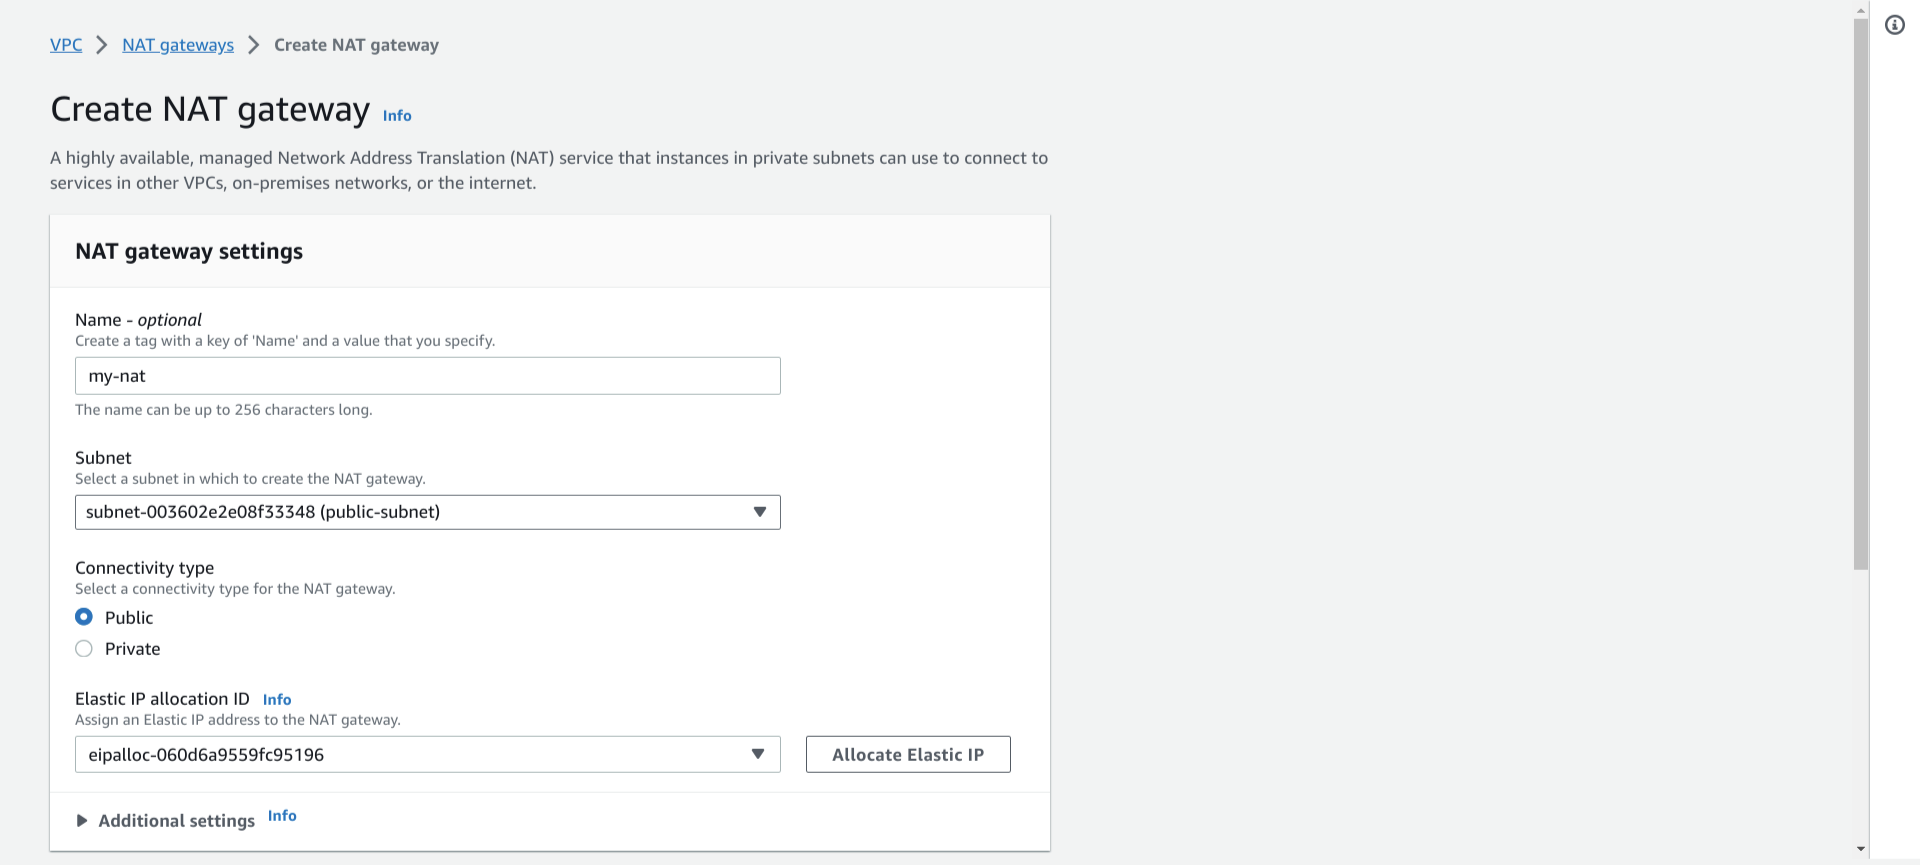
Step 6: Create a new NAT gateway
Create a new NAT gateway and assign it to a public subnet.
VPC dashboard >> NAT gateway >> create
Add a new NAT gateway in the “routes” of the existing default main route table (as a private subnet is associated with the default main route table)

Now the commands will work from private instances too, so the private instance can access to the outside work using NAT gateway.
Excellent guide! The step-by-step instructions made building an AWS VPC manually straightforward. I was able to follow along easily and set it up without any problems. Thanks for the clear explanations!
Very helpful guide! The clear, step-by-step instructions made creating an AWS VPC from scratch much easier. I followed the process without any trouble. Appreciate the detailed explanations!
Awesome project to clear concepts in networking.