Ansible:
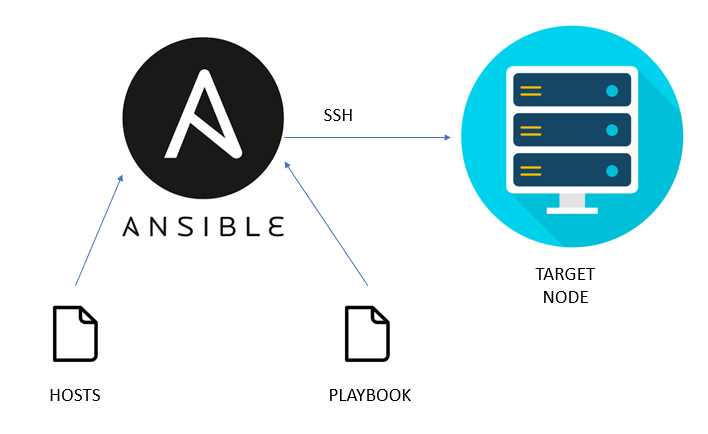
Ansible is an open-source automation tool used for configuration management, application deployment, task automation, and orchestration. It employs declarative language to define the desired state of infrastructure, operates in an agentless manner, and uses simple YAML scripts called playbooks to execute tasks across multiple machines. Ansible is widely used in IT operations, DevOps, and system administration to automate routine tasks, enforce consistency, and streamline the management of infrastructure.
Steps:
Step 2: Install Ansible in the Ansible control node
Step 3: Connect the ansible control node with the managed nodes and check for connectivity
Step 4: Perform some task , like:
Step 9: Create encrypted files with ansible
Step 10: Setup Ansible Dynamic Inventory
Step 1: Launch ec2 instances
Launch ec2 instances: 1 for the Ansible control node and 2 as managed (target) node
Launch one instance with Amazon Linux OS as ansible master and 2 others as client machines. In the 2 client machine create one with Amazon Linux OS and the other with Ubuntu.
We will be installing Ansible in the master machine and configuring the other 2 as Ansible client machines.
Step 2: Install Ansible in the Ansible control node
SSH into the host machine and execute the below command to install Ansible:
sudo su

yum update -y

yum install ansible -y
Step 3: Connect the ansible control node with the managed nodes and check for connectivity
Ansible uses an inventory file that holds the data of worker machines(IPs) to be connected with the host machine.
— Let’s connect our host machine with client machine and check its status.
cd /etc/ansible/

mkdir .ssh

cd .ssh

vi my_key #Paste your private key value (.pem) to ssh

cd ..

chmod 600 ./.ssh/my_key
Create new host files (used as an inventory file) to store the IP addresses of client nodes.
vi hosts                              #here “hosts” file is the inventory file

#Paste the below content with ip of your worker machine
[workers]
worker1 ansible_host=23.22.80.52 ansible_user=ec2-user ansible_ssh_private_key_file=./.ssh/my_key
worker2 ansible_host=53.22.34.52 ansible_user=ubuntu ansible_ssh_private_key_file=./.ssh/my_key
To check for connectivity, run the ping command :
ansible all -i hosts -m ping
Execution of tasks on machines through Ansible can be primarily done in two ways i.e. AdHoc Commands and Playbooks.
The Below table lists the common differences between ad-hoc commands and playbooks.
1)Ad hoc 2) Playbooks
| Aspect | Ad Hoc Commands | Playbooks |
|---|---|---|
| Purpose | Quick tasks, one-off operations, testing. | Configuration management, automation, complex tasks. |
| Execution Method | Command line using ansible command. | YAML file executed using ansible-playbook command. |
| Syntax | Simple one-liners. | Structured YAML with tasks, plays, and roles. |
| Control Flow | Limited to simple tasks, less control flow capabilities. | Supports advanced control flow, conditional statements. |
| Reusability | Less reusable, designed for immediate use. | Highly reusable, can be organized into roles. |
| Modularity | Limited modularity. | Highly modular with roles, tasks, and variables. |
| Examples | ansible all -m ping | ansible-playbook -i <inventory> example_playbook.yml |
| Parallel Execution | Yes, can execute tasks on multiple hosts in parallel. | Yes, tasks can run in parallel across different hosts. |
| Immediate Execution | Suitable for immediate execution of tasks. | Suitable for automation, ensuring consistency. |
| Task Complexity | Simple, one-off tasks. | Suitable for complex automation with multiple tasks. |
Ad hoc commands in Ansible:
– Simple syntax:
ansible <host-pattern> -m <module> -a <module-arguments>
Step 4: Perform some tasks, like:
Ping:
A few flags are as:
-m – module
-a – arguments
-b – sudo privileges
ansible all -i hosts -m ping #Tries to connect with registered nodes

Run a command:
Here command will be executed on worker machines directly
ansible all -i hosts -a "ls /path/to/directory" #give some path and verify
Copy a File:
Copy a file from your local machine to the managed nodes
-First, create a file from-master.txt in the master and run the below command to copy in nodes:
ansible all -i hosts -m copy -a "src=/etc/ansible/file_from_master.txt dest=/home/ec2-user/text.txt"Here content in file from_master.txt from the master machine is copied as text.txt in the worker machine
Install a Package:
Install a package on the managed nodes, using the ansible package manager. Here we are using module
ansible all -i hosts -m apt -a "name=package-name state=present" # For Debian/Ubuntu

ansible all -i hosts -m yum -a "name=package-name state=present" # For RHEL/CentOS/Amazon linux
To install git in the managed nodes using package manager, use below commands:
ansible worker1 -i hosts -m yum -a "name=git state=present" -b
ansible worker2 -i hosts -m apt -a "name=git state=present" -b

Execute a Shell Command:
Run a shell command on the managed nodes
ansible all -i hosts -a "command-to-run"

ansible all -i hosts -a "sudo yum install docker -y"
#or
ansible all -i hosts -a "yum install docker -y" -b

Step 5: Ansible Playbook
A playbook is a structured and reusable configuration file that defines a set of tasks to be executed on a group of hosts. Playbooks are written in YAML (YAML Ain’t Markup Language) and serve as a human-readable and machine-readable way to describe automation tasks.
A playbook typically consists of the following components:
Hosts: Specifies the target hosts or groups of hosts on which the tasks in the playbook will be executed. Hosts can be defined using patterns or explicitly listed.
Tasks: Describes a series of steps or actions to be performed on the target hosts. Each task is a module invocation, and modules are Ansible’s units of work. Tasks can include actions such as installing packages, copying files, restarting services, etc.
Variables: Allows the definition of variables that can be used in the playbook. Variables can be specific to hosts, groups, or global in scope.
Roles: Organizes tasks, variables, and other files into a reusable structure. Roles are a way to modularize and share Ansible content. Playbooks can include roles, and roles can include other roles.
Playbooks are executed using the ansible-playbook command, and they provide a powerful and flexible way to automate infrastructure configuration and management.
#Playbook for reference
---
- hosts: webservers
  tasks:
    - name: Install Apache
      apt:
        name: apache2
        state: present

    - name: Start Apache service
      service:
        name: apache2
        state: started
1. Playbook to install Chrome in managed nodes.
vi chrome_install.yml
#Paste the below playbook
-------------------------------------------------
- hosts: workers
  become: true
  vars:
    ansible_become_method: sudo
    ansible_become: yes
    ansible_become_user: root

  tasks:
    - name: Import Google Chrome GPG key (Debian-based)
      apt_key:
        url: https://dl-ssl.google.com/linux/linux_signing_key.pub
        state: present
      when: ansible_pkg_mgr == 'apt'

    - name: Import Google Chrome GPG key (Red Hat-based)
      rpm_key:
        key: https://dl-ssl.google.com/linux/linux_signing_key.pub
        state: present
      when: ansible_pkg_mgr in ['yum', 'dnf']

    - name: Add Google Chrome repository (Debian-based)
      apt_repository:
        repo: deb [arch=amd64] http://dl.google.com/linux/chrome/deb/ stable main
        state: present
      when: ansible_pkg_mgr == 'apt'

    - name: Add Google Chrome repository (Red Hat-based)
      yum_repository:
        name: google-chrome
        description: Google Chrome Repository
        baseurl: http://dl.google.com/linux/chrome/rpm/stable/x86_64
        gpgkey: https://dl-ssl.google.com/linux/linux_signing_key.pub
        state: present
      when: ansible_pkg_mgr in ['yum', 'dnf']

    - name: Update package manager cache (Debian-based)
      apt:
        update_cache: yes
      when: ansible_pkg_mgr == 'apt'

    - name: Update package manager cache (Red Hat-based)
      dnf:
        update_cache: yes
      when: ansible_pkg_mgr == 'dnf'

    - name: Install Google Chrome (Debian-based)
      apt:
        name: google-chrome-stable
        state: present
      when: ansible_pkg_mgr == 'apt'

    - name: Install Google Chrome (Red Hat-based)
      dnf:
        name: google-chrome-stable
        state: present
      when: ansible_pkg_mgr == 'dnf'

    - name: Verify Chrome installation
      command: google-chrome --version
      register: chrome_version
      ignore_errors: true

    - name: Print Chrome version
      debug:
        var: chrome_version.stdout_lines
      when: "'Google Chrome' in chrome_version.stdout_lines[0]"
Run the playbook using the following command:
ansible-playbook -i hosts example_playbook.yml
This playbook does the following:
- Installs necessary dependencies based on the distribution (LSB for Ubuntu and redhat-lsb-core for CentOS).
- Determines the package manager (
yumfor CentOS,aptfor Ubuntu). - Downloads Google Chrome repository file for CentOS.
- Imports Google Chrome signing key for CentOS.
- Installs Google Chrome on CentOS using
yumand on Ubuntu using the direct download link for the.debpackage. - Verifies that Google Chrome is installed by checking its version.
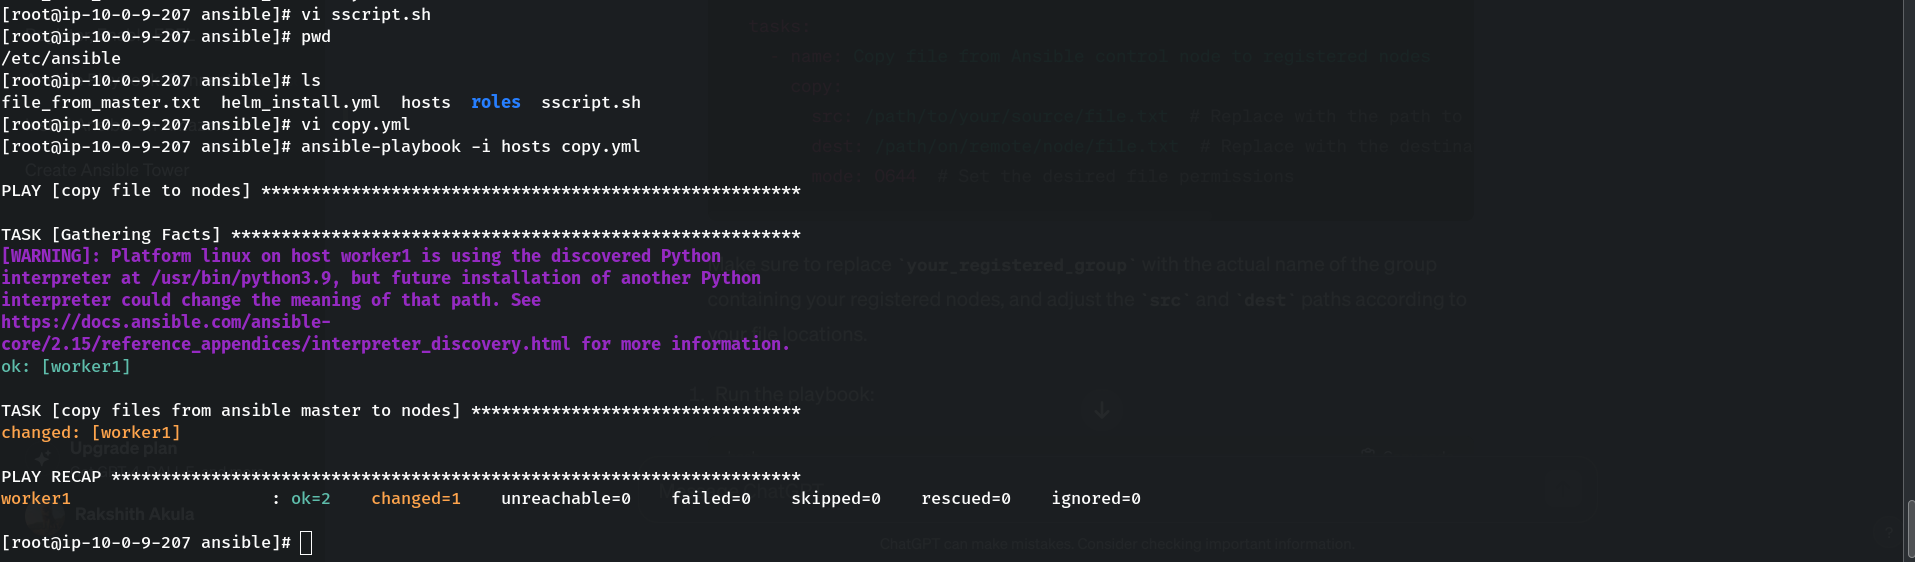
2. Playbook to Copy files to managed nodes from the control node
Create a file master in the control node
vi sscript.sh #for some commands
#Paste below commands
vi copy.yml #Playbook to copy file
#Use below playbook
-----------------------
- name: copy file to nodes
  hosts: workers
  become: true

  tasks:
    - name: copy files from ansible master to nodes
      copy:
	src: /etc/ansible/sscript.sh/
	dest: /home/ec2-user/worker/shellscript.sh
ansible-playbook -i hosts copy.yml
3. Playbook to execute shell script in nodes
To execute shell script in managed nodes from control node using playbook, write the playbook as mentioned below:
vi shellscript.yml
#Use the below playbook
---------------------
- name: copy file to nodes
  hosts: workers
  become: true

  tasks:
    - name: copy files from ansible master to nodes
      copy:
	src: /etc/ansible/sscript.sh/
        dest: /home/ec2-user/worker/shellscript.sh

    - name: Execute shell scripts
      command: /home/ec2-user/worker/shellscript.sh
ansible-playbook -i hosts shellscript.yml

4. A playbook to backup a file in the remote servers before copying it into the server
touch helloworld.txt

vi copy.yml
---
- hosts: workers
  tasks:
    - name: ansible copy file backup example
      copy:
        src: /etc/ansible/helloworld.txt
        dest: /tmp
        backup: yes

ansible-playbook -i hosts copy.yml
5. Playbook to Install, start, enable the nginx service, and then grep the nginx version and check the nginx service status on the host machine using Ansible
vi nginix.yml
#Playbook to install Nginix server
---
- name: Setup Nginx server on myserver list
  hosts: workers
  become: true
  tasks:
    - name: Install the latest version of Nginx
      package:
        name: nginx
        state: latest
      when: ansible_distribution == 'Amazon'

    - name: Install Nginx on Ubuntu
      apt:
        name: nginx
        state: present
      when: ansible_distribution == 'Ubuntu'

    - name: Start Nginx
      service:
        name: nginx
        state: started
        enabled: yes

    - name: Ensure nginx is at the latest version
      command: nginx -v

    - name: Get status of nginx installed
      command: systemctl status nginx
ansible-playbook -i hosts nginix.yml
Step 6: Ansible roles
Ansible Roles:
Ansible roles are a way to organize and package related tasks, handlers, variables, and files into a reusable structure. Roles make it easier to manage and share complex automation workflows. They provide a standardized and modular approach to organizing Ansible playbooks.
Here’s how to create a simple Ansible role:
Step 1: Directory Structure
Create the directory structure for a role. For example, let’s call the role “webserver.”
- Open a terminal.
- Run the following command to create a new Ansible role: ansible-galaxy init webserver
webserver/
├── tasks/
│   └── main.yml
├── handlers/
│   └── main.yml
├── templates/
├── files/
├── vars/
│   └── main.yml
├── defaults/
│   └── main.yml
└── README.md
- tasks/main.yml: Contains the main tasks for the role.
- handlers/main.yml: Contains handlers for the role.
- templates/: Directory for Jinja2 templates.
- files/: Directory for static files to be copied to the target.
- vars/main.yml: Contains variables for the role.
- defaults/main.yml: Contains default values for variables.
- README.md: Documentation for the role.
Step 2: Write Tasks
Edit the tasks/main.yml file with the main tasks you want the role to perform. For example, let’s create a role to install and start the Apache service.
# webserver/tasks/main.yml
vi webserver/tasks/main.yml
---
- name: Install Apache
  apt:
    name: apache2
    state: present

- name: Start Apache service
  service:
    name: apache2
    state: started
Step 3: Write Handlers
Edit the handlers/main.yml file with any handlers you need for the role. Handlers are tasks that respond to notifications from other tasks.
# webserver/handlers/main.yml
vi webserver/handlers/main.yml
---
- name: Restart Apache
  service:
    name: apache2
    state: restarted
Step 4: Write Variables
Edit the vars/main.yml file to define variables for the role.
# webserver/vars/main.yml
vi webserver/vars/main.yml
---
apache_port: 80
Step 5: Write Defaults
Edit the defaults/main.yml file to provide default values for variables.
# webserver/defaults/main.yml
vi webserver/defaults/main.yml
---
apache_port: 80
Step 6: Use the Role in a Playbook
You can now use your role in an Ansible playbook.
cd /etc/ansible/
vi playbook.yml
# playbook.yml
---
- hosts: worker2
  roles:
    - webserver
Step 7: Run the Playbook
Run the playbook using the following command from the ansible root directory:
ansible-playbook -i hosts playbook.yml -b
Browse the webpage with <ip> of ubuntu worker machine and should see apache server info on webpage
Step7: Ansible Galaxy
Ansible Galaxy is a platform for sharing, finding, and managing Ansible content. It provides a centralized hub where you can discover and share roles, collections, and other Ansible content. Ansible content available on Galaxy can be easily reused, which accelerates automation development.
Here are key components and concepts related to Ansible Galaxy:
- Roles:
- Roles are a way of organizing and distributing Ansible content.
- They provide a structured way to organize tasks, variables, and other content.
- Roles can be used to encapsulate reusable functionality and share it across different projects.
- Roles can be created manually or downloaded from Ansible Galaxy.
- Collections:
- Collections are a more recent addition to Ansible and include roles, modules, and plugins.
- Collections provide a way to organize and distribute Ansible content more flexibly.
- Collections can be installed from Ansible Galaxy and used in your playbooks.
- Ansible Galaxy Command-Line Interface (CLI):
- The ansible-galaxy command-line tool is used to interact with Ansible Galaxy.
- It allows you to search, download, and install roles and collections.
- Ansible Galaxy Website:
- The Ansible Galaxy website is the online platform where you can explore and search for roles and collections.
- Roles and collections on Ansible Galaxy are versioned, making it easy to reference a specific version in your playbooks.
The ansible-galaxy init command is used to initialize a new Ansible role with a standardized directory structure, and it does not create an entire Ansible Galaxy. Roles created with ansible-galaxy init can be used within your Ansible projects and can also be shared with others through Ansible Galaxy if you choose to publish them.
Step 8: LAMP stack
LAMP stack
LAMP is an acronym that stands for Linux, Apache, MySQL, and PHP/Python/Perl. It represents a popular and widely used software stack for building and deploying web applications. Each component in the stack serves a specific role in web application development and hosting:
- Linux (Operating System):
- The “L” in LAMP represents the Linux operating system. Linux is a widely used open-source Unix-like operating system that provides a stable and secure foundation for web applications.
- Apache (Web Server):
- The “A” in LAMP represents the Apache HTTP Server. Apache is a robust and highly configurable open-source web server. It is one of the most widely used web servers globally and plays a crucial role in serving web pages to users.
- MySQL (Database):
- The “M” in LAMP represents MySQL. MySQL is an open-source relational database management system (RDBMS). It is used for storing and managing the application’s data. MySQL is known for its reliability, performance, and ease of use.
- PHP/Python/Perl (Programming Language):
- The “P” in LAMP represents a programming language used to build dynamic web applications. While PHP is the most common choice, alternatives like Python and Perl can also be used. These languages enable developers to embed dynamic content within web pages and interact with databases.
The LAMP stack provides a comprehensive environment for developing and deploying web applications. It has been widely adopted for its flexibility, cost-effectiveness, and the strong community support surrounding each of its components.
In addition to LAMP, variations such as MEAN (MongoDB, Express.js, AngularJS, Node.js) and MERN (MongoDB, Express.js, React, Node.js) have emerged, introducing different technologies to serve similar purposes. Each stack caters to different use cases and preferences.
Create a LAMP stack and deploy a webpage by using Ansible.
Here we will sample a webpage in Ubuntu server
In the ansible control node in the root directory create an index.html file.
cd /etc/ansible

mkdir index

vi /index/index.html
#paste any code, like
Hellow World
Create a playbook for LAMP
vi lamp.yml
---
- hosts: worker2
  tasks:
    - name: Add ppa repository
      become: yes
      apt_repository:
        repo: ppa:ondrej/php

    - name: Install lamp stack
      become: yes
      apt:
        pkg:
          - apache2
          - mysql-server
          - php7.0
          - libapache2-mod-php7.0   # Include libapache2-mod-php7.0 for Apache and PHP integration
          - php7.0-mysql
        state: present
        update_cache: yes

    - name: Start apache server
      become: yes
      service:
        name: apache2
        state: started
        enabled: yes

    - name: Start mysql service
      become: yes
      service:
        name: mysql
        state: started
        enabled: yes

    - name: Create target directory
      become: yes
      file:
        path: /var/www/html/index
        state: directory
        mode: 0755

    - name: Deploy index.html
      become: yes
      copy:
        src: /etc/ansible/index/index.html
        dest: /var/www/html/index.html
 Now access the webpage with <ip of ubuntu machine> you should see your webpage
eg: http://ec2-13-233-121-118.ap-south-1.compute.amazonaws.com/index.html
Step 9: Create encrypted files with ansible
Encrypted files in Ansible are useful for securing sensitive information such as passwords, private keys, or other confidential data that might be used within playbooks or roles. Ansible provides a way to encrypt files using the ansible-vault command, which allows you to protect sensitive information and store it in a secure manner.
Ansible provides the ansible-vault command for managing encrypted files. You can use ansible-vault to create, view, edit, and encrypt sensitive data such as passwords or secret keys within your Ansible projects.
Here are the basic steps to create an encrypted file using ansible-vault:
1. Create a New Encrypted File
To create a new encrypted file, you can use the following command:
ansible-vault create secret_file.yml
2. Edit an Existing Encrypted File
If you already have an encrypted file and need to edit it, you can use the following command:
ansible-vault edit secret_file.yml
This command decrypts the file, allowing you to edit its content. After saving and closing the editor, Ansible re-encrypts the file.
3. View an Encrypted File
To view the contents of an encrypted file without modifying it, you can use:
ansible-vault view secret_file.yml
4. Encrypt an Unencrypted File
If you have a plain text file and want to encrypt it, you can use:
ansible-vault encrypt plain_text_file.yml
5. Decrypt an Encrypted File
If you need to decrypt an encrypted file for editing or inspection, you can use:
ansible-vault decrypt secret_file.yml
6. Rekey the Vault
To change the password or rekey an existing vault file, you can use:
ansible-vault rekey secret_file.yml
Step 10: Setup Ansible AWS Dynamic Inventory
Ansible Dynamic Inventory For AWS or Any Cloud Services.
Using Ansible with AWS, maintaining the inventory file will be a hectic task as AWS has frequently changed IPs, auto-scaling instances, and much more. So having a static inventory will never help us.
There are two types of inventory:
Static Inventory:- The inventory in which we need to put the IP address manually. This will never help us in a complex environment where we have a large amount of systems running and we keep on installing and uninstalling the systems. And the IPs keep on changing.
Dynamic Inventory:- However, there is an easy solution called ansible dynamic inventory. In our case, for AWS, Dynamic Inventory is an ansible plugin that makes an API call to AWS to get the instance information in the run time. It gives you the ec2 instance details dynamically to manage the AWS infrastructure.
Step 1: Ensure you have python3 & pip3 installed in your Ansible control node.
Most Linux operating system comes with phyton3. You can validate it using the following command.
python3 --versionIf you don’t have python3, you can install it using the following command.
For centos, Redhat
sudo yum -y install python3
sudo yum –y install python3-pip
For Debian, Ubuntu,
sudo apt-get install python3 -y
sudo apt-get install python3-pip -y
Step 2: Install the boto3 library. Ansible uses the boot core to make API calls to AWS to retrieve ec2 instance details.
sudo pip3 install boto boto3
Step 3: Create a file named aws_ec2.yaml in the inventory directory.
sudo vim aws_ec2.yaml
Copy the following configuration to the file. If you are running an ansible server outside the AWS environment, replace add your AWS access key and secret to the config file.
---
plugin: aws_ec2
aws_access_key: <YOUR-AWS-ACCESS-KEY-HERE>
aws_secret_key: <YOUR-AWS-SECRET-KEY-HERE>
keyed_groups:
  - key: tags
    prefix: tag
If your ansible server is running inside the AWS environment, attach an ec2 instance role with the required AWS ec2 permissions (Mostly describe instances). This way you don’t have to add the access and secret key in the configuration. Ansible will automatically use the attached role to make the AWS API calls.
Step 4: Open /etc/ansible/ansible.cfg file.
sudo vi /etc/ansible/ansible.cfg
Find the [inventory] section or create by yourself and add the following line to enable the ec2 plugin.
enable_plugins = aws_ec2
It should look something like this.
[inventory]
enable_plugins = aws_ec2
If you want to use the dynamic inventory as a default Ansible inventory, edit the /etc/ansible/ansible.cfg file and search for inventory parameters under defaults. Change the inventory parameter value as shown below.
[inventory]
enable_plugins = aws_ec2

[defaults]
inventory      = /etc/ansible/inventory/aws_ec2.yaml
remote_user = ec2-user
private_key_file = /etc/ansible/ssh/my_key
ask_pass = False
deprecation_warnings = False
Make sure you have your private key placed at path provided above if not do that.
Now if you run the inventory list command without passing the inventory file, Ansible looks for the default location and picks up the aws_ec2.yaml inventory file.
Step 5: Now let’s test the dynamic inventory configuration by listing the ec2 instances.
ansible-inventory --list
Step 6: Execute the following command to test if Ansible can ping all the machines returned by the dynamic inventory.
ansible all -m ping