Resources used:
Jenkins | Terraform | AWS – EKS, IAM, EC2, Load-balancer, Route53, S3, ECR
Steps:
Step 1: Create one ec2 instance for Jenkins Master and install Jenkins and pre-requisite software
Step 2: Initial setup of Jenkins in the Jenkins Master machine
Step 4: Create credentials in the Jenkins server(application) to connect Jenkins slave as a node
Step 5: Create a job —– 1_client-machine-setup job
Step 6: Create a job —– 2_clean_up_s3_bucket
Step 7: Create a job —– 3_build_code_and_create_docker_image
Step 8: Create a job —– 4_create_helm_pck_push_to_s3
Step 9: Create a job —– 5_create_eks_deploy_applin
Step 11: Create a job —- 7_destroy_eks_application
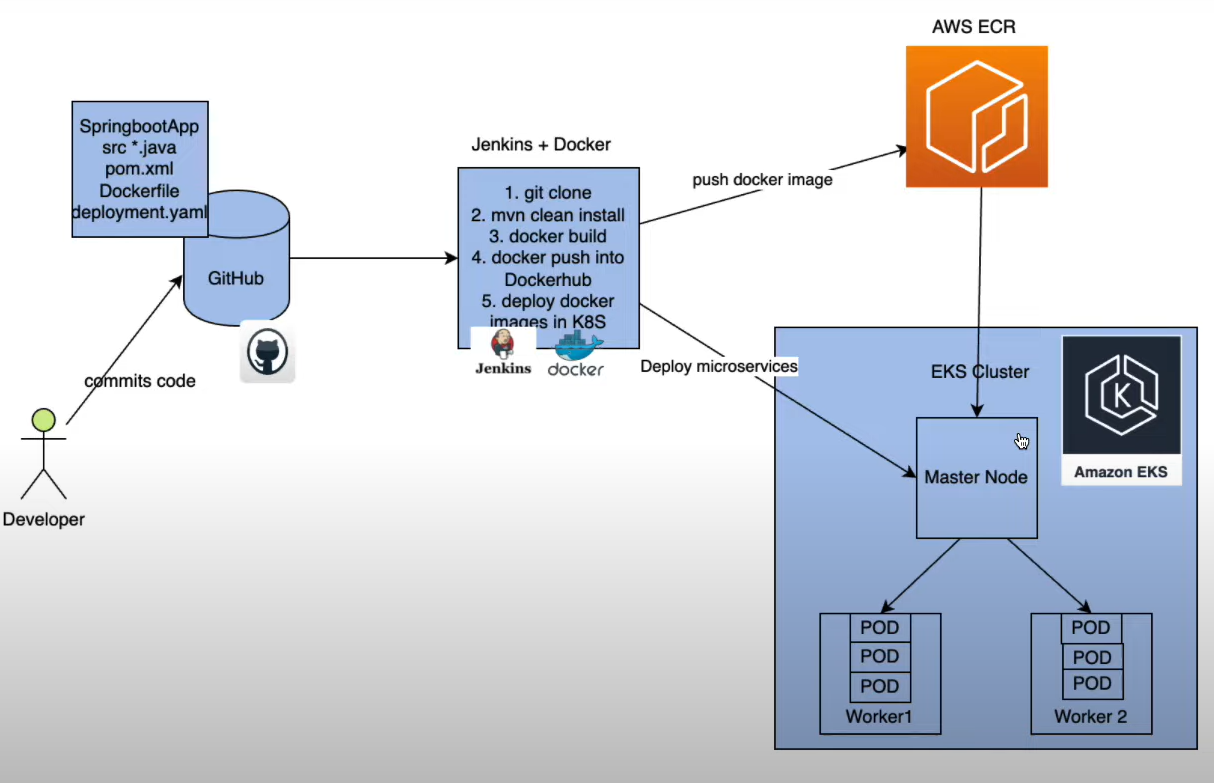
Flow Diagram
Step 1: Create one ec2 instance for Jenkins Master and install Jenkins and pre-requisite software
Create an EC2 instance of Amazon Linux2 machine with t2.micro and install Jenkins and pre-requisite software as mentioned below.
ssh into the machine and install git,java and jenkins
sudo su
yum install git -y
sudo amazon-linux-extras install java-openjdk11 -y
sudo wget -O /etc/yum.repos.d/jenkins.repo https://pkg.jenkins.io/redhat/jenkins.repo
sudo rpm --import https://pkg.jenkins.io/redhat-stable/jenkins.io-2023.key
sudo yum install -y jenkins
sudo systemctl start jenkins
sudo systemctl enable jenkins
Step 2: Initial setup of Jenkins in the Jenkins Master machine
Open Jenkins on port 8080 with URL <I.p of instance:8080>
Complete initial steps by creating a user <ref here>
Step 3: Create an IAM admin role, Launch an EC2 instance for Jenkins slave, with type as t3.medium, apply the IAM admin role to the instance, and install Java and git.
Reference to create IAM Role is at : <ref here>
Create EC2 Amazon Linux 2 machine – t3.medium type.
Install java11 and git in this slave machine.
amazon-linux-extras install java-openjdk11 –y
yum -y install git
Step 4: Create credentials in the Jenkins server(application) to connect Jenkins slave as a node
Adding credentials:
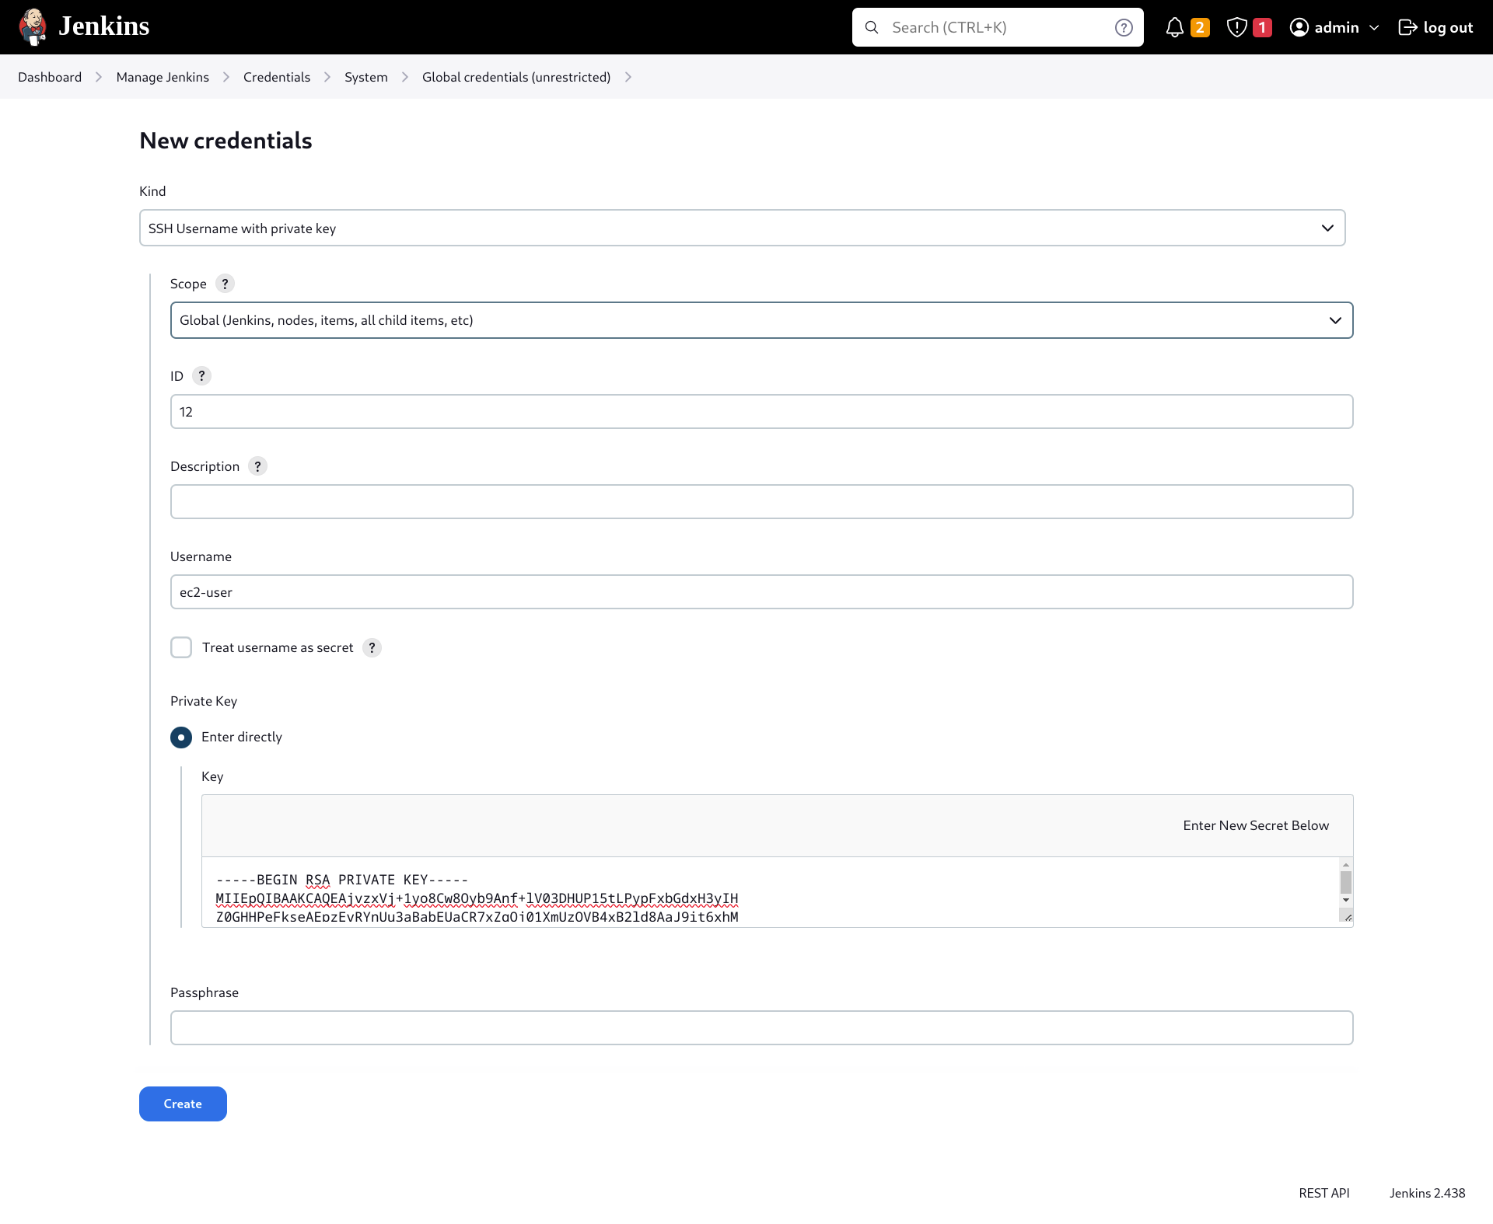
Navigate to: Manage Jenkins >> Credentials >> global >> add credentials
Here choose Kind as “SSH username with private key”. The “ID” can be any, but the “Username” should be “ec2-user” only and in the Private key paste content of the Private key(.pem/.ppk), that was selected while creating Jenkins slave (EC2) instance. Please refer below screenshot :
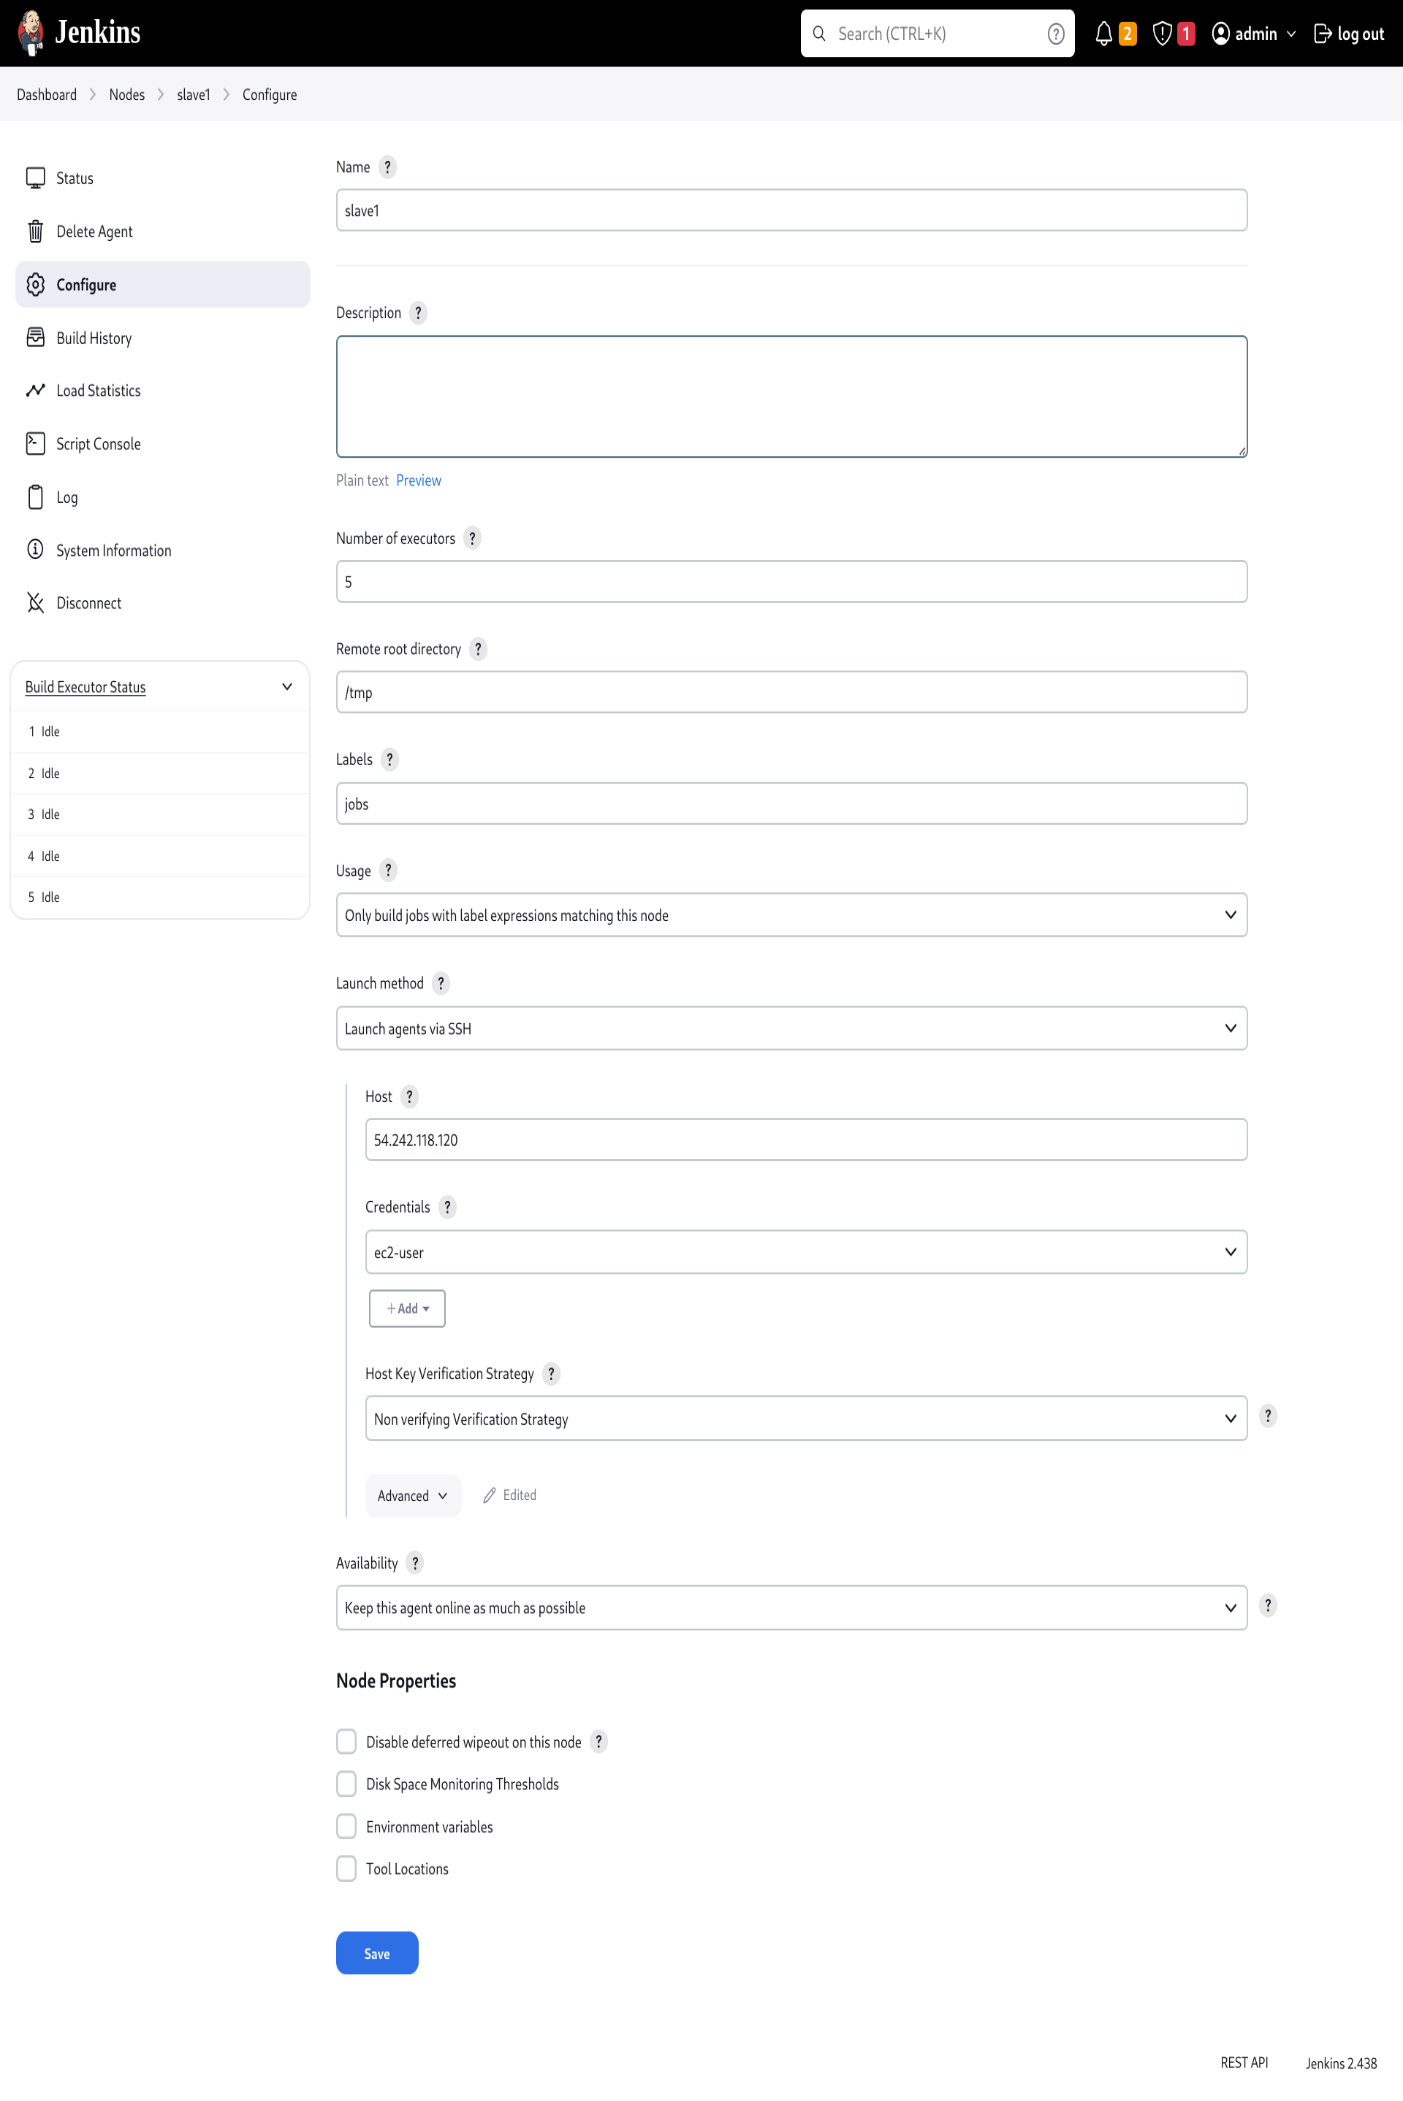
Adding node: Here we will be adding worker nodes/agents to run our jobs
Browse Jenkins-URL/computer
Add new node and give proper inputs as shown in the below snapshot.
In Host give the ip of the Jenkins slave machine (an instance where our jobs are to be run)
Install Jenkins rebuild plugin (this plugin helps in performing rebuild of Jenkins jobs) –
Manage jenkins >> plugins >> Available plugins >> Rebuilder – Install
Once plugin is installed, restart the server.
To restart jenkins, run below command in Jenkins master server:
systemctl restart jenkins or
from browser click >> jenkins-url/restart
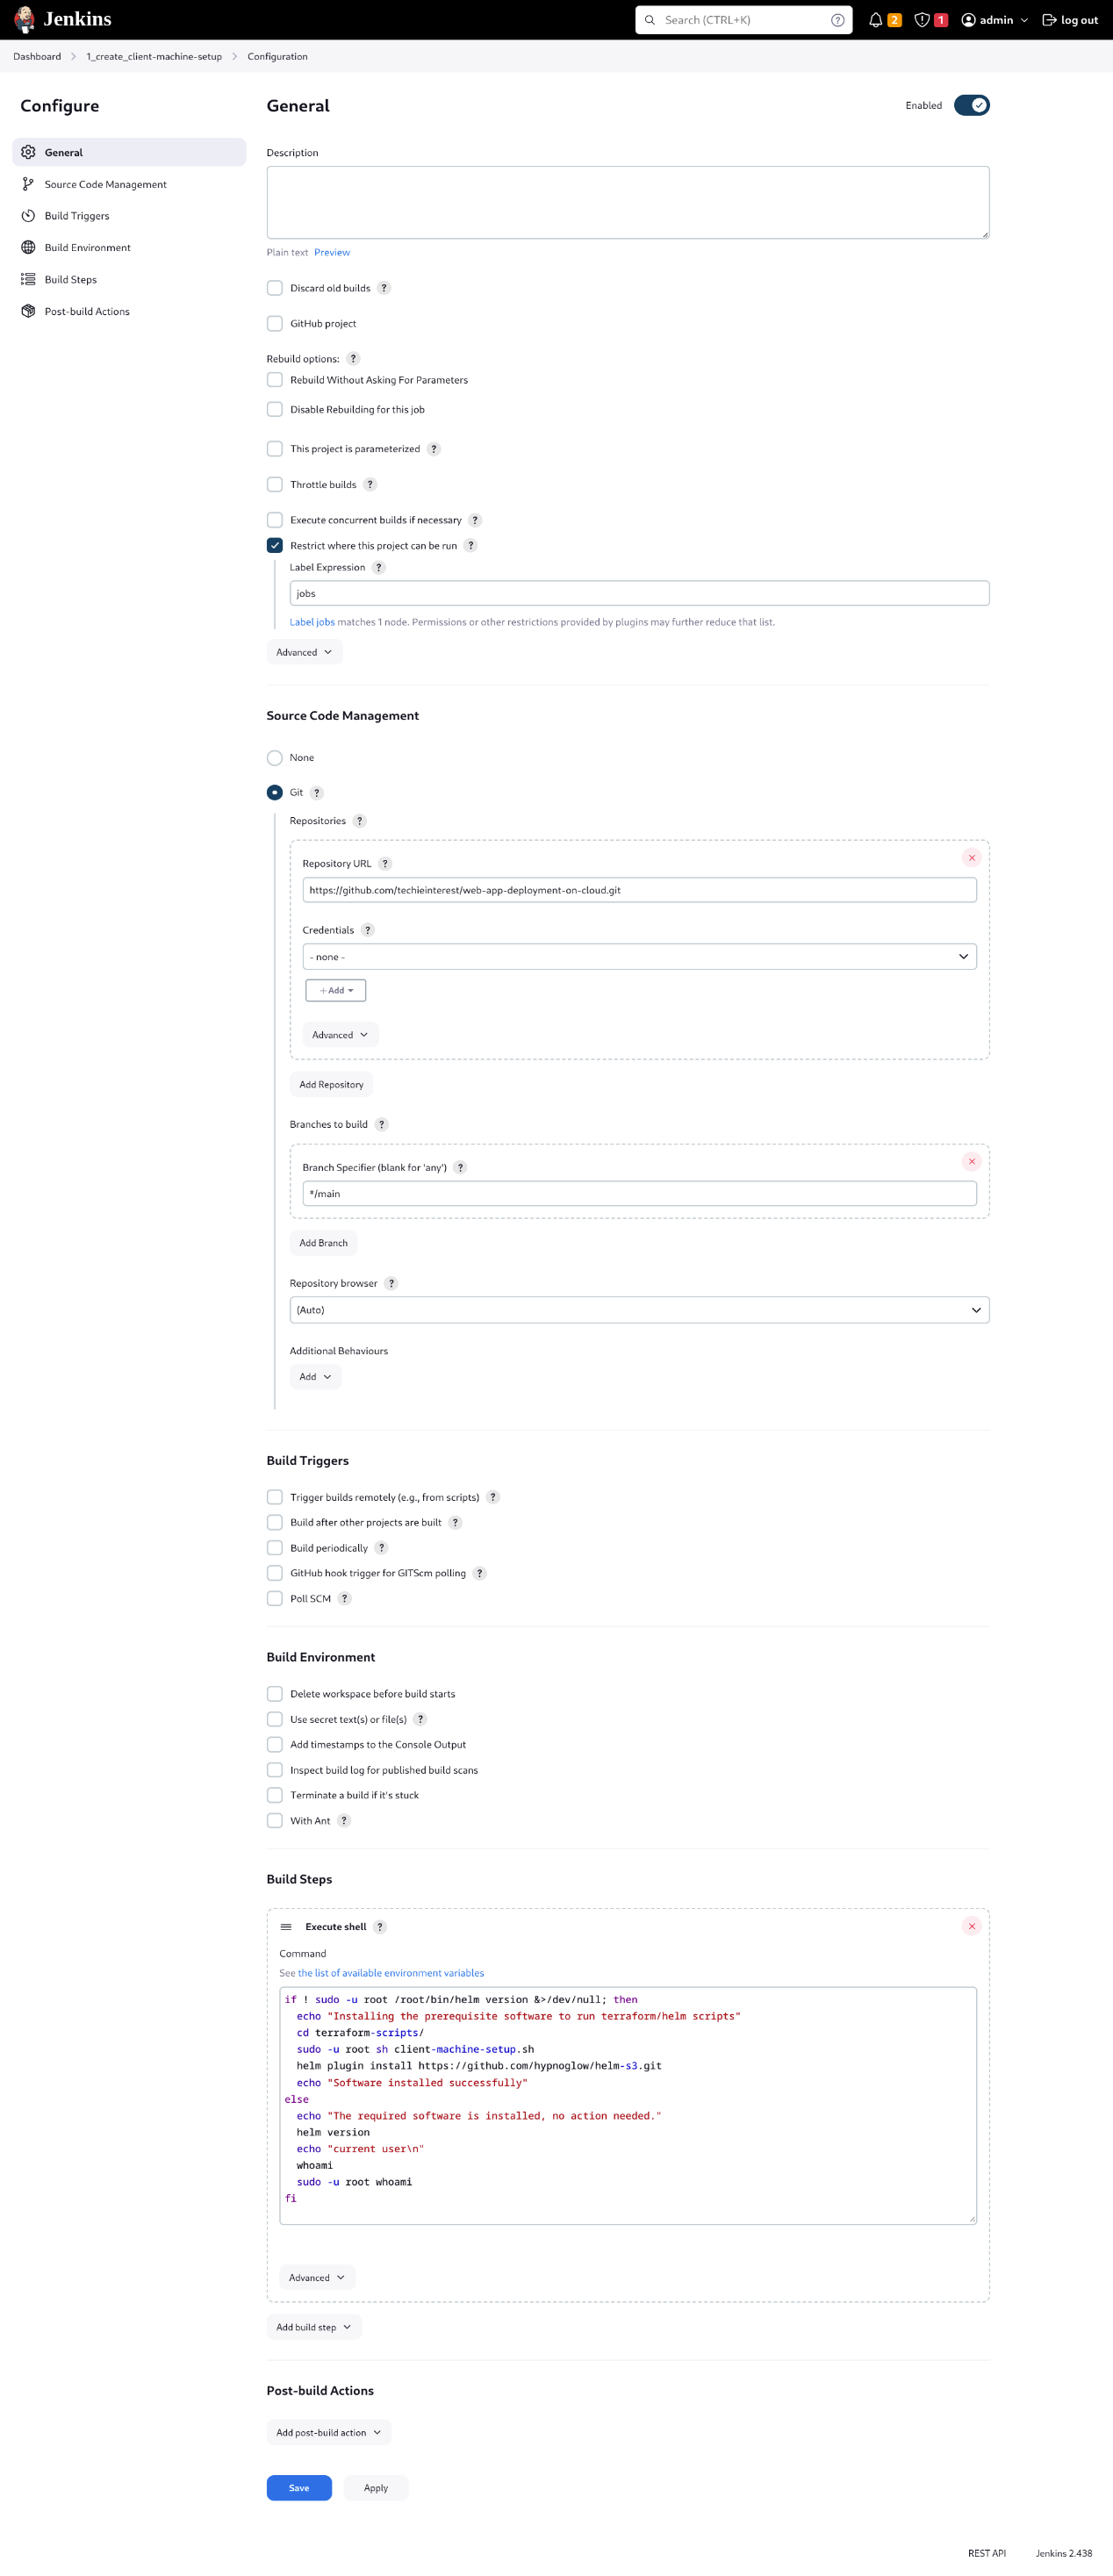
Step 5: 1.Create client-machine-setup job
This job installs the required softwares to run the application
Create a job
Jenkins dashboard >> new item >> Name — 1_create_client-machine-setup >> select — freestyle project
Configure:
“Restrict where this project can be run” to the label of jenkins client (can be “jobs” or any label)
SCM — select git and give repo url — https://github.com/devopsenlight/web-app-deployment-on-cloud.git
In build – select execute shell and copy the below code
if ! sudo -u root /root/bin/helm version &>/dev/null; then
  echo "Installing the prerequisite software to run terraform/helm scripts"
  cd terraform-scripts/
  sudo -u root sh client-machine-setup.sh
  helm plugin install https://github.com/hypnoglow/helm-s3.git
  echo "Software installed successfully"
else
  echo "The required software is installed, no action needed."
  helm version
  echo "current user\n"
  whoami
  sudo -u root whoami
fi
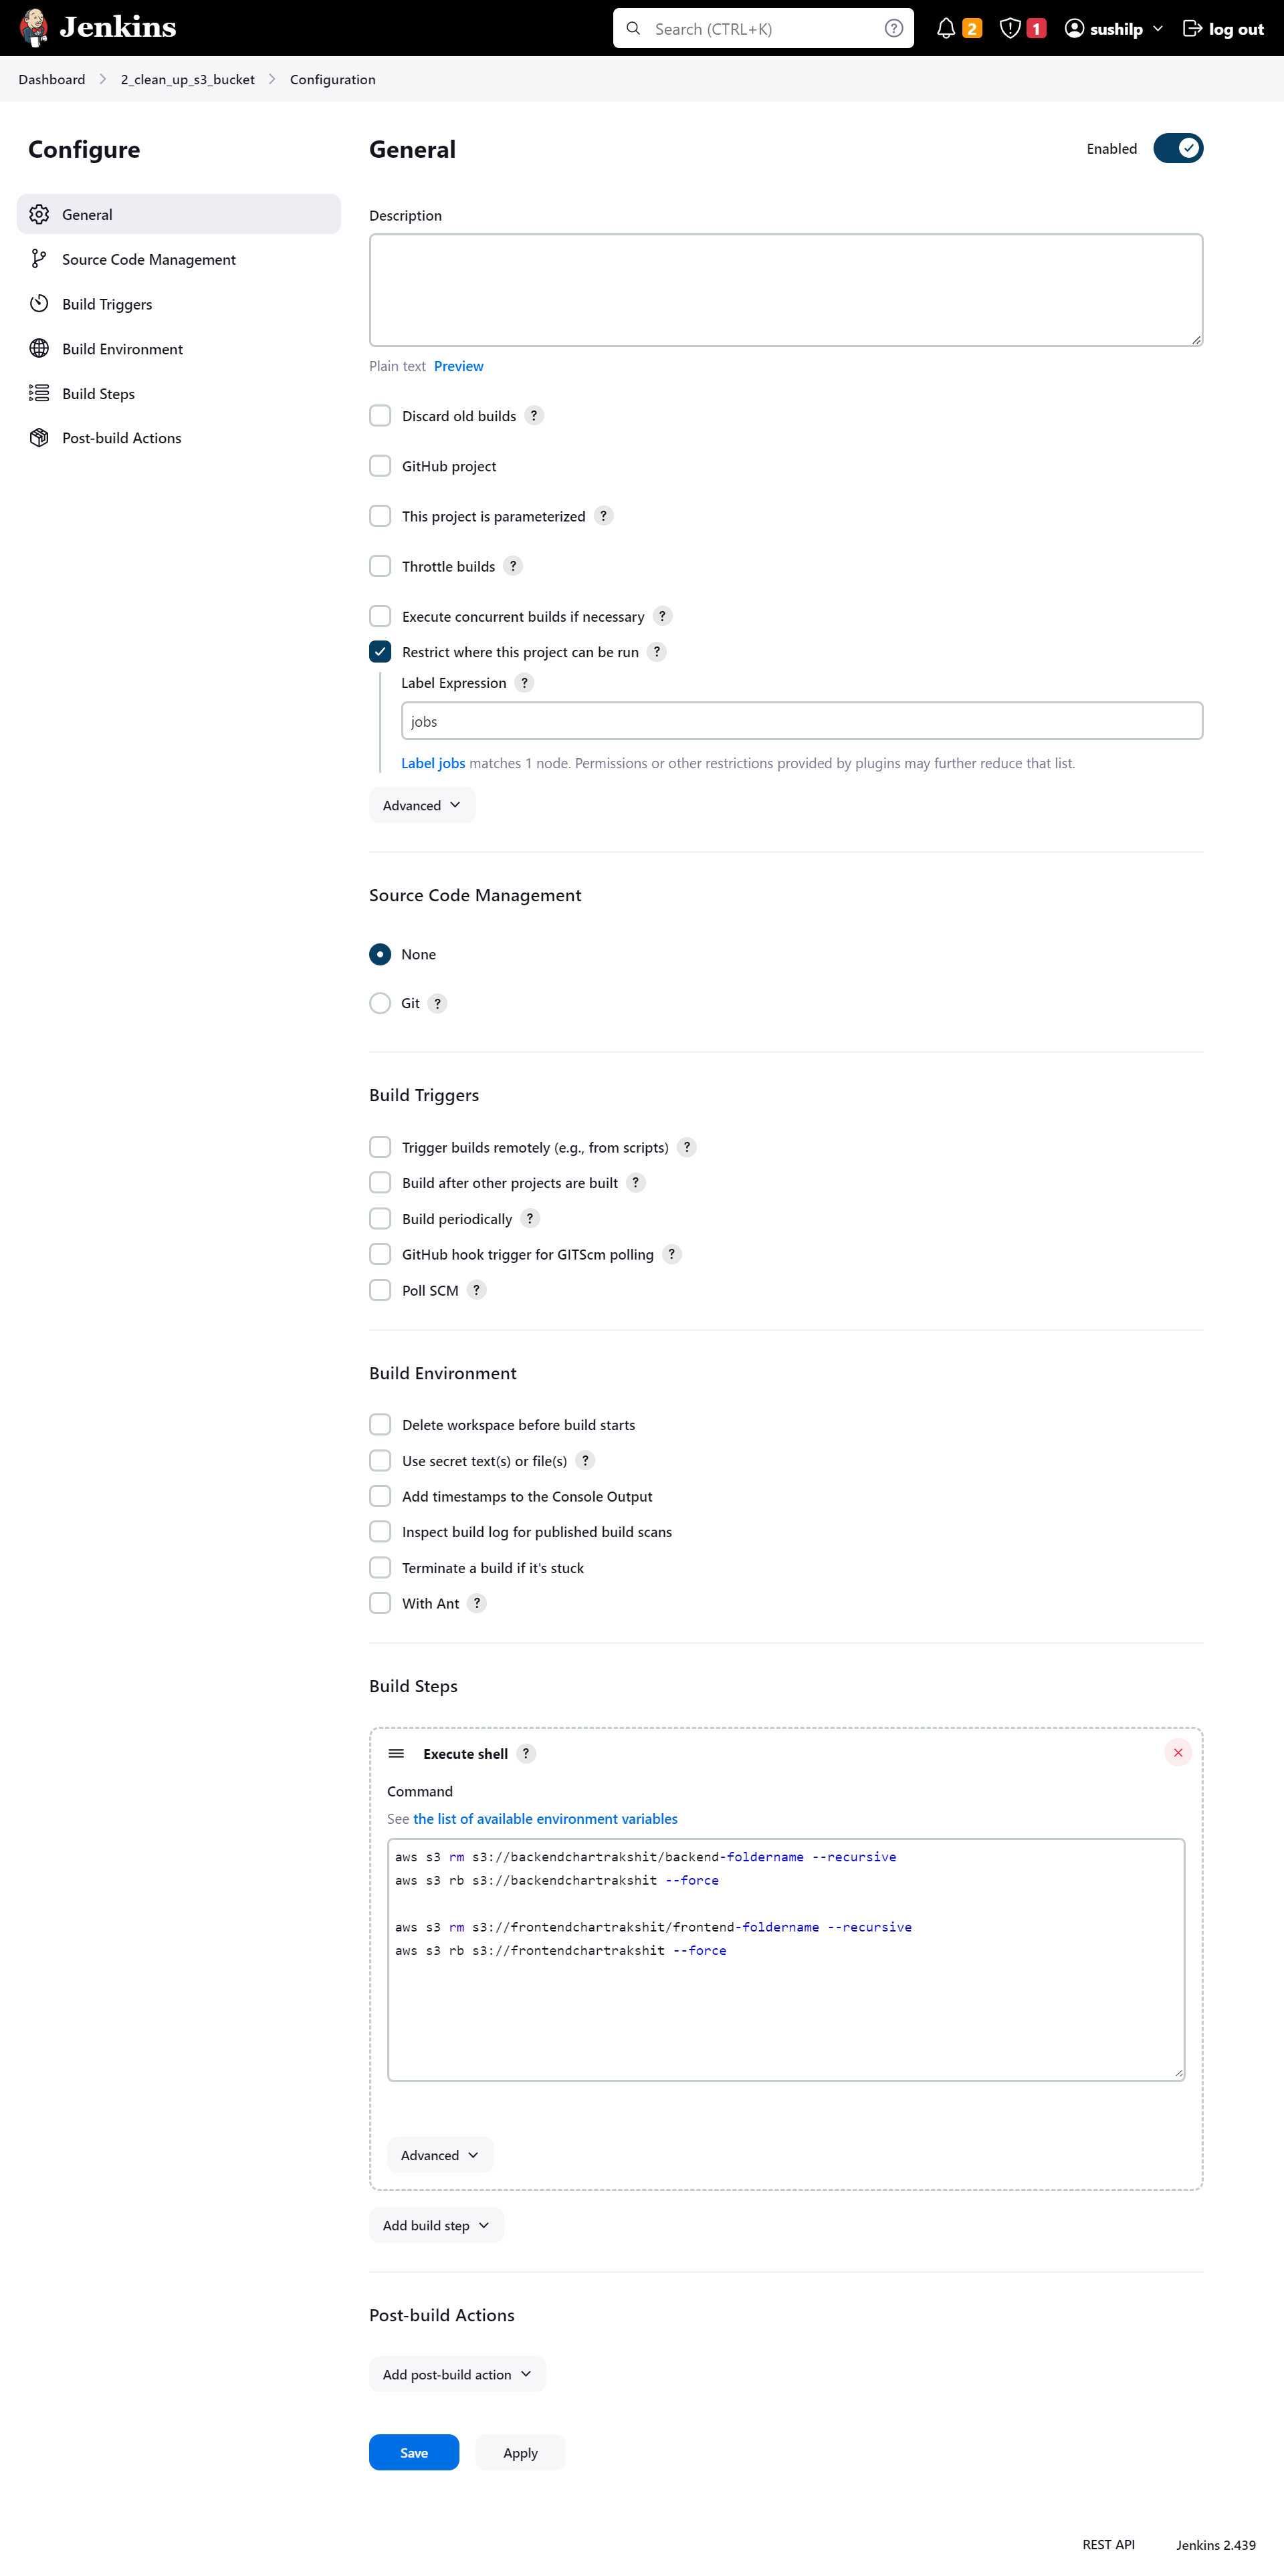
Step 6: Create a job —– 2_clean_up_s3_bucket
This job cleans up AWS S3 buckets if they are existing with below mentioned names
Create a job
Jenkins dashboard >> new item >> Name — 2_clean_up_s3_bucket >> select — freestyle project
Configure:
“Restrict where this project can be run” to the label of jenkins client (can be “jobs” or any label you created)
SCM — select git is not required here
In build – select execute shell and use the below code
aws s3 rm s3://backendchartrakshit/backend-foldername --recursive
aws s3 rb s3://backendchartrakshit --force

aws s3 rm s3://frontendchartrakshit/frontend-foldername --recursive
aws s3 rb s3://frontendchartrakshit --force
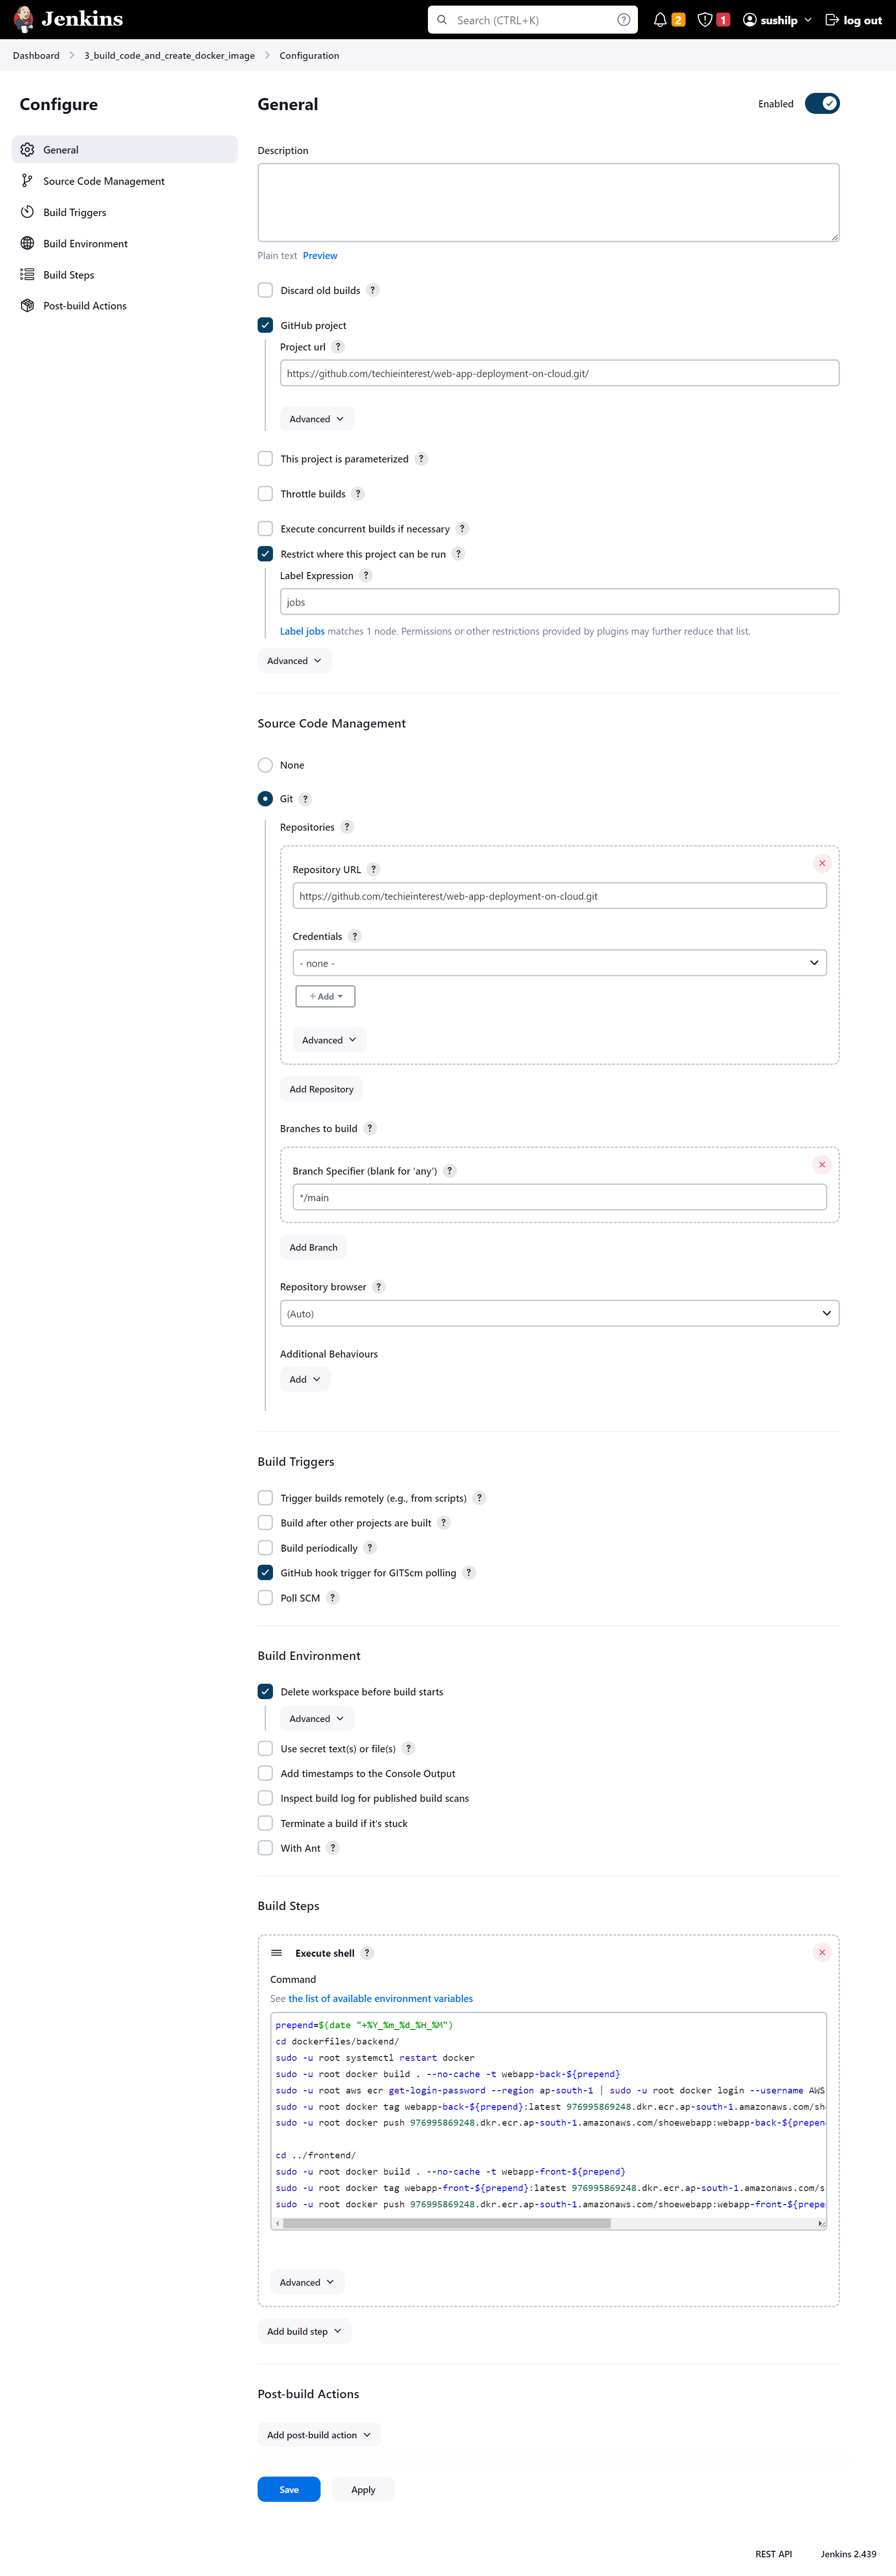
Step 7: Create a job —– 3_build_code_and_create_docker_image
This job builds docker image and pushes it to ECR
Create a job
Jenkins dashboard >> new item >> Name — 3_build_code_and_create_docker_image >> select — freestyle project
Configure:
“Restrict where this project can be run” to the label of jenkins client (can be “jobs” or any label)
SCM — select git and give repo url — https://github.com/devopsenlight/web-app-deployment-on-cloud.git
In build – select execute shell and copy the below code
In the below commands use tagging and pushing commands carefully since they are user specific
prepend=$(date "+%Y_%m_%d_%H_%M")
cd dockerfiles/backend/
sudo -u root systemctl restart docker
sudo -u root docker build . --no-cache -t webapp-back-${prepend}
sudo -u root aws ecr create-repository --repository-name shoewebapp --region us-east-1
sudo -u root aws ecr get-login-password --region ap-south-1 | sudo -u root docker login --username AWS --password-stdin 976995869248.dkr.ecr.ap-south-1.amazonaws.com
sudo -u root docker tag webapp-back-${prepend}:latest 976995869248.dkr.ecr.ap-south-1.amazonaws.com/shoewebapp:webapp-back-${prepend}
sudo -u root docker push 976995869248.dkr.ecr.ap-south-1.amazonaws.com/shoewebapp:webapp-back-${prepend}

cd ../frontend/
sudo -u root docker build . --no-cache -t webapp-front-${prepend}
sudo -u root docker tag webapp-front-${prepend}:latest 976995869248.dkr.ecr.ap-south-1.amazonaws.com/shoewebapp:webapp-front-${prepend}
sudo -u root docker push 976995869248.dkr.ecr.ap-south-1.amazonaws.com/shoewebapp:webapp-front-${prepend}
Step 8: Create a job —– 4_create_helm_pck_push_to_s3
Create a job
This job creates helm packages and pushes to S3
Jenkins dashboard >> new item >> Name — 4_create_helmp_pck_push_to_s3 >> select — freestyle project
Configure:
“Restrict where this project can be run” to the label of jenkins client (can be “jobs” or any label)
SCM — select git and give repo url — https://github.com/devopsenlight/web-app-deployment-on-cloud.git
This is a parameterized build with parameters –fe_image_name and be_image_name whose values to be given while execution from AWS ECR
Enable Delete workspace before build starts
In build – select execute shell and copy the below code
cd terraform-scripts/backend-chart/
echo ${be_image_name}
sed -i "s/webappss-be/${be_image_name}/" values.yaml
sh pushhelmpkg.sh

sleep 120

cd ../frontend-chart/
sed -i "s/weabpp-fe/${fe_image_name}/" values.yaml
sh pushhelmpackfe.sh
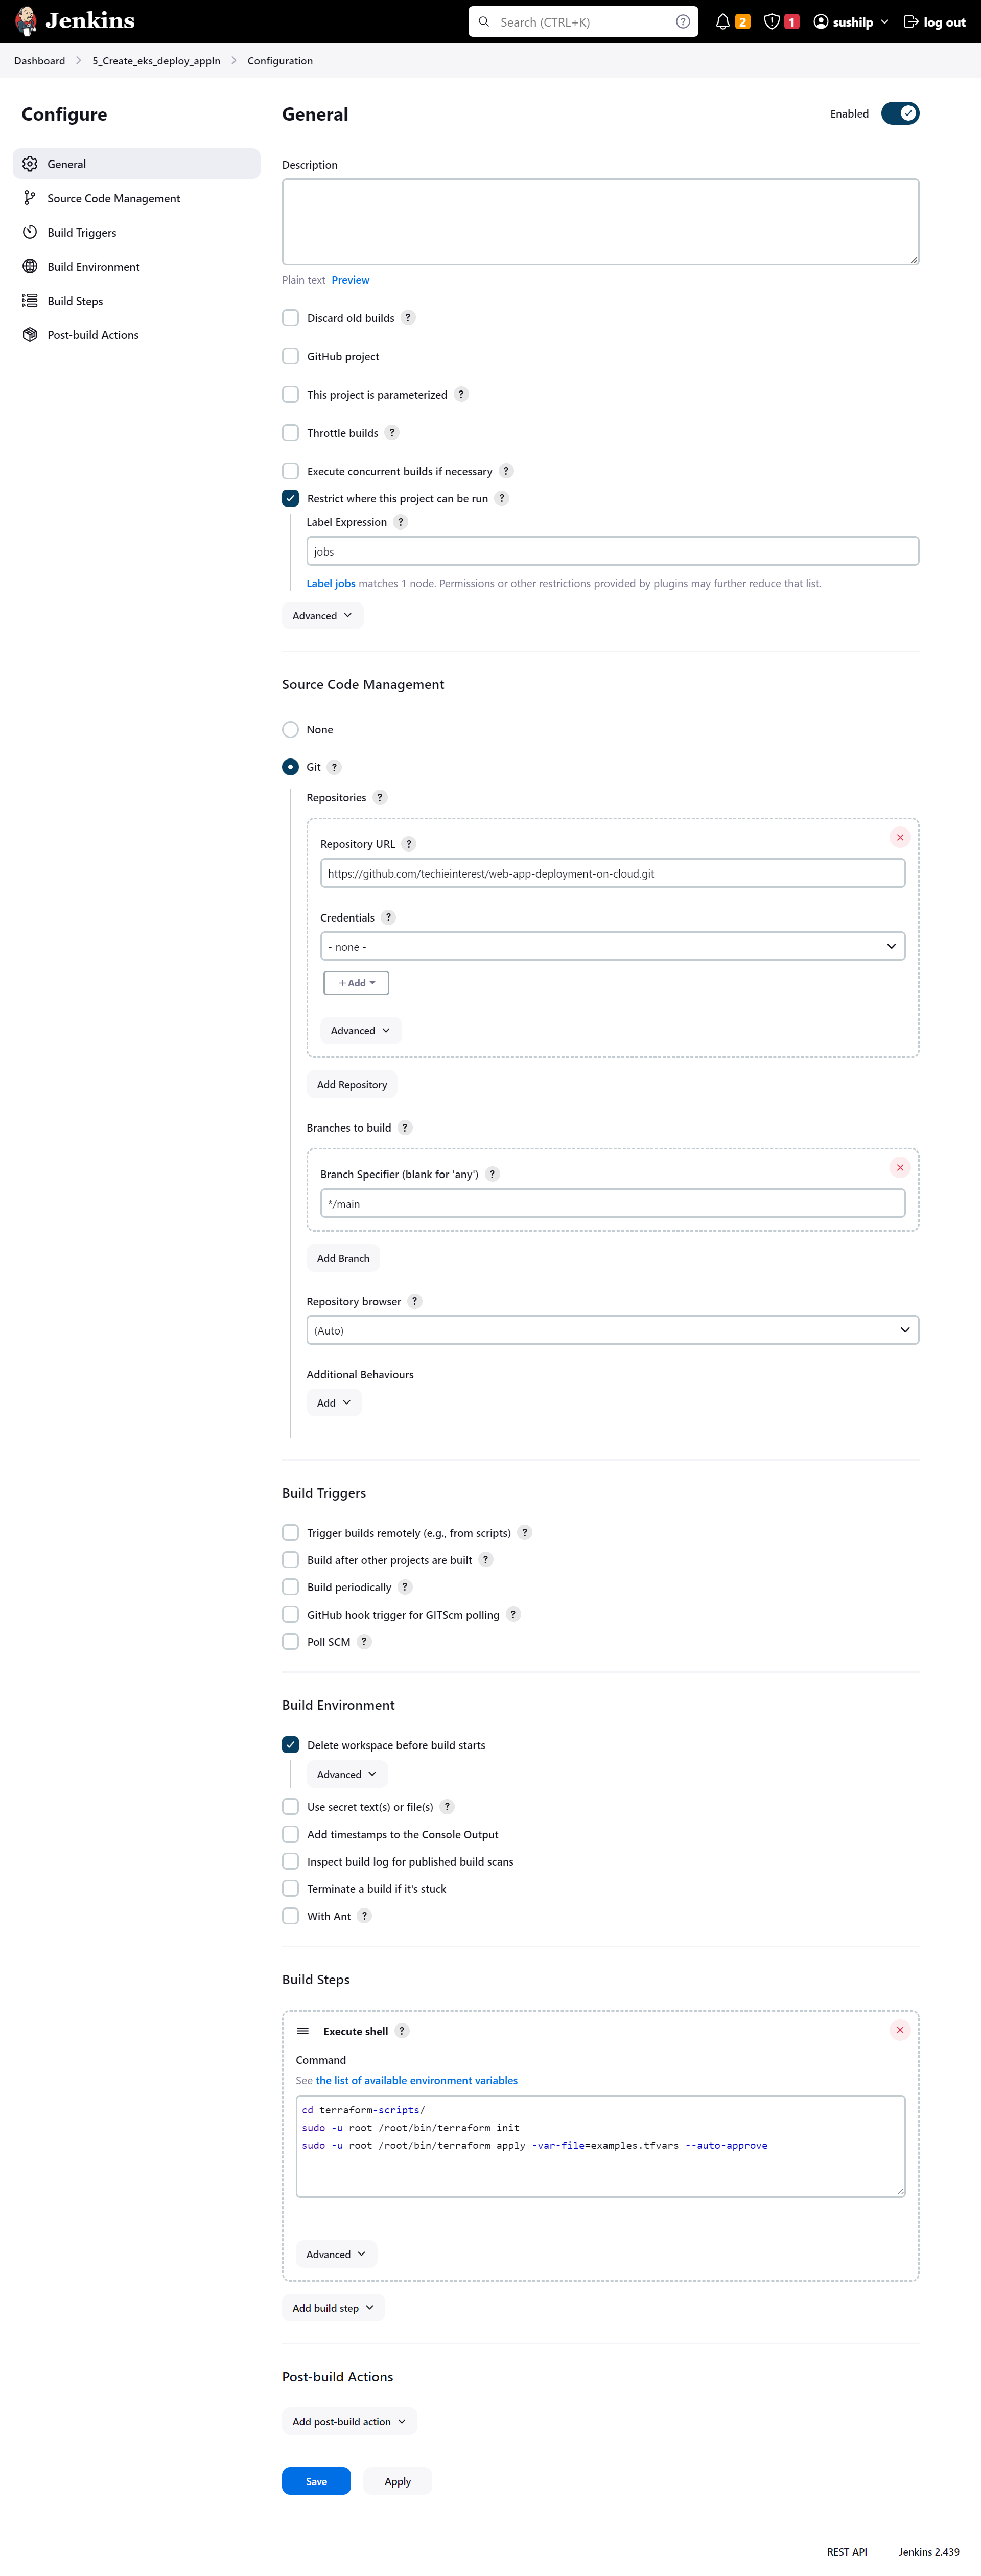
Step 9: Create a job —– 5_create_eks_deploy_applin
Create a job
This job creates EKS cluster and starts service for webapp through terraform script
Jenkins dashboard >> new item >> Name — 5_create_eks_deploy_applin >> select — freestyle project
Configure:
“Restrict where this project can be run” to the label of jenkins client (can be “jobs” or any label)
SCM — select git and give repo url — https://github.com/devopsenlight/web-app-deployment-on-cloud.git
In build – select execute shell and copy the below code
cd terraform-scripts
aws s3api create-bucket --bucket my-terraform-webapps-bucket1
sudo -u root /root/bin/terraform init
sudo -u root /root/bin/terraform apply -var-file=examples.tfvars -auto-approve
Step 10: Create a job —– 6_upgrade_deployment
If the developer makes some changes in the source code of the application, to get it deployed in production, it needs to build and a new docker image has to be created. The steps are as mentioned below:
– developer makes changes to the source code of the application.
for example, he makes changes in line number 22 of file: https://github.com/devopsenlight/web-app-deployment-on-cloud/blob/main/client/src/app/home/home.component.html
<h2> Products </h2> is updated to <h2>Flash Products</h2>
– Build job 3_build_code_and_create_docker_image either manually or configured to get it triggered automatically through GitHub webhooks
– Then cleanup old/existing helm packages stored in s3 by execution job 2_clean_up_s3_bucket
– Then create and push new helm packages by running job 4_create_helm_pck_push_to_s3 by passing new images as parameters.
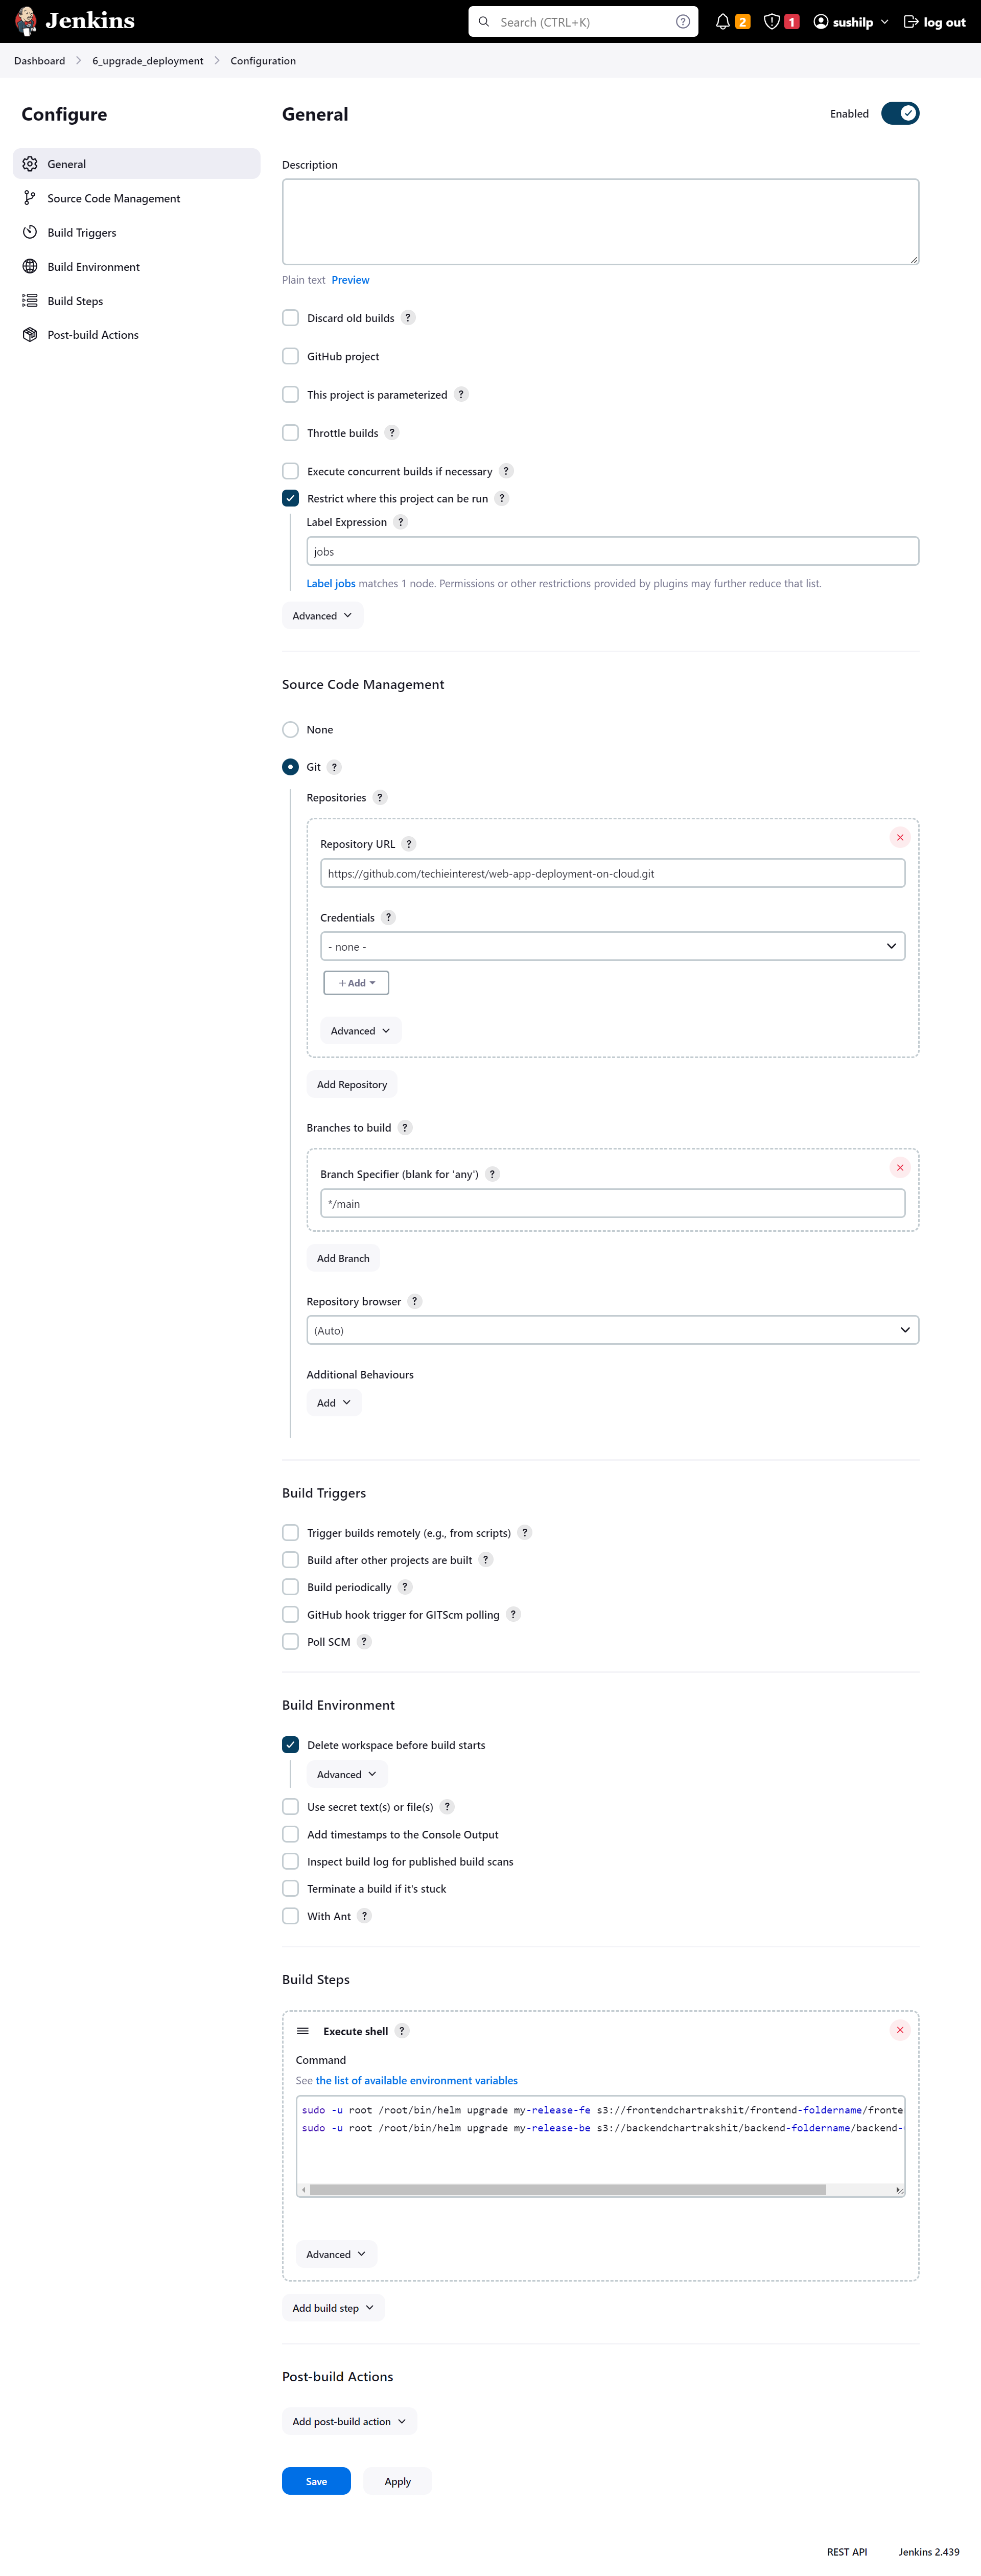
– Upgrade new helm packages in EKS cluster by running job : 6_upgrade_deployment
Create a job
This job upgrades the helm packages to be used
Jenkins dashboard >> new item >> Name — 6_upgrade_deployment >> select — freestyle project
Configure:
“Restrict where this project can be run” to the label of jenkins client (can be “jobs” or any label)
SCM — select git and give repo url — https://github.com/devopsenlight/web-app-deployment-on-cloud.git
In build – select execute shell and copy the below code
sudo -u root /root/bin/helm upgrade my-release-fe s3://frontendchartrakshit/frontend-foldername/frontend-0.1.0.tgz
sudo -u root /root/bin/helm upgrade my-release-be s3://backendchartrakshit/backend-foldername/backend-0.1.0.tgz
Step 11: Create a job —- 7_destroy_eks_application
Create a job
This job destroys the resources created through terraform
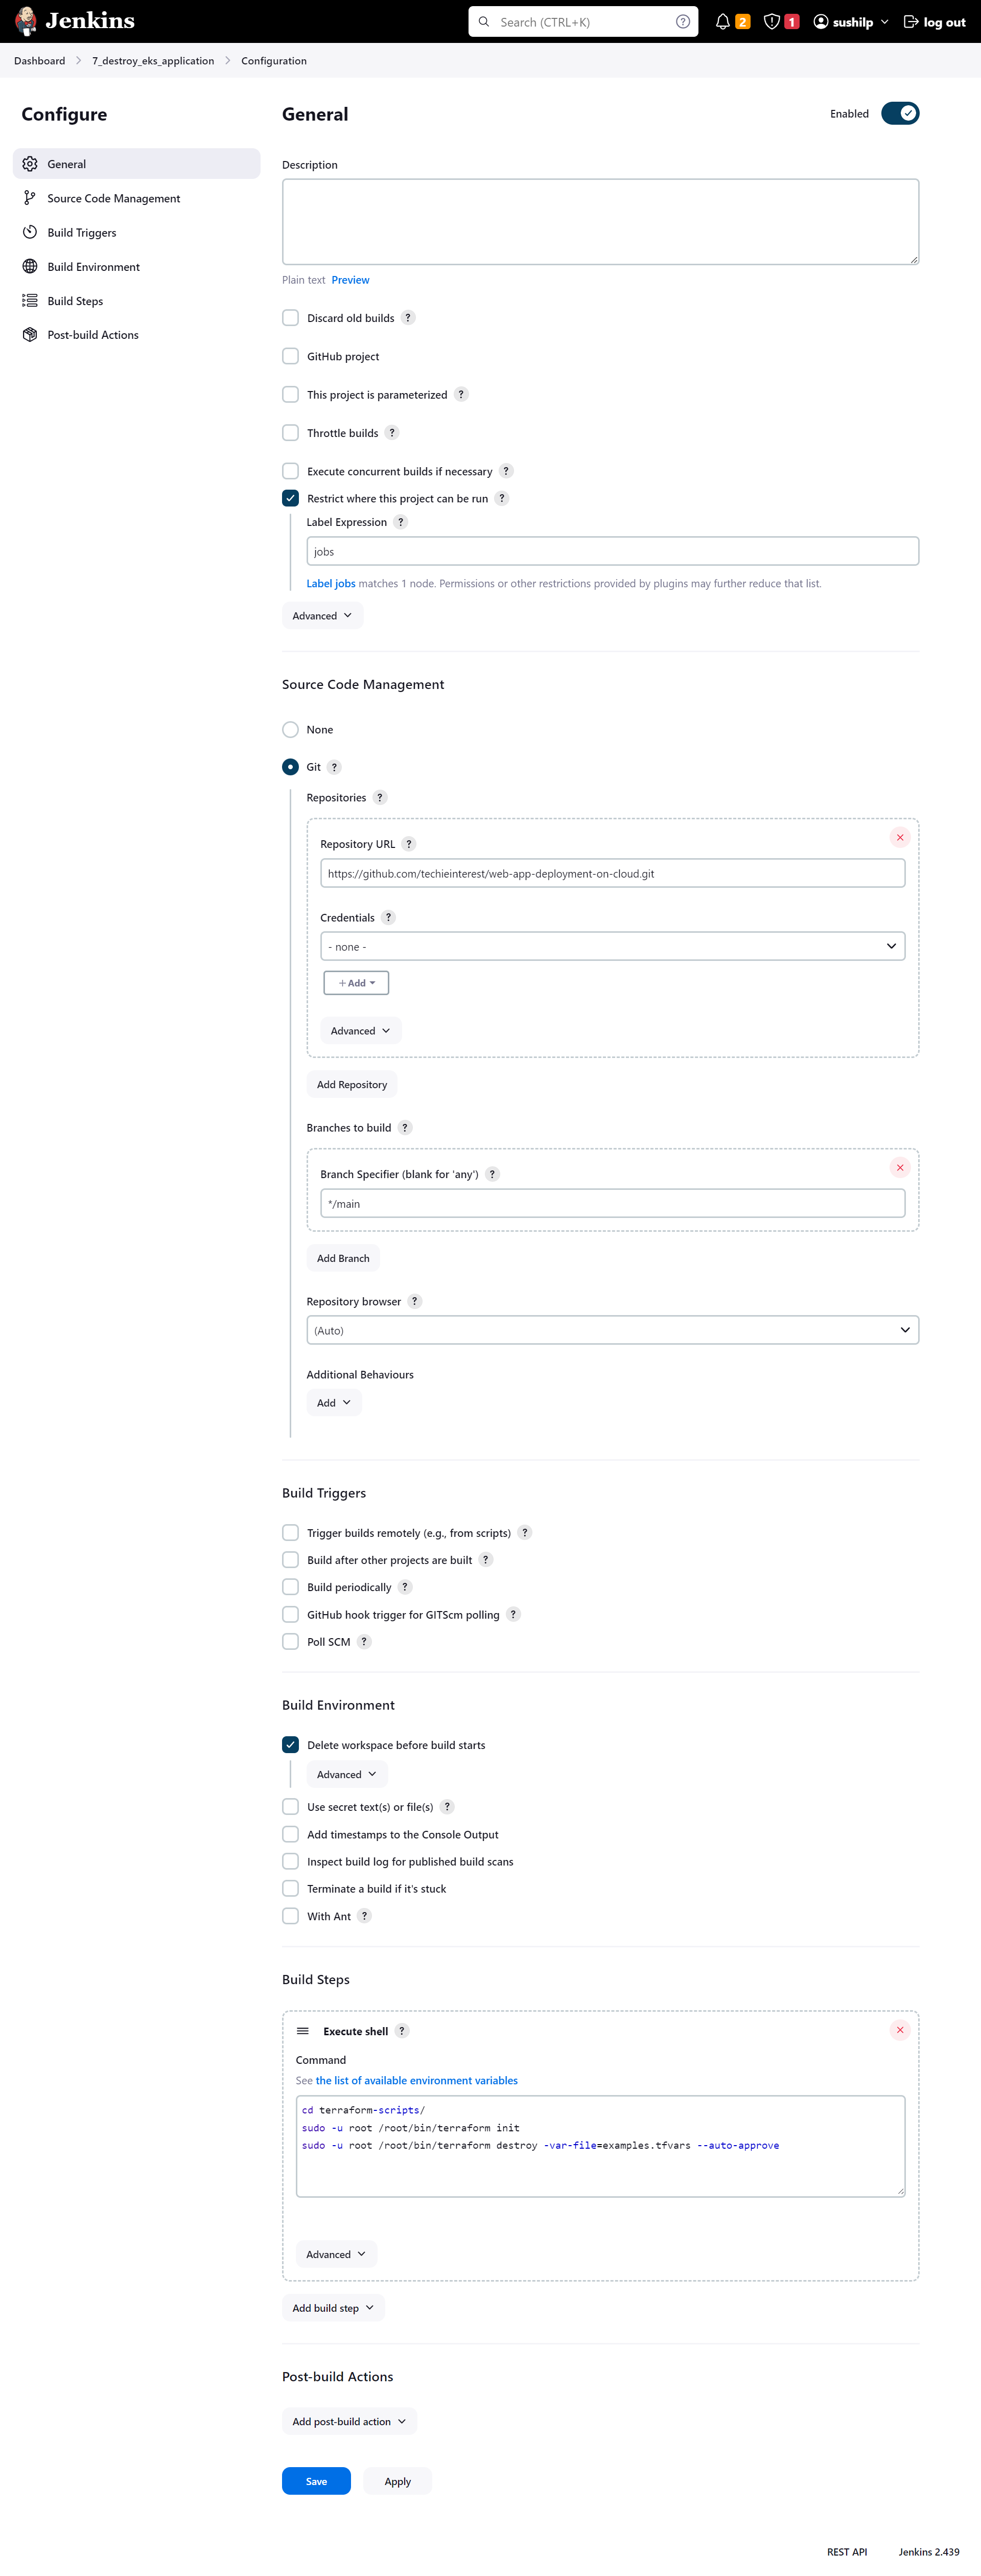
Jenkins dashboard >> new item >> Name — 7_destroy_eks_application >> select — freestyle project
Configure:
“Restrict where this project can be run” to the label of jenkins client (can be “jobs” or any label)
SCM — select git and give repo url — https://github.com/devopsenlight/web-app-deployment-on-cloud.git
In build – select execute shell and copy the below code
cd terraform-scripts/
sudo -u root /root/bin/terraform init
sudo -u root /root/bin/terraform destroy -var-file=examples.tfvars --auto-approve
