
Resources used
Kubectl| Eksctl| Helm| Docker| Git| Terraform| IAM| ECR| EKS
Steps:
Step 2: Installation of kubectl, eksctl, docker, git, helm and terraform on the client-machine.
Step 3: Create backend and frontend images using dns name and push to ECR.
Step 4: Create Helm charts for Frontend and backend
Step 5: Push helm packages to S3
Step 7: Access the Application
Process flow
– Create Dockerfiles -> Push docker images to ECR – > Create k8s manifests file ( i.e. deployment & service k8s file ) -> Create Helm Charts -> Push the helm charts to the S3 buckets.
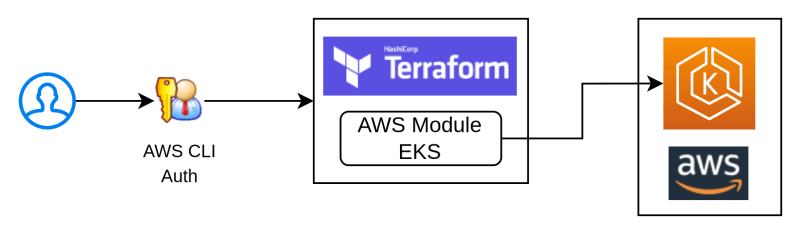
– Create Client Machine and attach Admin Role to it – > Install pre-requisite s/w in client machine-> Download Terraform script (vpc.tf, eks.tf – IAM-policies/Eks-cluster/security-groups/launch-template/node-groups/Helm-charts-from-s3, variables.tf, example.tfvariables) -> Execute terraform script and deploy application.
Definitions
Kubectl:
kubectl is a command-line tool for interacting with Kubernetes clusters. Kubernetes is an open-source container orchestration platform that automates the deployment, scaling, and management of containerized applications.
Eksctl:
eksctl is a command-line utility for creating, managing, and interacting with Amazon EKS (Elastic Kubernetes Service) clusters. It is an official command-line tool provided by AWS (Amazon Web Services) to simplify the process of deploying and managing Kubernetes clusters on the AWS platform.
Helm:
Helm is a package manager for Kubernetes applications. It simplifies the deployment and management of applications on Kubernetes clusters by providing a standard way of defining, installing, and upgrading applications. Helm uses charts, which are packages of pre-configured Kubernetes resources.
Terraform:
Terraform is an open-source infrastructure as code (IaC) tool created by HashiCorp. It enables users to define and provision infrastructure using a declarative configuration language. With Terraform, you can manage and automate the deployment and lifecycle of various infrastructure resources, including virtual machines, networks, storage, and more, across different cloud providers and on-premises environments.
Step 1: Create a role with AWS admin access and create an ec2 instance and attach the role to ec2 instance.
In the below reference link, the policies attached are different, but for this case, we need to add Administrative access.
Step 2: Installation of kubectl, eksctl, docker, git, helm and terraform on the client-machine.
1. Install kubectl on AWS linux 2 machine
sudo su
curl -O https://s3.us-west-2.amazonaws.com/amazon-eks/1.23.15/2023-01-11/bin/linux/amd64/kubectl
chmod +x ./kubectl
mkdir -p $HOME/bin && cp ./kubectl $HOME/bin/kubectl && export PATH=$PATH:$HOME/bin
kubectl version
2. Install eksctl on AWS linux 2 machine
curl -sLO "https://github.com/eksctl-io/eksctl/releases/latest/download/eksctl_Linux_amd64.tar.gz"
tar -zxvf eksctl_Linux_amd64.tar.gz
chmod +x ./eksctl; mkdir -p $HOME/bin && cp ./eksctl $HOME/bin/eksctl && export PATH=$HOME/bin:$PATH
echo 'export PATH=$HOME/bin:$PATH' >> ~/.bashrc
eksctl version
3. Install docker on AWS linux 2 machine
yum install docker
4. Install terraform on AWS linux 2 machine
wget https://releases.hashicorp.com/terraform/1.6.5/terraform_1.6.5_linux_amd64.zip
unzip terraform_1.6.5_linux_amd64.zip
chmod +x ./terraform; mkdir -p $HOME/bin && cp ./terraform $HOME/bin/terraform && export PATH=$HOME/bin:$PATH
echo 'export PATH=$HOME/bin:$PATH' >> ~/.bashrc
terraform -v
5. Install GIT on AWS linux 2 machine
yum install git
6. Install helm on AWS linux 2 machine
curl https://raw.githubusercontent.com/helm/helm/master/scripts/get-helm-3 > get_helm.sh
chmod 700 get_helm.sh
DESIRED_VERSION=v3.8.2 bash get_helm.sh
cp /usr/local/bin/helm $HOME/bin/helm && export PATH=$HOME/bin:$PATH
echo 'export PATH=$HOME/bin:$PATH' >> ~/.bashrc
helm version
Step 3: Create backend and frontend images using DNS name and push to ECR.
In the below reference link, localhost should be replaced by the DNS name ( like devopsenlight.com or testdns.com )
Step 4: Create Helm charts for Frontend and backend
Creating helm charts
backend-chart/
├── charts/
├── templates/
│ ├── deployment.yaml
│ ├── service.yaml
│ └── _helpers.tpl
├── values.yaml
└── Chart.yaml
Create Helm Chart for backend:
helm create backend #It creates helm charts directly with required files and repos
Remove files and repos from created chart which are not listed in above Directory structure.
Update Chart.yaml:
apiVersion: v2
name: backend
description: A Helm chart for the backend service
version: 0.1.0
Update values.yaml:
replicaCount: 3
fullname: backend
image:
  repository: 557792715966.dkr.ecr.us-east-1.amazonaws.com/webappecr
  tag: be
Make sure You change your values depending on your repository and image tag from your ECR in values.yaml file
cd to template folder and delete all content of it and then create two files deployment.yaml and service.yaml. The content of these files is mentioned below.
deployment.yaml
apiVersion: apps/v1
kind: Deployment
metadata:
  name: {{ .Values.fullname }}
spec:
  replicas: {{ .Values.replicaCount }}
  selector:
    matchLabels:
      app: backend
  template:
    metadata:
      labels:
        app: backend
    spec:
      containers:
      - name: backend
        image: {{ .Values.image.repository }}:{{ .Values.image.tag }}
        ports:
        - containerPort: 5000
Update service.yaml
apiVersion: v1
kind: Service
metadata:
  name: {{ .Values.fullname }}
spec:
  selector:
    app: backend
  ports:
  - name: backend-port
    protocol: TCP
    port: 5000
    targetPort: 5000
  - name: db-port
    protocol: TCP
    port: 3306
    targetPort: 3306
  type: LoadBalancer
———————————–frontend———————-
Move to the root directory
frontend-chart/
├── charts/
├── templates/
│ ├── deployment.yaml
│ ├── service.yaml
│ └── _helpers.tpl
├── values.yaml
└── Chart.yaml
Create Helm Chart for frontend:
helm create frontendchart
Remove files and repos from created chart which are not listed in above Directory structure.
Update Chart.yaml:
apiVersion: v2
name: frontend
description: A Helm chart for the frontend service
version: 0.1.0
Update values.yaml:
replicaCount: 3
fullname: frontend
image:
  repository: 976995869248.dkr.ecr.ap-south-1.amazonaws.com/shoewebapp
  tag: webappss-fe
Make sure You change your values depending on your repository and image tag from your ECR in values.yaml file
cd to template folder and delete all content of it and then create two files deployment.yaml and service.yaml. The content of these files is mentioned below.
deployment.yaml
apiVersion: apps/v1
kind: Deployment
metadata:
  name: {{ .Values.fullname }}
spec:
  replicas: {{ .Values.replicaCount }}
  selector:
    matchLabels:
      app: frontend
  template:
    metadata:
      labels:
        app: frontend
    spec:
      containers:
      - name: frontend
        image: {{ .Values.image.repository }}:{{ .Values.image.tag }}
        ports:
        - containerPort: 80
Update service.yaml
apiVersion: v1
kind: Service
metadata:
  name: {{ .Values.fullname }}
spec:
  selector:
    app: frontend
  ports:
  - name: frontend-port
    protocol: TCP
    port: 80
    targetPort: 80
  type: LoadBalancer
On a side note: In case we want to test the helm packages manually, we can do so by first creating an AWS EKS Cluster and once the cluster is up, we need to authenticate the eks cluster from the client machine and run helm command to install the helm packages in eks cluster to deploy the application
– Command to setup/configure eks from client machine :
aws eks –region ap-south-1 update-kubeconfig –name webapp-dev –alias iams
kubectl config set-context –current
kubectl config view
kubectl get nodes
– helm command to deploy application :
cd to the frontend/backend helm folders and create frontend and backend packages
helm package .
helm install backend ./webapp_back_tf-0.1.0.tgz
helm install frontend ./webapp_front_tf-0.1.0.tgz
heml list ( to list installed helm packages)
helm uninstall frontendapp ( to uninstall any installed helm packages)
Step 5: Push helm packages to AWS S3
1. Create 2 S3 buckets one for frontend and one for backend
Navigate to All services >> S3 >> Create bucket
Create a S3 bucket for frontend
Create a S3 bucket for backend
2. From the ec2 instance which had admin policy attached and helm charts are created follow the below steps:
#Install "helm s3" plugin
helm plugin install https://github.com/hypnoglow/helm-s3.git

#Navigate to the frontend helm charts directory
#Initialize the plugin with S3 bucket information for frontend
helm s3 init s3://frontend-bucket-name/frontend-chart

#After initializing, package frontend Helm chart
helm package .

  #Add repo
helm repo add frontend-bucket-name s3://frontend-bucket-name/frontend-chart

   #Push the packaged frontend chart to S3
helm s3 push your-chart-version.tgz frontend-bucket-name
Navigate to the backend helm charts directory
#Initialize the plugin with S3 bucket information for backend
helm s3 init s3://backend-bucket-name/backend-chart

 #After initializing, package backend Helm chart
helm package .

 #Add repo
helm repo add backend-bucket-name s3://backend-bucket-name/backend-chart

 #Push the packaged backend chart to S3
helm s3 push your-chart-version.tgz backend-bucket-name
Helm packages has been succesfully pushed into AWS S3 you chan check in your S3 buckets from AWS console.
Step 6: Create Terraform scripts and execute them on client-machine to deploy application in EKS cluster
Vpc.tf – This terraform script create VPC and its components ( Public/private subnets, Internet Gateway, Route Table, NAT Gateway, EIP, etc)
resource "aws_vpc" "main" {
  cidr_block       = var.vpc_cidr

  tags = {
    Name = "${var.cluster_name}"
  }
}

resource "aws_internet_gateway" "gw" {
  vpc_id = aws_vpc.main.id

  tags = {
    Name = "${var.cluster_name}"
  }
}

resource "aws_route" "egress" {
  route_table_id         = aws_vpc.main.main_route_table_id
  destination_cidr_block = "0.0.0.0/0"
  gateway_id             = aws_internet_gateway.gw.id
}


#
# PUBLIC SUBNET 1 RESOURCES
#

resource "aws_subnet" "public_subnet1" {
  vpc_id                  = aws_vpc.main.id
  cidr_block              = var.vpc_public_subnet1_cidr
  availability_zone       = var.vpc_az1
  map_public_ip_on_launch = true

  tags = {
    Name = "${var.cluster_name}-public1"
  }
}

resource "aws_eip" "nat_gw1" {
  vpc        = true
  depends_on = [aws_internet_gateway.gw]
}

resource "aws_nat_gateway" "nat_gw1" {
  allocation_id = aws_eip.nat_gw1.id
  subnet_id     = aws_subnet.public_subnet1.id
  depends_on    = [aws_internet_gateway.gw]

  tags = {
    Name = "${var.cluster_name}-1"
  }
}


#
# PUBLIC SUBNET 2 RESOURCES
#

resource "aws_subnet" "public_subnet2" {
  vpc_id                  = aws_vpc.main.id
  cidr_block              = var.vpc_public_subnet2_cidr
  availability_zone       = var.vpc_az2
  map_public_ip_on_launch = true

  tags = {
    Name = "${var.cluster_name}-public2"
  }
}

resource "aws_eip" "nat_gw2" {
  vpc        = true
  depends_on = [aws_internet_gateway.gw]
}


resource "aws_nat_gateway" "nat_gw2" {
  allocation_id = aws_eip.nat_gw2.id
  subnet_id     = aws_subnet.public_subnet2.id
  depends_on    = [aws_internet_gateway.gw]

  tags = {
    Name = "${var.cluster_name}-2"
  }
}


#
# PRIVATE SUBNET 1 RESOURCES
#

resource "aws_subnet" "private_subnet1" {
  vpc_id                  = aws_vpc.main.id
  cidr_block              = var.vpc_private_subnet1_cidr
  availability_zone       = var.vpc_az1
  map_public_ip_on_launch = false

  tags = {
    Name = "${var.cluster_name}-private1"
  }
}

resource "aws_route_table" "private_subnet1_egress" {
  vpc_id = aws_vpc.main.id

  route {
    cidr_block     = "0.0.0.0/0"
    nat_gateway_id = aws_nat_gateway.nat_gw1.id
  }

  tags = {
    Name = "${var.cluster_name}-private-subnet1-egress"
  }
}

resource "aws_route_table_association" "private_subnet1_egress" {
  subnet_id      = aws_subnet.private_subnet1.id
  route_table_id = aws_route_table.private_subnet1_egress.id
}


#
# PRIVATE SUBNET 2 RESOURCES
#

resource "aws_subnet" "private_subnet2" {
  vpc_id                  = aws_vpc.main.id
  cidr_block              = var.vpc_private_subnet2_cidr
  availability_zone       = var.vpc_az2
  map_public_ip_on_launch = false

  tags = {
    Name = "${var.cluster_name}-private2"
  }
}


resource "aws_route_table" "private_subnet2_egress" {
  vpc_id = aws_vpc.main.id

  route {
    cidr_block     = "0.0.0.0/0"
    nat_gateway_id = aws_nat_gateway.nat_gw2.id
  }

  tags = {
    Name = "${var.cluster_name}-private-subnet2-egress"
  }
}

resource "aws_route_table_association" "private_subnet2_egress" {
  subnet_id      = aws_subnet.private_subnet2.id
  route_table_id = aws_route_table.private_subnet2_egress.id
}
Breakdown of the Terraform script:
1. VPC and Internet Gateway:
• The script defines a VPC with the CIDR block provided by the var.vpc_cidr variable.
• It creates an internet gateway using the aws_internet_gateway resource and attaches it to the VPC.
• A route table is automatically created for the VPC, and a route is added to send all traffic outside the VPC to the internet gateway.
2. Public Subnets:
• Two public subnets are defined, each with its own CIDR block and availability zone.
• Public subnets allow instances to launch with public IP addresses for external access.
• Each public subnet has an Elastic IP (EIP) attached to it and a NAT Gateway configured.
• The NAT Gateway translates private IP addresses of instances in the private subnets to public IP addresses for internet access.
3. Private Subnets:
• Two private subnets are defined, each with its own CIDR block and availability zone.
• Private subnets do not allow instances to launch with public IP addresses.
• Each private subnet has a separate route table associated with it.
• The route tables for the private subnets route all traffic outside the VPC to the NAT Gateways in the corresponding public subnets. This ensures that instances in the private subnets can access the internet but are not directly exposed to the public network.
4. Tags:
• The script uses tags to identify resources associated with the cluster.
• Each resource has a tag named Name with the value ${var.cluster_name} followed by a specific identifier like public1, private2, etc.
5. Dependencies:
• The depends_on meta-argument is used to ensure resources are created in the correct order.
• For example, the NAT Gateway depends on the creation of the EIP and the internet gateway.
• This ensures the NAT Gateway has the necessary resources before it is created.
6. Resources:
• The script uses various AWS resources like aws_vpc, aws_internet_gateway, aws_eip, aws_nat_gateway, aws_subnet, aws_route_table, and aws_route_table_association to build the network infrastructure.
• Each resource has specific configuration options like cidr_block, availability_zone, map_public_ip_on_launch, allocation_id, subnet_id, nat_gateway_id, and route_table_id to define its behavior.
eks.tf – This terraform script creates roles for the EKS cluster and node group, then it creates EKS Cluster, node group, etc.
#
# Control Plane Resources
#

resource "aws_iam_role" "k8s" {
  name = "k8s-role"

  assume_role_policy = <<POLICY
{
  "Version": "2012-10-17",
  "Statement": [
    {
      "Effect": "Allow",
      "Principal": {
        "Service": "eks.amazonaws.com"
      },
      "Action": "sts:AssumeRole"
    }
  ]
}
POLICY
}

resource "aws_iam_role_policy_attachment" "k8s_policy_attachment1" {
  policy_arn = "arn:aws:iam::aws:policy/AmazonEKSClusterPolicy"
  role       = aws_iam_role.k8s.name
}

resource "aws_eks_cluster" "k8s" {
  name     = var.cluster_name
  role_arn = aws_iam_role.k8s.arn

  vpc_config {
    subnet_ids = [
      aws_subnet.private_subnet1.id,
      aws_subnet.private_subnet2.id
    ]
  }

  depends_on = [
    aws_iam_role_policy_attachment.k8s_policy_attachment1,
  ]
}


#
# Worker Node Resources
#

resource "aws_iam_role" "k8s_node_group" {
  name = "noderole"

  assume_role_policy = jsonencode({
    Statement = [
      {
        Action = "sts:AssumeRole"
        Effect = "Allow"
        Principal = {
          Service = "ec2.amazonaws.com"
        }
      }
    ]
    Version = "2012-10-17"
  })
}

resource "aws_iam_role_policy_attachment" "worker_node_policy" {
  policy_arn = "arn:aws:iam::aws:policy/AmazonEKSWorkerNodePolicy"
  role       = aws_iam_role.k8s_node_group.name
}

resource "aws_iam_role_policy_attachment" "cni_policy" {
  policy_arn = "arn:aws:iam::aws:policy/AmazonEKS_CNI_Policy"
  role       = aws_iam_role.k8s_node_group.name
}

resource "aws_iam_role_policy_attachment" "ecr_read_only" {
  policy_arn = "arn:aws:iam::aws:policy/AmazonEC2ContainerRegistryReadOnly"
  role       = aws_iam_role.k8s_node_group.name
}

resource "aws_security_group" "workers" {
  vpc_id = aws_vpc.main.id

  # Based on https://docs.aws.amazon.com/eks/latest/userguide/sec-group-reqs.html

  ingress {
    description = "Inbound traffic from other workers"
    from_port   = 0
    to_port     = 0
    protocol    = "all"
    self        = true
  }

  ingress {
    description = "Inbound HTTPS traffic"
    from_port   = 443
    to_port     = 443
    protocol    = "tcp"
    cidr_blocks = ["0.0.0.0/0"]
  }

  ingress {
    description = "All other inbound traffic"
    from_port   = 1025
    to_port     = 65535
    protocol    = "tcp"
    cidr_blocks = ["0.0.0.0/0"]
  }

  egress {
    description = "Outbound traffic"
    from_port   = 0
    to_port     = 0
    protocol    = "all"
    cidr_blocks = ["0.0.0.0/0"]
  }
}


resource "aws_launch_template" "k8s" {
  name     = var.cluster_name
  key_name = var.ec2_key_name

  vpc_security_group_ids = [
    aws_eks_cluster.k8s.vpc_config[0].cluster_security_group_id,
    aws_security_group.workers.id
  ]

  tag_specifications {
    resource_type = "instance"
    tags = {
      Name = "${var.cluster_name}"
    }
  }
}

resource "aws_eks_node_group" "k8s" {
  cluster_name    = aws_eks_cluster.k8s.name
  node_group_name = var.cluster_name
  node_role_arn   = aws_iam_role.k8s_node_group.arn
  instance_types  = var.k8s_node_instance_types
  subnet_ids = [
    aws_subnet.private_subnet1.id,
    aws_subnet.private_subnet2.id
  ]

  launch_template {
    id      = aws_launch_template.k8s.id
    version = aws_launch_template.k8s.latest_version
  }

  scaling_config {
    desired_size = var.k8s_desired_size
    min_size     = var.k8s_min_size
    max_size     = var.k8s_max_size
  }

  # Allow external changes without causing plan diffs
  lifecycle {
    ignore_changes = [scaling_config[0].desired_size]
  }

  depends_on = [
    aws_iam_role_policy_attachment.worker_node_policy,
    aws_iam_role_policy_attachment.cni_policy,
    aws_iam_role_policy_attachment.ecr_read_only,
  ]
}

provider "null" {}

resource "null_resource" "update_kubeconfig" {
  provisioner "local-exec" {
    command = "aws eks --region=${var.aws_region} update-kubeconfig --name ${var.cluster_name} --alias iams"
  }

  depends_on = [aws_eks_cluster.k8s]
}

resource "null_resource" "install_helm_release1" {
  provisioner "local-exec" {
    command = "helm install my-release-fe s3://helmcharts-s3/frontend-chart/frontend-0.1.0.tgz"
  }

  depends_on = [null_resource.update_kubeconfig]
}

resource "null_resource" "install_helm_release2" {
  provisioner "local-exec" {
    command = "helm install my-release-be s3://helmbackends3/backend-chart/backend-0.1.0.tgz"
  }

  depends_on = [null_resource.update_kubeconfig]
}

resource "null_resource" "uninstall_fe_release" {
  provisioner "local-exec" {
    # Uninstall Helm chart during resource destruction
    when    = destroy
    command = "helm uninstall my-release-fe"
  }
}

resource "null_resource" "uninstall_be_release" {
  provisioner "local-exec" {
    # Uninstall Helm chart during resource destruction
    when    = destroy
    command = "helm uninstall my-release-be"
  }
}
EKS Cluster Control Plane Resources:
IAM Role (k8s):
- Allows EKS service to manage the cluster.
- Attached to AmazonEKSClusterPolicy for necessary permissions.
EKS Cluster (k8s):
- Defined with a specified name and IAM role.
- Uses private subnets for worker nodes.
- Depends on policy attachment for role permissions.
Worker Node Resources:
IAM Role (noderole):
- Allows EC2 instances to join the cluster.
- Assumed by EC2 service.
Policy Attachments:
- AmazonEKSWorkerNodePolicy:
- Grants necessary permissions for cluster communication and actions.
- AmazonEKS_CNI_Policy:
- Configures container network.
- AmazonEC2ContainerRegistryReadOnly:
- Provides ECR read-only access for image pulling.
Security Group (workers):
- Defines rules for inbound and outbound traffic for worker nodes.
- Allows specific traffic based on source and port.
Launch Template (k8s):
- Defines a template for launching worker nodes.
- Specifies key pair, security groups, and tags.
EKS Node Group (k8s):
- Defines a group of worker nodes within the cluster.
- Specifies relevant configuration:
- Cluster and node group names.
- IAM role for worker nodes.
- Instance types for the nodes.
- Subnets for node launch.
- Launch template for provisioning.
- Scaling configuration with desired, minimum, and maximum capacity.
- Lifecycle rule to ignore desired size changes for smoother plans.
- Depends on policy attachments for necessary permissions.
Null (from working machine):
- update_kubeconfig: Updates Kubernetes configuration for the EKS cluster.
- install_helm_release1 and install_helm_release2: Installs Helm charts for frontend and backend.
- uninstall_fe_release and uninstall_be_release: Uninstalls Helm releases during destruction.
Variables.tf – This terraform contains variables used in the creation of various AWS resource.
variable "cluster_name" {
  description = "The name to give to this environment. Will be used for naming various resources."
  type        = string
}

variable "aws_profile" {
  description = "The AWS CLI profile to use"
  type        = string
}

variable "aws_region" {
  description = "AWS region to use"
  type        = string
}

variable "vpc_cidr" {
  description = "The CIDR block for the VPC"
  type        = string
}

variable "ec2_key_name" {
  description = "The name of the public key to inject to instances launched in the VPC"
  type        = string
}

variable "ec2_key" {
  description = "The public key to inject to instances launched in the VPC"
  type        = string
}

# Reference: https://docs.aws.amazon.com/autoscaling/ec2/userguide/auto-scaling-dedicated-instances.html
variable "vpc_instance_tenancy" {
  description = "How are instances distributed across the underlying physical hardware"
  type        = string
  default     = "default"
}

variable "vpc_az1" {
  description = "The AZ where *-subnet1 will reside"
  type        = string
}

variable "vpc_az2" {
  description = "The AZ where *-subnet2 will reside"
  type        = string
}

variable "vpc_public_subnet1_cidr" {
  description = "The cidr block to use for public-subnet1"
  type        = string
}

variable "vpc_public_subnet2_cidr" {
  description = "The cidr block to use for public-subnet2"
  type        = string
}

variable "vpc_private_subnet1_cidr" {
  description = "The cidr block to use for private-subnet1"
  type        = string
}

variable "vpc_private_subnet2_cidr" {
  description = "The cidr block to use for private-subnet2"
  type        = string
}

variable "k8s_desired_size" {
  description = "Desired number of worker nodes"
  type        = number
  default     = 2
}

variable "k8s_min_size" {
  description = "Minimum number of worker nodes"
  type        = number
  default     = 1
}

variable "k8s_max_size" {
  description = "Maximum number of worker nodes"
  type        = number
  default     = 2
}

variable "k8s_node_instance_types" {
  description = "List of instance types associated with the EKS Node Group"
  type        = list(any)
  default     = ["t3.medium"]
}
Variable Descriptions:
Cluster Management:
- cluster_name: Name for the environment and various resources. (string)
- aws_profile: AWS CLI profile to use. (string)
- aws_region: AWS region for deployment. (string)
VPC Network:
- vpc_cidr: CIDR block for the VPC. (string)
- vpc_instance_tenancy: Distribution of instances across hardware. (string)
- vpc_az1, vpc_az2: Availability zones for subnet placement. (string)
- vpc_public/private_subnet_cidr:* CIDR blocks for public and private subnets. (string)
EKS Cluster:
- k8s_desired_size, k8s_min_size, k8s_max_size: Desired, minimum, and maximum worker node count. (number)
- k8s_node_instance_types: List of instance types for worker nodes. (list)
Additional Variables:
- ec2_key_name: Name of the public key injected into instances. (string)
- ec2_key: Public key content injected into instances. (string)
examples.tfvars – This script holds the values of the variables.
cluster_name = "webapp-dev"

# AWS CLI config profile
aws_profile = "default"
aws_region  = "us-east-1"

ec2_key_name = ""
ec2_key      = ""

vpc_cidr                 = "10.4.20.0/24"
vpc_az1                  = "us-east-1a"
vpc_az2                  = "us-east-1b"
vpc_public_subnet1_cidr  = "10.4.20.0/26"
vpc_public_subnet2_cidr  = "10.4.20.64/26"
vpc_private_subnet1_cidr = "10.4.20.128/26"
vpc_private_subnet2_cidr = "10.4.20.192/26"

k8s_desired_size        = 2
k8s_max_size            = 2
k8s_min_size            = 1
k8s_node_instance_types = ["t3.medium"]
- cluster_name:
- Specifies the name of the EKS cluster, e.g., “webapp-dev.”
- aws_profile:
- AWS CLI profile to use.
- aws_region:
- AWS region, e.g., “us-east-1.”
- ec2_key_name and ec2_key:
- Key pair information for EC2 instances.
VPC Configuration:
- vpc_cidr:
- CIDR block for the main VPC, e.g., “10.4.20.0/24.”
- vpc_az1 and vpc_az2:
- Availability Zones for the VPC, e.g., “us-east-1a” and “us-east-1b.”
- vpc_public_subnet1_cidr and vpc_public_subnet2_cidr:
- CIDR blocks for public subnets.
- vpc_private_subnet1_cidr and vpc_private_subnet2_cidr:
- CIDR blocks for private subnets.
EKS Cluster Configuration:
- k8s_desired_size, k8s_max_size, and k8s_min_size:
- Desired, maximum, and minimum sizes for the worker node group.
- k8s_node_instance_types:
- Instance types for the worker nodes, e.g., [“t3.medium”].
Execution of the Terraform Script
Initialize terraform from the directory of terraform files(.tf)
terraform initApply the Terraform configuration using the specified variable file.
terraform apply -var-file=examples.tfvars
Destroy the resources created by Terraform using the specified variable file.
terraform destroy -var-file=examples.tfvars
Step 7: Access the Application
kubectl get nodes #It will display nodes kubectl get services #It will display details of sevices started with load balancers URL
Access the application with load balancer URL