
3 tier web application deployment in AWS
Here we are using various services of AWS like – Route53, VPC, RDS, EC2 – Launch Template, EC2 – AutoScaling Group, Ec2 – Load Balancer, and EC2 – Instances.
The web application is built using angular.js, node.js, and MySQL. Its code base is at: https://github.com/devopsenlight/web-app-deployment-on-cloud.git
What is 3-Tier Architecture?
It’s a type of client-server architecture that divides the architecture into three tiers: data layer, application layer, and presentation layer.
Presentation (Frontend) — This layer sends HTML, JS, and CSS to browsers. It may use frameworks like React, Angular, Ember, Aurora, etc.
Application (Backend) — Processes business logic for an application. It might be written in Node.js, Java, Ruby, etc.
Database — This layer provides access to application data through a database management system. This could be MSSQL, MySQL, or PostgreSQL, etc.
Benefits of 3-Tier Architecture
- Modularity: Different development teams can focus on different areas of expertise. Rather than working on the full stack, developers today are more likely to have deep competency in one area, like coding the front end.
- Scalability: Each tier of the architecture can scale horizontally to support the traffic and request demand coming to it. This can easily be done by adding more EC2 instances to each tier and load balancing across them.
- High Availability: With AWS, we can design our infrastructure to be highly available by hosting our application in different locations known as the availability zones.
- Fault Tolerant: We want our infrastructure to design such that we have two EC2 instances working at 50% each, such that when one instance goes bad, the other instance will be working at 100% capacity until a new instance is brought up by our Auto Scaling Group, we can have extra instance making it three instances working at approximately 35% each.
- Security: The architecture is designed such that the frontend is in a public subnet and the database and backend are in a private subnet, also creating a security group and providing limited required access, makes the system highly secure.
- Database integrity and security— the client cannot directly access the data. There is an application (backend) layer between the client and the database, making it secure.
Overview of the Steps:
Step-1: Create VPC, Subnets, Route-table, Internet gateway, and NAT gateway.
Step-2: Create FE and BE Security Groups
Step-3: Create RDS in VPC
Step-4: Create an instance (Frontend), perform setup steps, create its image, and terminate the instance.
Step-5: Create an instance (Backend), perform setup steps, create its image, and terminate the instance.
Step-6: Create a launch template, Autoscaling group, and load balancer for the Backend.
Step-7: Create a launch template, Autoscaling group, and load balancer for the Frontend.
Step-8: (Optional Step) If you have a domain name, create a hosted zone in Route 53 and update the record set of the back and front domains to the load balancer.
Here is my design architecture for 3 Tier E-commerce web application:

Step-1: Create VPC, Subnets, Route-table, Internet gateway, and NAT gateway.
Navigate to your AWS console and type VPC in the search bar. Go to “Your VPC” and hit Create a new VPC.
In this step, we will create 6 subnets total for our VPC. Two public subnets for our Web-facing(frontend) servers and four private subnets. Two each for our application(backend) and database tiers. This will be configured across two availability zones to ensure high availability.
Included in our VPC will be a NAT Gateway for our hosts in the private subnets to ensure they are able to reach out to the internet for updates etc. Public and private route tables will be configured.
Input your project name and check to the auto-generate box. Select 2 public subnets and 4 private subnets. Your settings should look like this so far.


Hit create VPC, It will take a little time to create the VPC, and then, it’s done !.
- Go to the subnets page on the left pane and there should be 6 subnets that created. Select a public subnet of your choice and hit Actions -> Edit Subnet Settings.
Checkmark “Enable auto-assign public IPv4 address”. Hit save and repeat the same thing on another public subnet. We will enable public IP for these 2 public subnets.

The wizard will create a route table for each private subnet. This is not needed in our case, and we can modify one of the private route tables to include all of our private subnets for ease of management.
Let’s modify one of the route tables to include all of the private subnets. I’ll navigate to VPC > Route tables and Click on the route table > subnet associations tab then clicks edit associations within Explicit subnet associations. Check the boxes for all our private subnets then click Save Associations.
Now we can delete the other private route tables. Check the boxes for the subnets then from the actions drop-down click Delete route table.
Edit subnet association of one route table :

Attach 4 subnet to one route table :

Delete the other 3 route tables :

Finally, we will have just 2 route tables, one for public with 2 subnets and one for private with 4 subnets.
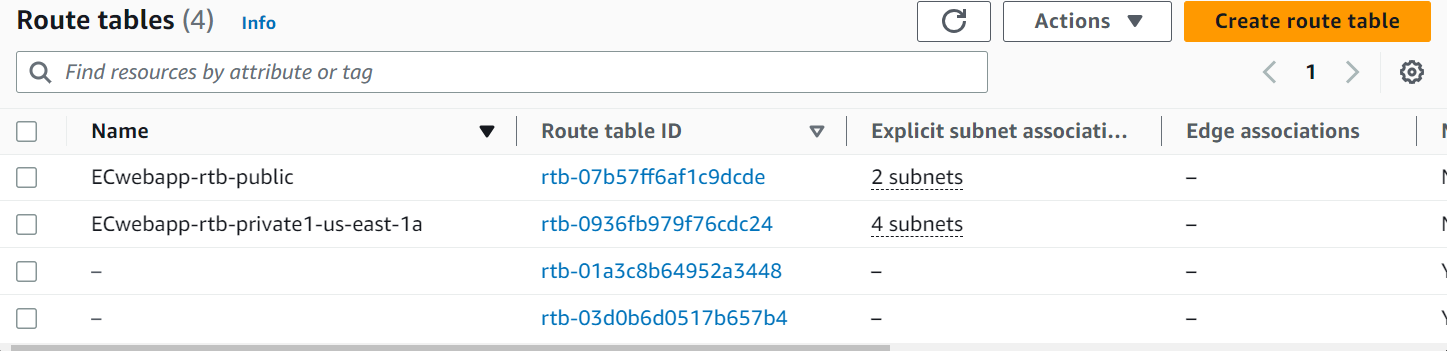
It’s done, we have created VPC with 4 private subnets, 2 public subnets, 2 route tables, one internet gateway, and one NAT gateway.
Step-2: Create FE and BE Security Groups
Create FE security group
Go to EC2 in the left panel select “Security Groups” and Create a Frontend security group with ports 80, 443, and 22 open from anywhere so that users/customers from any location can visit your web application.

Create a Backend security group
Ideally, for Backend security group we need to allow all ports from the frontend security group, so that the FE instance in the public subnet can access any backend instances created in the private subnet.
However, due to the limitations and requirements of the e-commerce web app used in this project, the backend security group needs to have ports 80, 443, 3306, and 22 open from anywhere as shown in below project :

Step-3: Create RDS in VPC
Navigate to RDS, hit Subnet Group on the left, and create DB Subnet group. Give it a name, select VPC, and selct 2 private subnets.

Now we go to the Databases section on the left pane and Create Database. We choose MySQL as our engine. In the Settings section, set up a master password and confirm it. In the Connectivity section, we will choose VPC, and create a new VPC security group.
Hit Create a Database.

Once it is created. Go into the database and click on the VPC security groups.
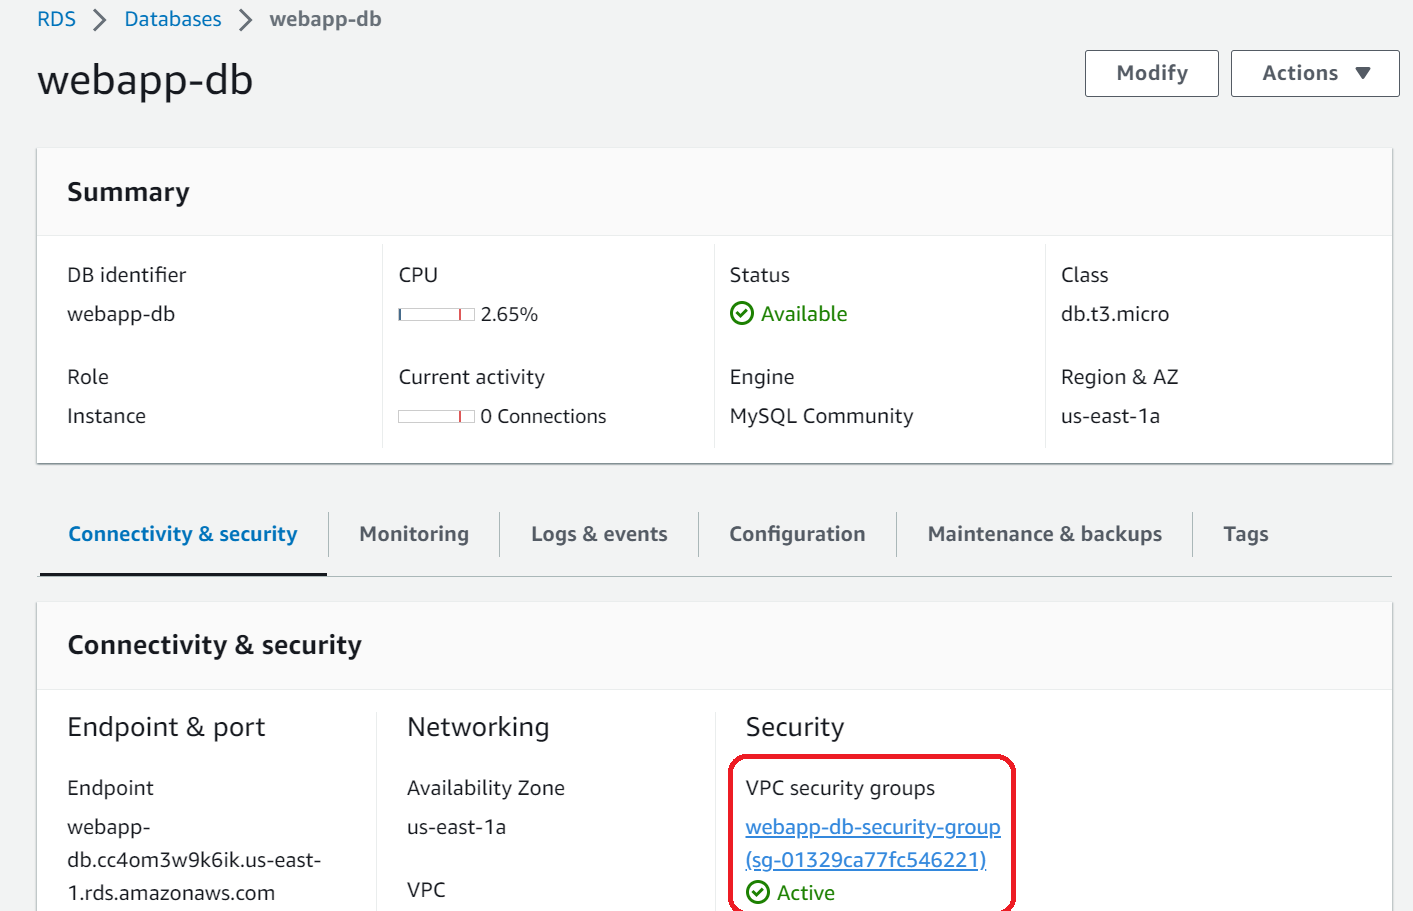
It opens the security group, Hit on Actions → Edit Inbound Rules. Delete the old security rule and add a new rule. We will allow port 3306 to be opened from anywhere.

Step-4: Create Frontend Image – Create an instance, perform frontend setup steps, create its image, and terminate the instance.
Please click the link and follow the instructions on the page to create a frontend image.
Create Frontend Image for HA 3-tier E-Commerce web Application
Step-5: Create Backend Image – Create an instance, perform backend setup steps, create its image, and terminate the instance.
Please click the link and follow the instructions on the page to create a backend image.
Create Backend Image for HA-3-tier-E-Commerce web Application
Step-6: Create a launch template, Autoscaling group, and load balancer for the Backend.
Go to your EC2 dashboard. Select Launch Templates on the left side.
Give the template a name and select your Backend AMI and instance type.
Attach your key pair and choose the security group that we created for Backend.
Select the options as shown in the screenshot. Hit Create Launch Template.

In an Ideal scenario and as per our architecture design, ASG for the backend application needs to be created in a private subnet with an internal load balancer.
But in our e-commerce web application, from the frontend server we are having API calls to the domain name of the backend app and so to provide the required access, we will have to create an ASG group of the backend in a public subnet with an external facing load-balancer.


We can keep desired capacity as “2”, minimum capacity as “2”, and maximum capacity as “4” and then create an autoscaling group.
Step-7: Create a launch template, Autoscaling group, and load balancer for the Frontend.
As per our architecture diagram, we are creating an ASG group of the Frontend application in a public subnet with an external facing load-balancer.
First, create launch template of the frontend as shown below:

Then create ASG for frontend application as shown below:


That’s all, Hit next and create an autoscaling group for front end.
Now, we have created an autoscaling group for both frontend and backend, and EC2 instances for these two ASGs will be made.
Security group attached to the load balancer.
Check and if required update the security group attached to the load balancer.
Frontend Load balancer should be having frontend security group attached to it and backend load balancer should be having backend security group attached to it.
Step-8: (Optional Step) If you have a domain name, create a hosted zone in Route 53 and update the record set of the back and front domains to the load balancer.
We suggest buying a low-priced domain name and proceeding with this project. After purchasing a domain name from any website, create a Hosted zone in AWS-> Route 53 and update the nameserver of the domain name in Hostinger (we have used hostinger, you can use any platform as per your choice) to that of the nameserver created in the aws-route53 hosted zone.
Steps:
Go to AWS Route 53 -> Create hosted zone ->
Create a hosted zone for route53:-
Domain name:- Enter your domain name (like devopstraining.store)
Type:- Public hosted zone
Create a hosted zone.
Then update the nameserver of the domain name to the nameserver mentioned in the aws-route53-hosted_zone.

During Frontend image creation, we have provided the domain name of the backend server i.e.
“back.techiematerials.com”, for the API calls from frontend to backend. We need to update the record set of the domain to update the backend load balancer.
Also, we need to update the record set of the domain name for the frontend server ( for testing purposes we are using the domain name – www.techiematerials.com )
Create record for backend :-

Similarly, we can Create a record for Frontend:-

That’s all, you can access the application using the domain name. Below is the screenshot of the web application.

Please write your comments below.